|
Disclaimer: This website makes use of sponsored and/or affiliate links. Please see this page for more information.
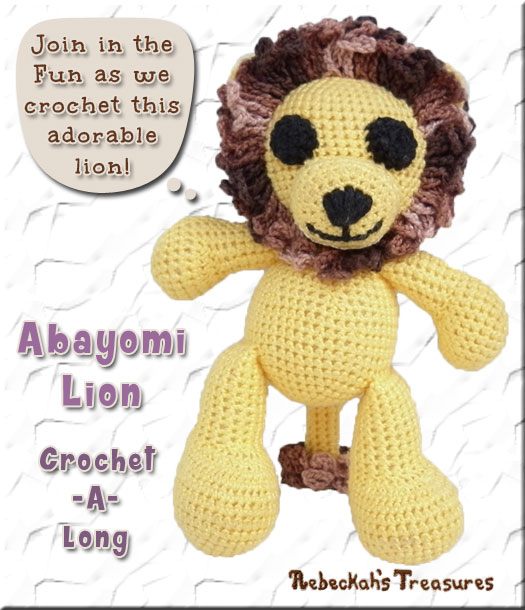
Welcome to part five of the amigurumi Abayomi lion crochet-a-long. Let's see some more magic as we crochet Abayomi's head and add the ears, eyes and muzzle as we go! Let the magic continue…
Are you just joining us today? Be sure to check out Amigurumi Abayomi Lion CAL Part 1, where we go over the pattern notes, abbreviations and gather our supplies.
Already completed this step? Move on to Amigurumi Abayomi Lion CAL Part 6 (link will activate on Thursday, September 17th, 2015), where we will crochet the mane and finishing touches, or check out the full schedule for this CAL below...
This pattern is copyrighted to Rebeckah Ferger of www.rebeckahstreasures.com. It is for personal use only. No part of this pattern may be copied or distributed in any way. If you sell what you make from this pattern, please credit me as the designer. All rights reserved, 2015.
REMINDER: Work in continuous rnds unless directed to do otherwise.
Lion Head Instructions:
You have 2 options for crocheting the head. You can either crochet the head normally and attach the ears, eyes and muzzle via sewing later, OR you can save time and incorporate them into the head as you crochet. Both start and end the same. Further instructions for each are included below...
Make 1 *Use MC rnd 1: sc 6 into a magic circle (6 sts) rnd 2: sc 2 into each st around (12 sts) rnd 3: [sc, sc 2 into next st] x 6 (18 sts) rnd 4: [sc 2, sc 2 into next st] x 6 (24 sts)
OPTION 1: Crochet normally - sew later...
rnd 5: [sc 3, sc 2 into next st] x 6 (30 sts) rnd 6: [sc 4, sc 2 into next st] x 6 (36 sts) rnd 7: [sc 3 into next 2 sts, sc 16] x 2 (44 sts) rnd 8-9: sc 44 for 2 rnds rnd 10: sc 2, (sc 2 in next st) x 2, sc 20, (sc 2 in next st) x 2, sc 18 (48 sts) rnd 11-18: sc 48 for 8 rnds Attach Safety Eyes Now to st sps #12 & #21 of rnd 12 if you are using them.
rnd 19: [sc 6, sc2tog] x 6 (42 sts)
rnd 20: [sc 5, sc2tog] x 6 (36 sts) rnd 21: [sc 4, sc2tog] x 6 (30 sts) rnd 22: [sc 3, sc2tog] x 6 (24 sts) rnd 23: [sc 2, sc2tog] x 6 (18 sts) Stuff head... rnd 24: [sc, sc2tog] x 6 (12 sts), sl st join to first st of rnd, f/o. Sew head to body with the body’s tail using 2 whipstitches per st. Every few sts pull tight. First and last sts of body should line up with the last and first sts of head, respectively. Next, sew legs, tail and arms to body, and sew the muzzle, ears and eyes to head. Weave in all ends. TIP for Sewing Pieces to Head:Use a scrap piece of yarn to mark st sps #11-#13 & 20-#22of rnd 10 (this marks the top of the eyes). Use another to mark st sps #11-#22 of rnd 14 (this marks the bottom rnd for the eyes and the top rnd for the muzzle). Use one more to mark st sps #8-#13 of rnd 22 (this marks the bottom rnd for the muzzle).
OPTION 2: Attach pieces as you crochet: Always insert hook into head sts before inserting hook into the joining pieces.
You will start attaching the ears in rnd 5, the eyes in rnd 10 and the muzzle in rnd 14. The flat side of the ears is what you will be attaching to the head. Each rnd you will attach one st of each ear to the head for a total of 6 rnds (first and last sts of the last rnd of ears count as the first and last sts to be attached to the head). As you are attaching the ears, pull the tails of the ears into the head.
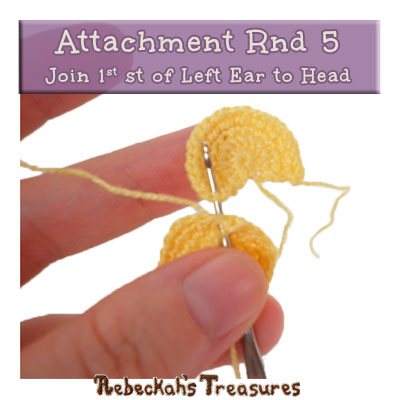
The eyes are a perfect circle, so you can start attaching them from any st of the eye. When attaching the eyes and muzzle to the head, always insert the hook from the RS to WS of the eye/muzzle for the first half of the sts. Then, switch it to the WS to RS for the last half. St sps #17-#10 of muzzle are the first 8 sts to be attached to the head in rnd 14. rnd 5: sc next st of head tog with first st of first/left ear, sc over next 2 sts of head, sc 2 into next st of head, [sc 3, sc 2 into next st] x 2 over next sts of head, sc next st of head tog with last st of second/right ear, sc in next 2 sts of head, sc 2 into next st of head, [sc 3, sc 2 into next st] x 2 over rem sts of head (30 sts).
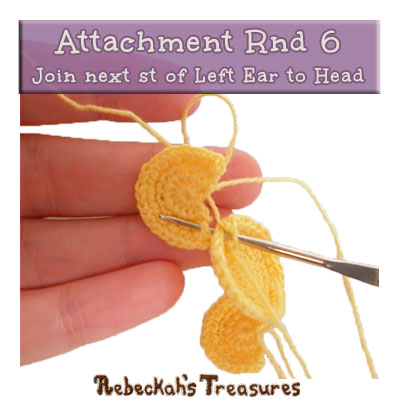
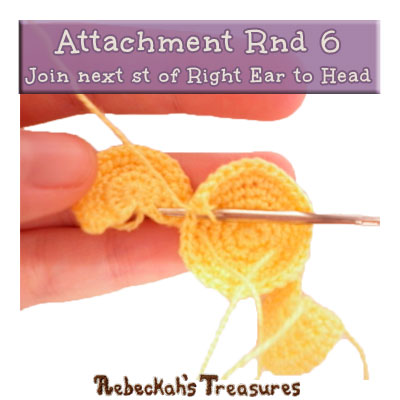
rnd 6: sc next st of head tog with next avail st sp on the flat edge of the left ear, sc over next 3 sts of head, sc 2 into next st of head, [sc 4, sc 2 into next st] x 2 over next sts of head, sc next st of head tog with next avail st sp on the flat edge of the right ear, sc over next 3 sts of head, sc 2 into next st of head, [sc 4, sc 2 into next st] x 2 over rem sts of head (36 sts).
Notice how you insert the hook from the BACK of the ear when attaching the left ear & how you insert the hook from the FRONT of the ear when attaching the right ear.
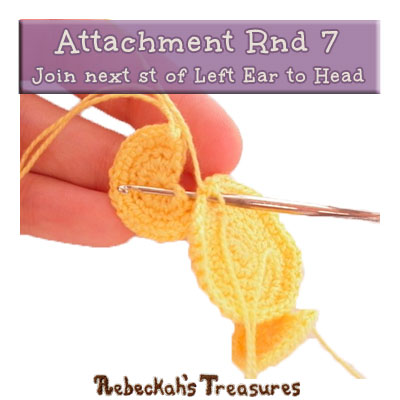
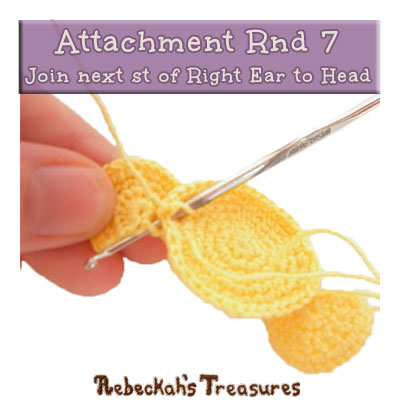
rnd 7: sc in next st of head, *insert hook into same st sp as the last sc made and sc that st of head tog with next avail st sp on the flat edge of left ear so that you create an inc,* sc one more time into the same st sp of the head so that you have 3 sts in the first st of this rnd, sc 3 in next st of head, sc over next 17 sts of head, *insert hook into same st sp as the last sc made and sc that st of head tog with next avail st sp on the flat edge of right ear so that you create an inc,* sc one more time into the same st sp of the head so that you have 3 sts in one st sp, sc 3 in next st of head, sc 16 over rem sts of head (44 sts).
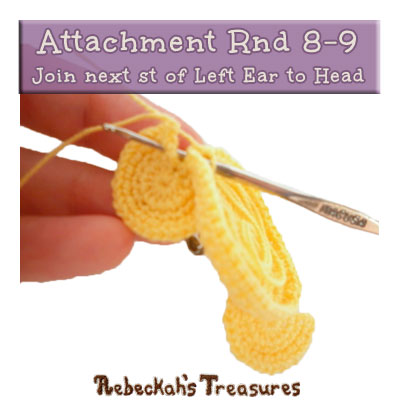
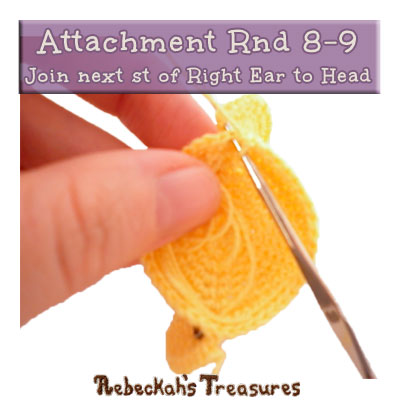
rnd 8-9: sc in next st of head, sc next st of head tog with next avail st sp on the flat edge of the left ear, sc over next 21 sts of head, sc next st of head tog with next avail st sp on the flat edge of the right ear, sc 20 over rem sts of head (44 sts).
Note: If using safety eyes, use the same st count in the rnd & ignore attaching the eyes.
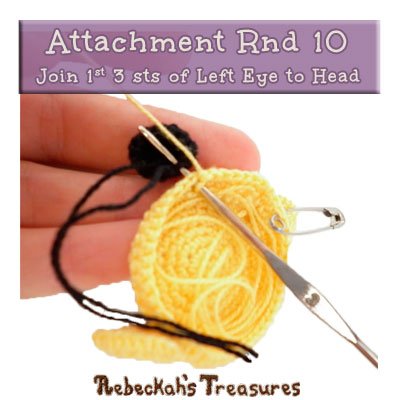
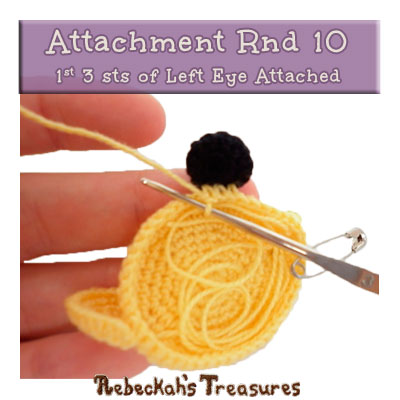
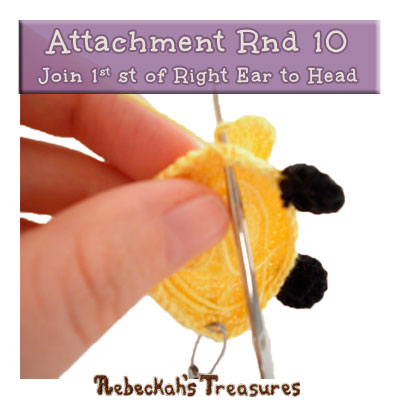
rnd 10: sc over next 3 sts of head, *insert hook into same st sp as the last sc made and sc that st of head tog with last st of left ear’s last rnd (hereby securing last st of this ear onto head) so that you create an inc,* sc 2 in next st of head, sc over next 4 sts of head, sc over next 3 sts of head tog with 3 sts of first/left eye, sc over next 6 sts of head, sc over next 3 sts of head tog with 3 sts of second/right eye, sc over next 5 sts of head, *insert hook into same st sp as the last sc made and sc that st of head tog with first st of right ear’s last rnd (hereby securing last st of this ear onto head) so that you create an inc,* sc 2 in next st of head, sc 18 over rem sts of head (48 sts).
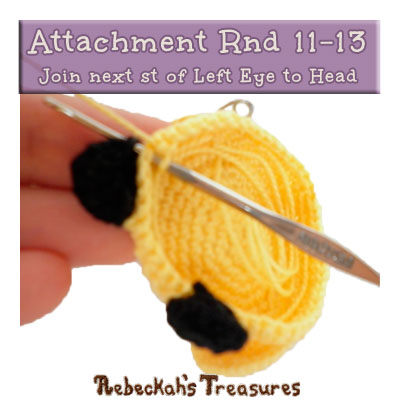
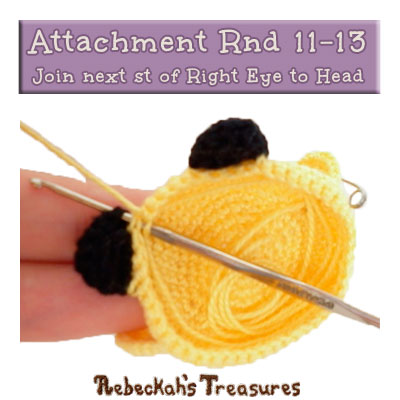
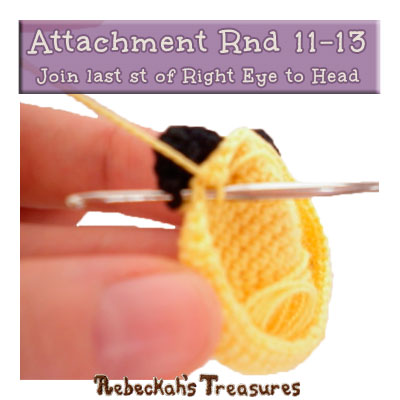
rnd 11-13: sc over next 9 sts of head, sc next st of head tog with first avail st of left eye, sc over next 3 sts of head, sc next st of head tog with last avail st of left eye, sc over next 4 sts of head, sc next st of head tog with first avail st of right eye, sc over next 3 sts of head, sc next st of head tog with last avail st of right eye, sc 25 over rem sts of head (48 sts).
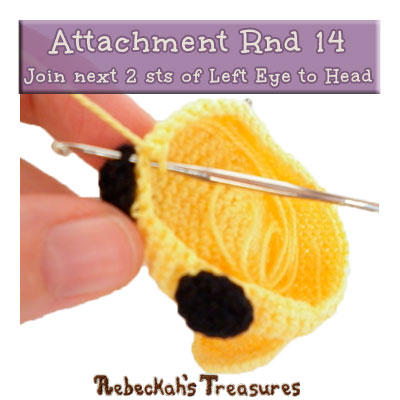
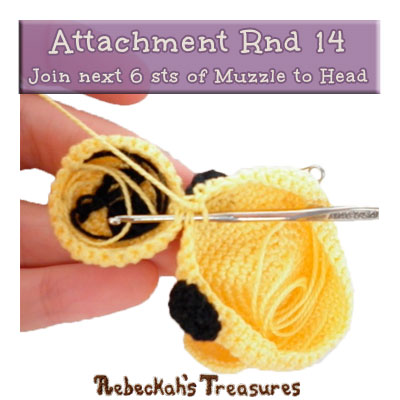
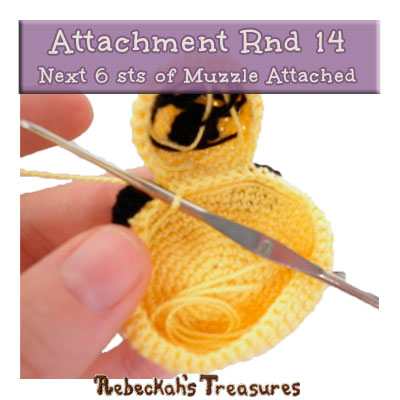
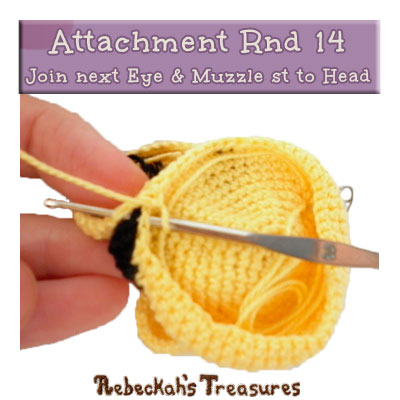
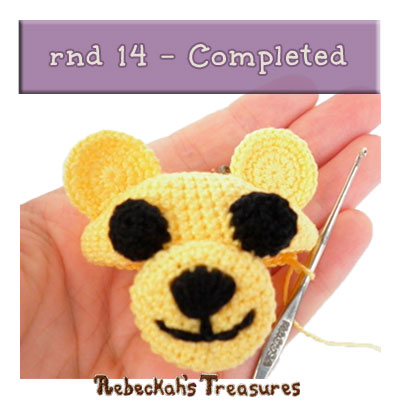
rnd 14: sc over next 10 sts of head, sc next 2 sts of head tog with first 2 avail sts of left eye, sc next st of head tog with last avail st of left eye AND st #17 of muzzle (hereby securing last st of this eye onto head), sc next 6 sts of head tog with next 6 sts of muzzle, sc next st of head tog with first avail st of right eye AND st #10 of muzzle, sc next 2 sts of head tog with last 2 avail sts of right eye (hereby securing last st of this eye onto head), sc 26 over rem sts of head (48 sts).
Notice how you are working counterclockwise as you crochet the head, but as you attach the muzzle, the muzzle is attached in a clockwise direction instead. Also, notice how you insert your hook from RS of muzzle in as you attach it to head.
rnd 15: sc over next 11 sts of head, sc next st of head tog with next avail st of muzzle, sc over next 8 sts of head, sc next st of head tog with last avail st of muzzle, sc 27 over rem sts of head (48 sts).
rnd 16-18: sc over next 10 sts of head, sc next st of head tog with next avail st of muzzle, sc over next 10 sts of head, sc next st of head tog with last avail st of muzzle, sc 26 over rem sts of head (48 sts). Attach Safety Eyes Now to st sps #12 & #21 of rnd 12 if you are using them.
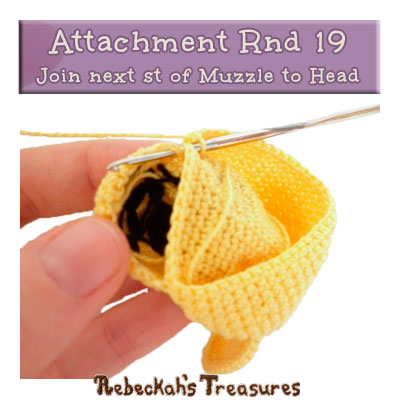
rnd 19: (sc 6, sc2tog, sc 3) over next sts of head, sc next st of head tog with next avail st of muzzle, (sc 2, sc2tog, sc 4) over next sts of head, sc next st of head tog with last avail st of muzzle, (sc, sc2tog) over next sts of head, [sc 6, sc2tog] x 3 over rem sts of head (42 sts).
Rnd 19 is the last rnd to be worked with you inserting your hook from RS of muzzle. Start inserting your hook from WS of muzzle from rnd 20+ to finish attaching it to head.
rnd 20: (sc 5, sc2tog, sc3) over next sts of head, sc next st of head tog with next avail st of muzzle, (sc, sc2tog, sc 4) over next sts of head, sc next st of head tog with last avail st of muzzle, sc2tog over next sts of head, [sc 5, sc2tog] x 3 over rem sts of head (36 sts).
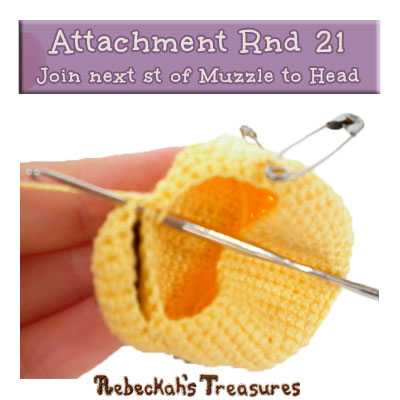
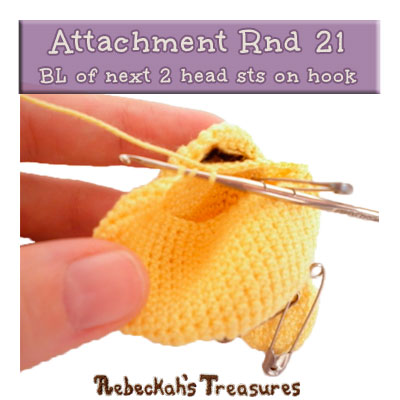
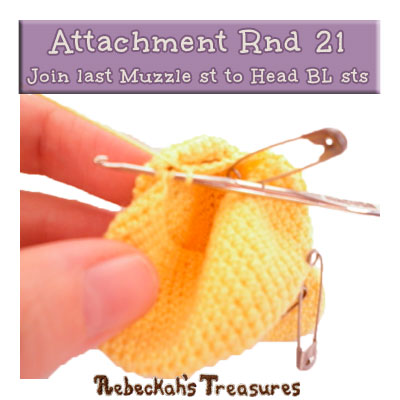
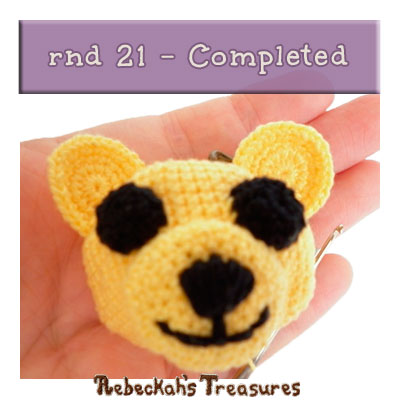
rnd 21: (sc 4, sc2tog, sc 3) over next sts of head, sc next st of head tog with next avail st of muzzle, (sc2tog, sc 4) over next sts of head, sc2tog next 2 sts of head tog with last avail st of muzzle, [sc 4, sc2tog] x 3 over rem sts of head (30 sts).
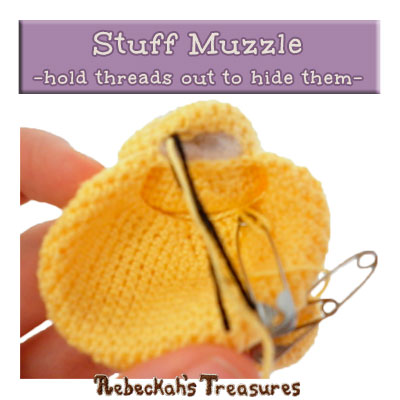
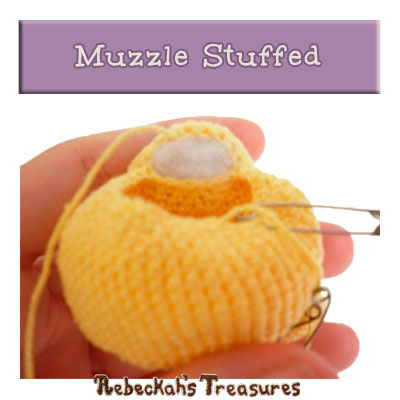
Pause here to stuff muzzle... It helps if you hold the muzzle threads out, so that you can better hide them between the stuffing and the head once it is stuffed.
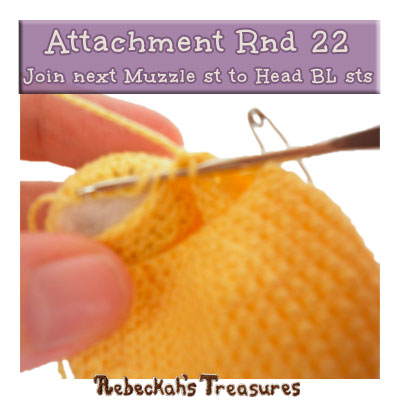
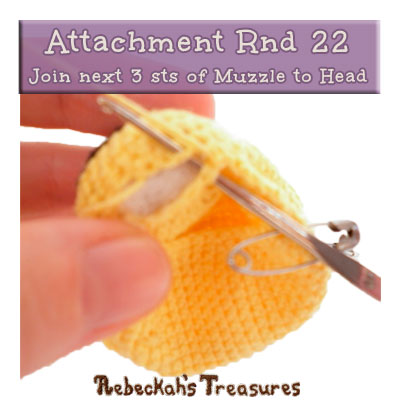
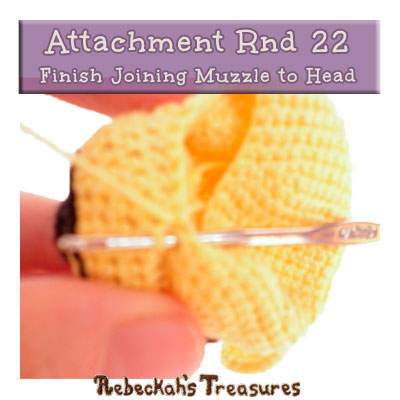
rnd 22: (sc 3, sc2tog, sc 3) over next sts of head, *sc2tog next 2 sts of head tog with next avail st of muzzle,* sc next 3 sts of head tog with next 3 sts of muzzle, rep from * to *, sc next st of head tog with last avail st of muzzle (hereby securing last st of muzzle onto head), (sc 2, sc2tog) over next sts of head, [sc 3, sc2tog] x 2 over rem sts of head (24 sts).
rnd 23: [sc 2, sc2tog] x 6 (18 sts).
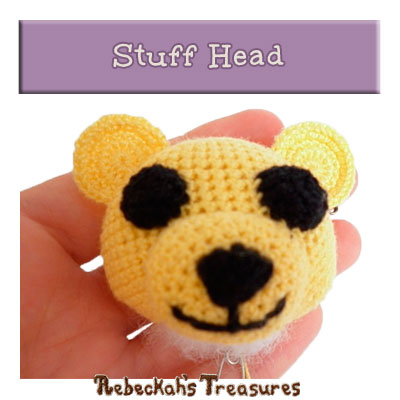
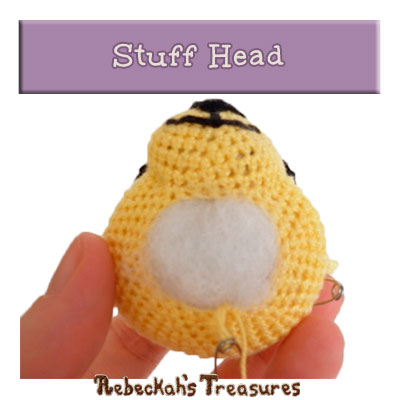
Stuff head...
rnd 24: [sc, sc2tog] x 6 (12 sts), sl st join to first st of rnd, f/o.
Sew head to body with the body’s tail using 2 whipstitches per st. Every few sts pull tight. First and last sts of body should line up with the last and first sts of head, respectively. Weave in all ends.
Are you enjoying this Abayomi Lion CAL? Tell me what you think either by commenting below, by visiting this pattern on ravelry, or by giving this pattern a star-rating…
Amigurumi Abayomi Lion CAL Schedule & Links to Each Part:
 

Hello Visitor and Welcome to Rebeckah's Treasures... I am a Norwegian/Canadian currently studying Midwifery in the UK. I love to crochet! At Rebeckah's Treasures, I share my crochet patterns and treasures. I hope they inspire you to crochet your own little treasures too... 
Comments
|


Hello, my name is Rebeckah.
I hope my crochet inspires you to create your very own treasures! Learn more about me... Categories
All
Archives
October 2021
© 2012-2021 Rebeckah Ferger
All rights reserved. Disclaimer: This website makes use of sponsored and/or affiliate links. Please see this page for more information.
|
- Home
-
-
- Special Offers
- New Releases
- Accessory Crochet Patterns
- Afghan Square Crochet Patterns
- Amigurumi Crochet Patterns
- Applique Crochet Patterns
- Baby Crochet Patterns
- Dolly Crochet Patterns
- Fashion Doll Crochet Patterns
- Free Downloads
- Holiday Crochet Patterns
- Tapestry Crochet Patterns
- Under the Sea Crochet Patterns
- Wedding Crochet Patterns
- Disclaimer and FAQs
-
-
- Free Crochet Patterns
- New Free Releases
- Free Accessory Crochet Patterns
- Free Afghan Square Crochet Patterns
- Free Amigurumi Crochet Patterns
- Free Applique Crochet Patterns
- Free Baby Crochet Patterns
- Free Dolly Crochet Patterns
- Free Fashion Doll Crochet Patterns
- Free Guest Crochet Patterns
- Free Holiday Crochet Patterns
- Free Tapestry Crochet Patterns
- Free Under the Sea Crochet Patterns
- Free Wedding Crochet Patterns
- Free Crochet Patterns Coming Soon
Welcome Visitor! I hope you enjoy my treasures.


 RSS Feed
