|
Disclaimer: This website makes use of sponsored and/or affiliate links. Please see this page for more information.
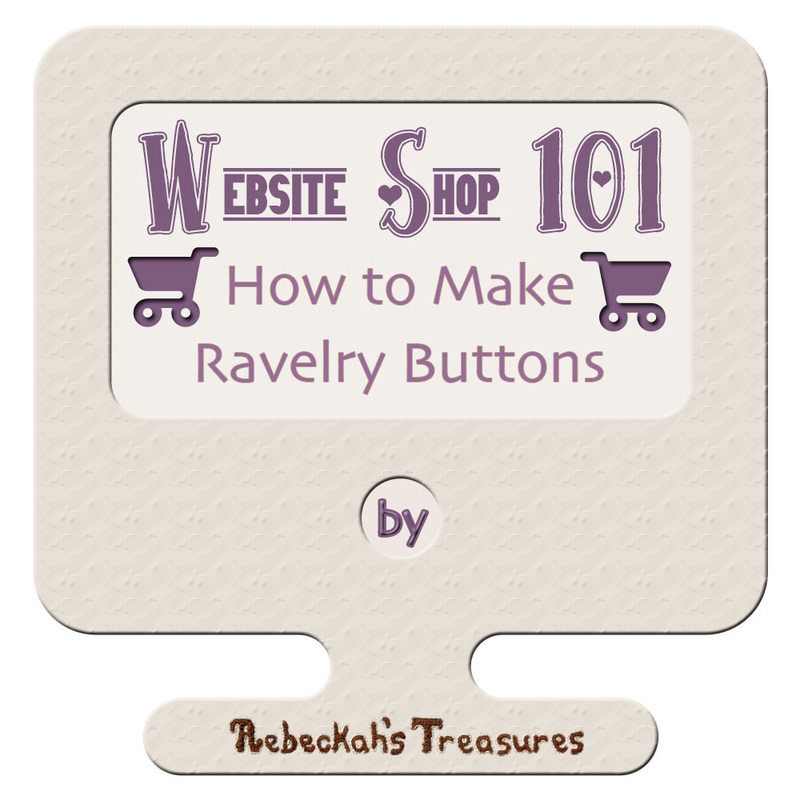
Welcome to lesson three of Website Shop 101 tutorial series for crafters. If you're planning to sell downloadable PDF crochet/knit patterns, Ravelry offers a very simple code you can link on your site. This lesson will show you how to combine this code with your newly created buttons you designed in lesson two.
This lesson assumes that you are already on Ravelry and have at least one pattern listed in your pro account.
If you're not on Ravelry yet, I highly recommend that you start adding you patterns there. It's a great way to help others find your patterns and it is also a cost efficient way to sell you patterns as instant PDF downloads. Checkout this amazing tutorial over at Oombawka Designs to see how you can add your patterns to Ravelry, and check out this Ravelry tutorial to see how you can add those patterns to your Raverly Shop. Upload Your Buttons to Your Website:
The first thing you will need to do is upload the shop buttons you designed from lesson two onto your site, so that you can grab the image URL from each of them. Weebly Users: You'll need to create a page, where you can drag the IMAGE element onto it. When you create your page, make sure you CHECK the "Hide page in navigation" BOX to hide this page from the navigation menu and your users, and in the Advanced Settings for the page, you'll also need to CHECK the "Hide this page from search engines" BOX to keep others from finding the page accidentally. Now that you have your page created, click Save & Edit to go to the page. 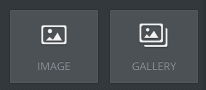 Image & Gallery Elements Image & Gallery Elements
Drag either the IMAGE or GALLERY elements onto the page and UPLOAD your buttons.
Next, right-click each image and copy the image URL. Paste and save each URL to a spreadsheet or notepad for future reference. Proceed to the next step below...
Wordpress Users:
You guys have it easy. Go to the Media section of your editor, click Add New and UPLOAD your buttons. Next, click on each image and copy the image URL from the URL field. Paste and save each URL to a spreadsheet or notepad for future reference. Proceed to the next step below... Other Users: If you have a place to upload your media like Wordpress users, do it this way. Otherwise, create a page where you can place your images, copy the URL of each image and save it to a spreadsheet or notepad for future reference. Proceed to the next step below... How to find the code for each product on Ravelry:
Now we are going to find the code you need on Ravelry.
Go to your Pro Account on Ravelry, and click on "Manage Store". This will take you to the patterns section, where you can add new patterns to your store and where you can edit the details of your patterns. You will need to click on each pattern to find the codes you need, and this is what you will be looking for once you have clicked on the pattern in question: 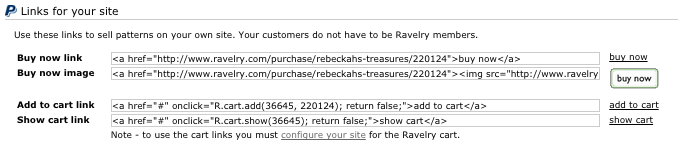
Configuring your Website for Ravelry Buttons:
In order to use the cart code links for the buttons on your website, you will first need to configure the header of your site with a simple line of code which can be found on this Ravelry page here.
Please note: You only need to do this if you want to have View/Show Cart buttons and/or Add to Cart buttons on your site. The Buy Now button doesn't require this step. If you want to run Ravelry promotions on your site, you will need the Add to Cart links. If you've decided you only want to use the Buy Now code, you can skip this step... Weebly Users: You will paste this code into the the header code of your website. You will find this in the Settings section (at the top) of your site under the SEO tab (to the left). You'll see I've highlighted where I have pasted the Ravelry cart code onto my site below... 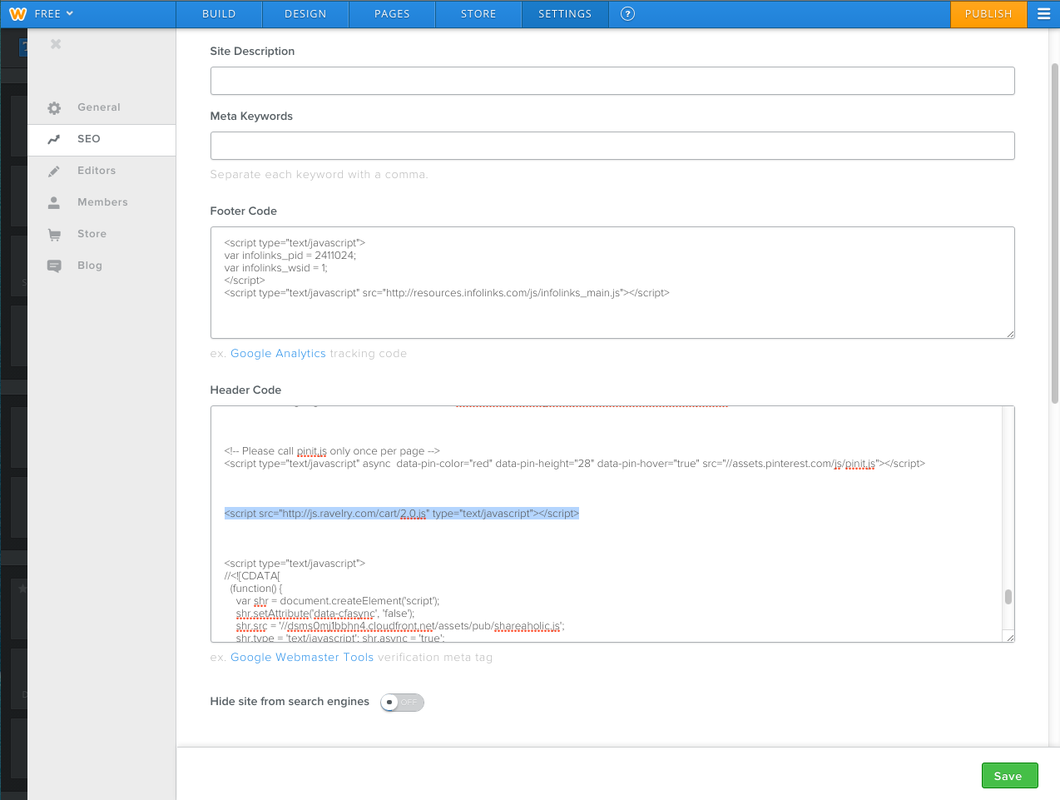
Simply paste it into the Header Code box, click the green "Save" button at the button and click "Publish". Now you can use the cart code on your site.
Wordpress Users: I believe you can find the header of your website by clicking on the Appearance tab, followed by clicking on Editor. However, according to Ravelry, you can add it to your normal page template. You can learn more about this here. Other Users: You need to locate where the header of your site is, and paste the code there. You can learn more about this here. View/Show Cart Ravelry Button:
The first button we're going to make is the "View Cart" button or the "Show Cart" button, or however you would like to call it.
This is the button that you will want to have on all of your shop pages or throughout your site to help your customers find easily what they've already added to their cart. When the View Cart button/link is clicked, it opens up a pop-up window that hovers over your page to show you what's been added to the shopping cart. It will look like this... 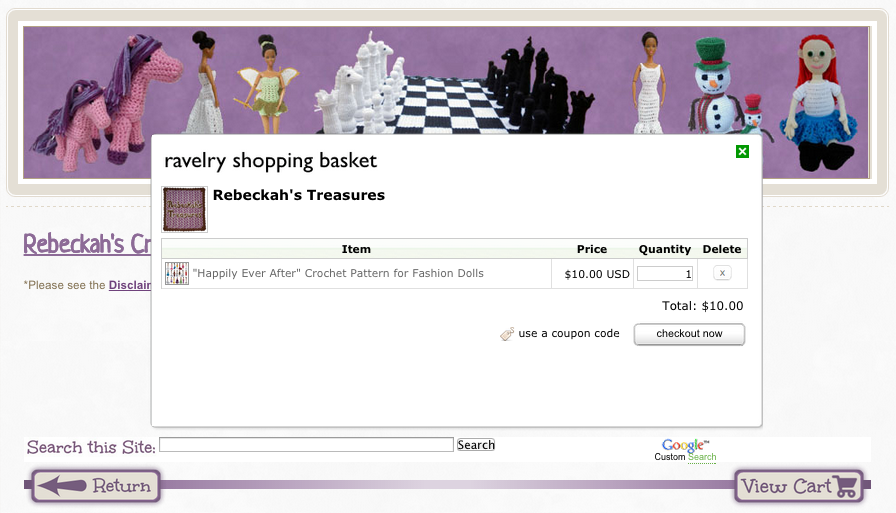
The code you will need for this button looks like this:
<a href="#" onclick="R.cart.show(36645); return false;">show cart</a>
Take note that I have highlighted the number in the code above in PURPLE. This number is what makes my shopping cart link unique to my store. You will have a different number that is unique to your own shop.
You will only need to copy it once, or at the very least take note of the numbers in parenthesis (). You can find this code/number in your pro, manage store section of your ravelry account when you click on any of your patterns. It's the code next to "Show cart link", see it highlighted below... 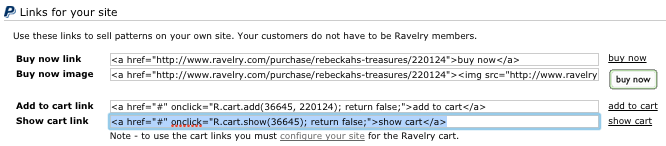
Now, let's make your official view shopping cart button!
Copy the following code:
<a href="#" onclick="R.cart.show(36645); return false;"><img src="URL" border="0" width="161" /></a>
In the code above, you'll need to change the following:
Once you've done this, your code will look like this:
<a href="#" onclick="R.cart.show(36645); return false;"><img src="http://www.weebly.com/uploads/1/4/3/9/14399682/_974069_orig.png" border="0" width="161" /></a>
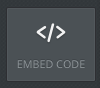 embed code element embed code element
All that's left to do is place this code wherever you want it to go!
Weebly Users: Locate the "EMBED CODE" element from the sidebar and drag it into position. Paste your shopping cart code into the element and align accordingly. Wordpress Users: Simply paste the code onto your page where you'd like it to go. Other Users: If you have an element website builder, drag that element onto the page and paste your code into into it. If not, simply paste the code onto your page where you'd like it to go.
Add to Cart Ravelry Button:
The next button we're going to make is the "Add to Cart" button. This is the button that you will want to have if you're wanting to make use of the ravelry promotions feature.
Like when the View Cart button/link is clicked, the Add to Cart button/link also opens a pop-up window that hovers over your page to show that you've just added a new pattern to the cart. The code you will need for this button looks like this:
<a href="#" onclick="R.cart.add(36645, 220124); return false;">add to cart</a>
Take note that I have highlighted the two numbers in the code above... the first one in PURPLE and the second in YELLOW. You will recognize the purple number as my unique store number. The yellow number is my pattern's unique number.
You should already have your unique store number noted down. Now you need to go into each of your patterns and take note of the second set of numbers in parenthesis (). You may find it helpful to create a spreadsheet in Excel (Microsoft) or Numbers (Mac) to keep track of your pattern ravelry code numbers. You can find this code/number in your pro, manage store section of your ravelry account when you click on any of your patterns. It's the code next to "Add to cart link", see it highlighted below... 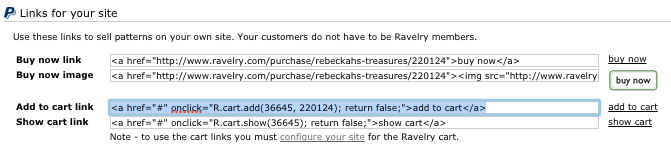
Now, let's make your official add to cart button!
Copy the following code:
<a href="#" onclick="R.cart.add(36645, 220124); return false;"><img src="URL" border="0" width="120"/></a>
In the code above, you'll need to change the following:
Once you've done this, your code will look like this:
<a href="#" onclick="R.cart.add(36645, 220124); return false;"><img src="http://www.weebly.com/uploads/1/4/3/9/14399682/_8947683_orig.png" border="0" width="120"/></a>
Repeat this process until you have the code for each of your patterns. TIP: Once you have one, all you have to change is the pattern number!
All that's left to do is place this code wherever you want it to go! To add this button to your website, simply repeat the same steps you did to add your view cart button code to your site.
Buy Now Ravelry Button:
The last button we're going to make today is the "Buy Now!" button. This button doesn't need any code configurations to work on your site.
However, this button code will not work with the Ravelry promotions since it takes the customer directly to Paypal's checkout. The code you will need for this button looks like this:
<a href="http://www.ravelry.com/purchase/rebeckahs-treasures/220124">buy now</a>
OR <a href="http://www.ravelry.com/purchase/rebeckahs-treasures/220124"><img src="http://www.ravelry.com/images/shopping/buy-now.gif" border="0"/></a>
Take note that I have highlighted the numbers in the codes above in YELLOW. You will recall from the add to cart button that the yellow number is my pattern's unique number. Take a minute to notice that it is the same number in the add to cart example above...
I have also highlighted part of the URL in RED. This is my unique shop link name. It will be different for your shop. If you haven't already done this, you need to go into each of your patterns and take note of the numbers in parenthesis (). You may find it helpful to create a spreadsheet in Excel (Microsoft) or Numbers (Mac) to keep track of your pattern ravelry code numbers. You can find this code/number in your pro, manage store section of your ravelry account when you click on any of your patterns. It's the code next to "Buy now link" or the "Buy now image", see it highlighted below... 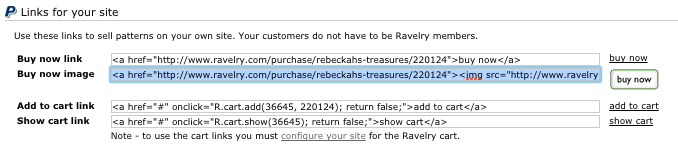
Now, let's make your official view shopping cart button!
Copy the following code:
<a href="http://www.ravelry.com/purchase/rebeckahs-treasures/220124"><img src="URL" border="0" width="144"/></a>
In the code above, you'll need to change the following:
Once you've done this, your code will look like this:
<a href="http://www.ravelry.com/purchase/rebeckahs-treasures/220124"><img src="http://www.weebly.com/uploads/1/4/3/9/14399682/_5219146_orig.png" border="0" width="144"/></a>
Repeat this process until you have this code for each of your patterns. TIP: Once you have one, all you have to change is the pattern number!
All that's left to do is place this code wherever you want it to go! To add this button to your website, simply repeat the same steps you did to add your view cart button code to your site.
Want a simple spreadsheet you can download to keep track of your patterns?
Check out my Website Shop 101 Free Downloads here!
Thanks so much for visiting today! Tell me what you thought about the third lesson of the series by commenting below or giving this a rating...
Additionally, please let me know if you have any questions or concerns. I will be happy to help in any way I can. Comment below, or visit my Website Shop 101 facebook support group...
Be sure to check out the intro to this series for upcoming lessons or lessons you may have missed! Wishing you a terrific day. See you again soon for lesson 4, where we'll make PayPal Buttons for your store...  

Hello Visitor and Welcome to Rebeckah's Treasures... I am a Norwegian/Canadian currently studying Midwifery in the UK. I love to crochet! At Rebeckah's Treasures, I share my crochet patterns and treasures. I hope they inspire you to crochet your own little treasures too... 
Comments
|


Hello, my name is Rebeckah.
I hope my crochet inspires you to create your very own treasures! Learn more about me... Categories
All
Archives
October 2021
© 2012-2021 Rebeckah Ferger
All rights reserved. Disclaimer: This website makes use of sponsored and/or affiliate links. Please see this page for more information.
|
- Home
-
-
- Special Offers
- New Releases
- Accessory Crochet Patterns
- Afghan Square Crochet Patterns
- Amigurumi Crochet Patterns
- Applique Crochet Patterns
- Baby Crochet Patterns
- Dolly Crochet Patterns
- Fashion Doll Crochet Patterns
- Free Downloads
- Holiday Crochet Patterns
- Tapestry Crochet Patterns
- Under the Sea Crochet Patterns
- Wedding Crochet Patterns
- Disclaimer and FAQs
-
-
- Free Crochet Patterns
- New Free Releases
- Free Accessory Crochet Patterns
- Free Afghan Square Crochet Patterns
- Free Amigurumi Crochet Patterns
- Free Applique Crochet Patterns
- Free Baby Crochet Patterns
- Free Dolly Crochet Patterns
- Free Fashion Doll Crochet Patterns
- Free Guest Crochet Patterns
- Free Holiday Crochet Patterns
- Free Tapestry Crochet Patterns
- Free Under the Sea Crochet Patterns
- Free Wedding Crochet Patterns
- Free Crochet Patterns Coming Soon
Welcome Visitor! I hope you enjoy my treasures.


 RSS Feed
