|
Disclaimer: This website makes use of sponsored and/or affiliate links. Please see this page for more information.
Welcome to lesson eight of the Website Shop 101 tutorial series for crafters. This lesson will show you how to create completely customizable product blocks for your category and product shop pages. These will display or showcase your products uniformly on a page.
This lesson assumes that you have gone over lessons two through five and have your various shop buttons and their codes ready and on hand. If you haven't completed any of these lessons yet, see the full list of lessons here...
What Will Lesson Go Over?
Before we dive in, let's take a look at what this lesson will go over.
Now it's time to learn about this useful tool to help organize your products on your shop pages!
Product blocks in this tutorial will include a linkable image and title with pricing details and a shop button, all wrapped up together in a box or a table cell with a border around it. Here are some examples of product blocks this lesson will show you how to make...
You'll see that I've demonstrated several borders, block and content options in the above examples.
*To see the live versions of these examples, please see Product Block Examples. Using Tables to Create Product Blocks:
When I was originally searching for a way to make my shop product blocks, I wanted to use an HTML box. Try as I may, I could not get any kind of border to go around the box without it going wacko and creating several, diagonal overlapping borders. I concluded that HTML boxes with borders are not very compatible with Weebly.
That's when I started looking for other ways to take advantage of the pretty border options available in HTML. This led me to HTML tables. Combining the table code with Weebly's column options allowed me to create a look that I could be proud of using to showcase my patterns.
IMPORTANT! Before we dive into tables, it is important to note what will work great for Weebly users may not work as well for Wordpress users. Luckily for both of you, I have discovered several options for both types of sites that will look amazing!
Other users, if you have a drag & drop element model like Weebly, you should be able to do whatever Weebly users can do. You'll just have to play with the different options to see what works best for your website...
All tables consist of margins, borders, padding and content areas.
*For more details about how each of these parts relate to one another, see w3school.com's CSS Box Model. *For more information on margins, see CSS margin on w3schools.com. *For more information on borders, see CSS border on w3schools.com. *For a full list of border styles, see CSS border-style Property on w3schools.com. *For more information on padding, see CSS padding on w3schools.com.
The first thing you'll need to do is design the style sheet for your table. Otherwise, your website will use whatever table settings it has in place.
There are many styling options and variations. You can include or exclude as many features as you like, and adjust each. Let's take a look at ONE style sheet code example for tables: <style> table.tablestyle08, .tablestyle08 th, .tablestyle08 td { border: 25px solid #DDD3E0; border-collapse: collapse; border-spacing: 1px; padding: 0px; margin: 10px 5px; empty-cells: hide; background-color:#DDD3E0; } </style> QUICK NOTE: Everything in BOLD above can change its value. This is true for this entire tutorial. Let's breakdown the code above:
Now that you have your table styled, it's time to build your table! This is the body of your code. We'll add content in later...
Let's take a look at a SINGLE cell table: <!DOCTYPE html> <html> <body> <table class="tablestyle08" style="width:99%"> <tr> <td><div align="center"><div style="background-color:#ffffff;"> Content Goes Here </div></div></td> </tr> </table> </body> </html> Let's breakdown the code above:
Let's take a look at a 2 row by 4 column table: <!DOCTYPE html> <html> <body> <table class="tablestyle08" style="width:99%"> <tr> <td><div align="center"><div style="background-color:#ffffff;"> Row_1–Column_1–Content Goes Here </div></div></td> <td><div align="center"><div style="background-color:#ffffff;"> Row_1–Column_2–Content Goes Here </div></div></td> <td><div align="center"><div style="background-color:#ffffff;"> Row_1–Column_3–Content Goes Here </div></div></td> <td><div align="center"><div style="background-color:#ffffff;"> Row_1–Column_4–Content Goes Here </div></div></td> </tr> <tr> <td><div align="center"><div style="background-color:#ffffff;"> Row_2–Column_1–Content Goes Here </div></div></td> <td><div align="center"><div style="background-color:#ffffff;"> Row_2–Column_2–Content Goes Here </div></div></td> <td><div align="center"><div style="background-color:#ffffff;"> Row_2–Column_3–Content Goes Here </div></div></td> <td><div align="center"><div style="background-color:#ffffff;"> Row_2–Column_4–Content Goes Here </div></div></td> </tr> </table> </body> </html> TIP: Start with a single cell table. Next, copy the <td>...</td> section for however many columns you'd like. Then, copy the <tr>...</tr> section for each row you need – this way each one has the same number of cell columns. Weebly Users: You have an additional option of making single cell tables, you can drag around and place wherever you like! More on this later... Now you can make tables for your website! All you need is content to put into them. Using Div Backgrounds to Create Product Blocks:
Before we dive into the content portion of this tutorial, let's go over another option for product blocks, that uses the <div> tag instead of tables.
This can be used in combination with the tables like shown above. However, since Weebly users have the option to drag and drop elements and can create columns that way, they can use a div background style to create a block. One benefit the <div> tag has over tables is that a style sheet is not needed. The styles can be adjusted right in the body of the code. Let's take a look at a div background code: <!DOCTYPE html> <html> <body> <div style="background-color:#ffffff; padding: 0px; margin: 10px 0px;"> <div align="center"> ContentGoesHere </div> </div> </body> </html> Let's breakdown the code above:
Pretty easy, right?!?! Creating Content for the Product Blocks:
Now it's time to create the content you will be placing into the blocks you've created!
First, let's go over making a clickable image and title text with a link. In each of the examples above, you will notice a picture of a product and right below it there is a title, which names the product, and a subtitle, which tells you what kind of product it is. Let's take a look at the code used to make an image with title link: <a href="ListingURL"><img src="ImageURL" alt="ImageDescriptionforSEO" border="0" width="100%" style="margin: 3px 0px"/><h4 style="margin: 0px">Product Title</h4><h5>Subtitle</h5></a> Let's breakdown the code above:
Now, if you will be using the div background as your block or if you are a WordPress user, you will need to add another portion of code to achieve the best look. Let's take a look at ANOTHER example code to make an image with title link: <p style="margin: 0px 0px;"><a href="ListingURL"><img src="ImageURL" alt="ImageDescriptionforSEO" border="0" width="100%" style="margin: 3px 0px"/></p><h5 style="margin: 0px">Product Title</h5><p class="small" style="margin: 0px">Subtitle</p></a> Notice how we added a paragraph styling <p style="margin: 0px 0px;"> before the code and closed it (</p>) after the image portion of the code. This tells the browser that the image is a paragraph and keeps it in line. The margin pixels can be adjusted to your liking. Take note that we also changed the title heading to a h5 and the subtitle heading to a paragraph (p) instead, making both sets of text smaller than the first example. On the note about the p in the above code, you'll see that I've added class="small" into the short hand styling for the paragraph. This is to make the line of text shorter than usual. To achieve this, an extra bit of code will need to be added to the style sheet. Here's what the code looks like: p.small { line-height: 60%; } The line-height: 60% means that the line will only be 60% of it's normal height. Change 60% to adjust the line height. NOTE: I have noticed that this doesn't work in every instance. You will have to play around with it. Learn more about CSS line-height Property here. On the topic of style sheets, there is another line of code you'll want to add to the style sheet to keep the title and subtitles from displaying an underline. Here's what the code looks like: a { text-decoration: none; } The text-decoration: none; forces the underline that normally appears under links to disappear. You can learn more about CSS text-decoration Property here.
Now that the image and titles are sorted, it's time to take a look at the different layouts for the pricing details and shop buttons!
In the above examples, you'll see that I have four basic layouts for the pricing (if any) and the buttons. They are the following:
Here are the SHORT form codes of each version above: Example #1 - Button FIRST, Text SECOND: <p style="margin: 0px 0px">YourButtonCodeGoesHere</p> <p>TEXT</p> Example #2 - Button ONLY: <p style="margin: 0px 0px">YourButtonCodeGoesHere</p> Example #3 - Text & Button Side by Side: <p style="margin: 0px 0px"><em>$1.99 USD </em>YourButtonCodeGoesHere</p> The next two examples both have the Text first and the Button second. The difference is that example #5 removes the paragraph styling (<p style="margin: 0px 0px">...</p>). I noticed on my Weebly site, that removing it reduced the height of the button line. Example #4 is the recommend option otherwise... Example #4 - Text FIRST, Button SECOND (recommended version): <p class="small" style="margin:0px 0px"><em>$1.99 USD</em></p> <p style="margin: 0px 0px">YourButtonCodeGoesHere</p> Example #5 - Text FIRST, Button SECOND (best for reducing button line height on Weebly): <p class="small" style="margin:0px 0px"><em>$1.99 USD</em></p> YourButtonCodeGoesHere You'll notice in ALL of the examples above, each line for the text and button is styled into a paragraph <p style="margin: 0px 0px">...</p>. This gives each its own line or in Example #3 helps to group both together. You can adjust the margins if you like. In examples #4-5, you'll notice the pricing line has been given that special small line height (class="small"). This works great on the listings I have formatted like this. Though, it didn't seem to make a difference to the version I tested on WordPress. It can be removed if you so choose. In examples #3-5, is the pricing is given an emphasized italic tag (<em></em>). You can remove this if you would prefer to keep the pricing text straight, or you can change em to b to make the price bold instead. Learn more about HTML Text Formatting Elements here. Change $1.99 USD to adjust the price, and change TEXT to adjust the text. Finally, in ALL of the examples above, you'll replace YourButtonCodeGoesHere with the special button code you created in lessons 3-5 accordingly. NOTE: For PayPal buttons, you'll simply copy the code from your saved buttons. For other types of buttons, here's a quick recap of a simple image button code: <a href="URL"><img src="ButtonURL" border="0" width="120" style="margin: 0px"/></a> Button Code Breakdown:
For a recap on making shop buttons see: Adding Content to Your Product Blocks:
I hope you're still with me! We're nearing the end of this tutorial.
The next thing to do is add the content you just created into the space in the table or div where it says "Content Goes Here". Paste the image/title link code first. Then, add the pricing/button codes in the line(s) after it. Repeat this for all of the lines where content should go. Let's see the content in place for a single cell table: <!DOCTYPE html> <html> <body> <table class="tablestyle08" style="width:99%"> <tr> <td><div align="center"><div style="background-color:#ffffff;"> <p style="margin: 0px 0px;"><a href="ListingURL"><img src="ImageURL" alt="ImageDescriptionforSEO" border="0" width="100%" style="margin: 3px 0px"/></p><h5 style="margin: 0px">Product Title</h5><p class="small" style="margin: 0px">Subtitle</p></a> <p style="margin: 0px 0px"><a href="URL"><img src="ButtonURL" border="0" width="120" style="margin: 0px"/></a></p> <p>TEXT</p> </div></div></td> </tr> </table> </body> </html> Now, let's see the content in place for a div background block: <!DOCTYPE html> <html> <body> <div style="background-color:#ffffff; padding: 0px; margin: 10px 0px;"> <div align="center"> <a href="ListingURL"><img src="ImageURL" alt="ImageDescriptionforSEO" border="0" width="100%" style="margin: 3px 0px"/><h4 style="margin: 0px">Product Title</h4><h5>Subtitle</h5></a> <p class="small" style="margin:0px 0px"><em>$1.99 USD</em></p> <a href="URL"><img src="ButtonURL" border="0" width="120" style="margin: 0px"/></a> </div> </div> </body> </html> It's that simple, and now your blocks are now ready to place on your site! Where to Place the Style Sheets on Your Website:
Before we start adding your product blocks to your website, you need to grab all the style sheet codes you created and place them all together.
Here's a quick look at all of the styles put together from the examples above: <style> table.tablestyle08, .tablestyle08 th, .tablestyle08 td { border: 25px solid #DDD3E0; border-collapse: collapse; border-spacing: 1px; padding: 0px; margin: 10px 5px; empty-cells: hide; background-color:#DDD3E0; } p.small { line-height: 60%; } a { text-decoration: none; } </style> Notice how all of the items are wrapped up in between the style tags (<style></style>). For best results and faster page load times, you'll only want to have this code once per page in between the head tags (<head></head>), OR even better directly into the HTML header code of your website.
Weebly Users - Here's how to add the above style sheet into your HTML header code:
Step ONE: Go into your Weebly Editor. Step TWO: Click on the Settings tab in the top navigation menu. Step THREE: Click on the SEO tab in the left navigation menu and look for the Header Code box section of the SEO. It should look like this... 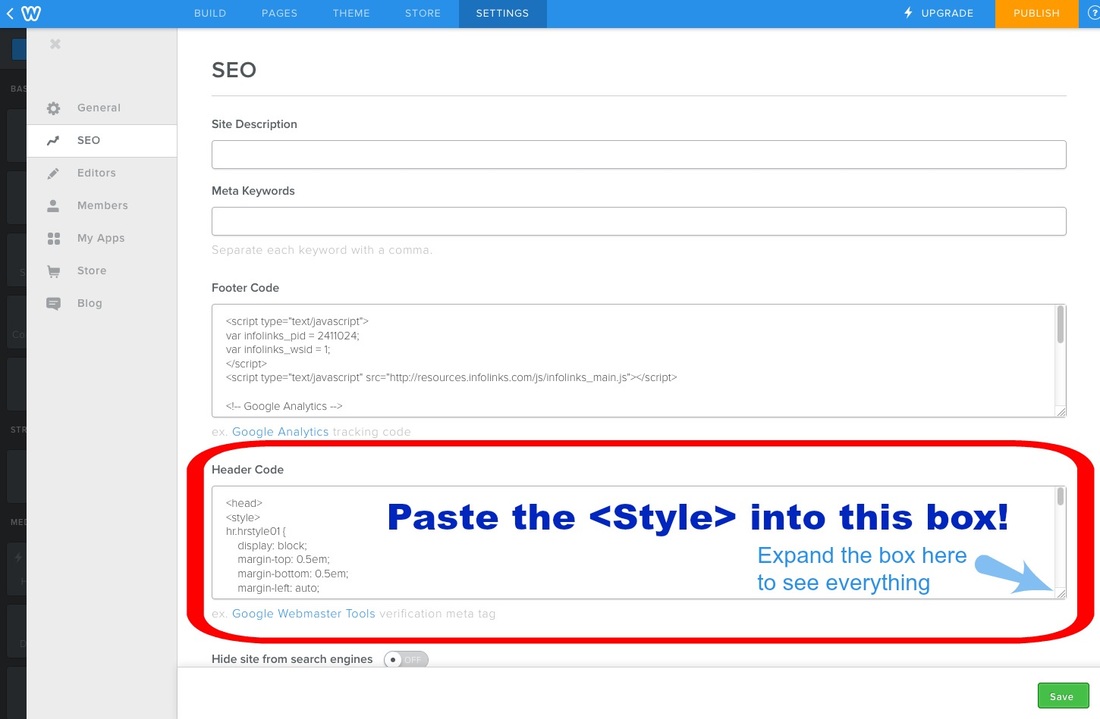
Step FOUR: Paste your style sheet code into the Header Code box.
Step FIVE: Click on the SAVE button and Publish your website again. NOTE: When you do it this way, you will not be able to see a preview of the table borders in the editor, but rest assured that you will see it on your published site.
WordPress Users - I am not very familiar with how to add CSS styles to the header in WordPress, but here is an article that looks informative. At any rate, you can easily add this bit of code directly onto each page once and that should do the trick for now. See below...
Other Users - you will have to find out where to place CSS styles on your website. How to Place the Product Block Code on Your Website:
The time has finally come to add your product blocks onto your website!
Weebly Users - How you add your blocks or tables onto you site depends on the type of block or tables you created. 1) If you created a table with rows and columns, simply drag and drop the embed code element onto your page wherever you'd like to display the table. Then, paste your table code and details into the element. You should be able to see a preview of the block contents even if you can't see the table borders. NOTE: The text may appear larger in the editor than when it is published and viewed on your site. 
2) If you created single cell tables or have chosen to use the div backgrounds as your individual blocks, you'll need to drag and drop the embed code element onto your page wherever you'd like to display the block. Drag another right next to it – this will give you two columns. Repeat for however many columns you like.
Now that you have one row of embed code elements on your page, you can easily create another by repeating the same process, or you can copy the whole set you just made to save time! But before you do this, you may like at paste the basic code for the single cell table or div background without the content code. This way, all you have to do is edit each one with the product you want to display in each one! Here's how to copy or make a duplicate of a whole row of the embed elements: Step ONE: Hover over the space between any of the elements until a vertical blue line appears. Step TWO: Click on that line to select the column group. Step THREE: Now that it is selected, you should see an arrow in the top-left corner. Click on it – this will open the move/copy menu. Step FOUR: Click on the copy tab of the menu and select "this page" to copy it to the same page and see a duplicate of the whole row appear on the page. STEP FIVE: Repeat steps 1-4 for additional rows. Once you have your embed table created, all you have to do is add the body code for the single cell table or div background with the content, or edit each to add the content to them. If you want to rearrange the blocks, simply select the block. Then, drag and drop into the space between or on either end of elements. Remember to look for that vertical blue line again! Another method to rearrange the blocks, is simply to copy and paste new codes into each element. Either way will work great!
WordPress Users - Here's how to add your tables to your pages...
Go to the page in question. Making sure you are in the "text" view of the page, click on the "code" button from the page menu – this will tell your website that you are adding code instead of text. 
1) If you were able to add the style sheet to the header of your website, then you only need to paste the body content of your table onto the page. Then, close the code section of your page by clicking on the "/code" button from the page menu.
2) If you were not able to add the style sheet to the header of your website, then you need to include it on each page where a table is added. Remember to close the code section of your page by clicking on the "/code" button from the page menu. 
If the second option is the case for you, here's what the layout of full code should look like for a single cell table:
<!DOCTYPE html> <html> <head> <style> table.tablestyle08, .tablestyle08 th, .tablestyle08 td { border: 25px solid #DDD3E0; border-collapse: collapse; border-spacing: 1px; padding: 0px; margin: 10px 5px; empty-cells: hide; background-color:#DDD3E0; } p.small { line-height: 60%; } a { text-decoration: none; } </style> </head> <body> <table class="tablestyle08" style="width:99%"> <tr> <td><div align="center"><div style="background-color:#ffffff;"> <p style="margin: 0px 0px;"><a href="ListingURL"><img src="ImageURL" alt="ImageDescriptionforSEO" border="0" width="100%" style="margin: 3px 0px"/></p><h5 style="margin: 0px">Product Title</h5><p class="small" style="margin: 0px">Subtitle</p></a> <p class="small" style="margin:0px 0px"><em>$1.99 USD</em></p> <p style="margin: 0px 0px"><a href="URL"><img src="ButtonURL" border="0" width="120" style="margin: 0px"/></a></p> </div></div></td> </tr> </table> </body> </html> Notice how the style sheet has been enclosed between the header code (<head>...</head>) at the top below the start of the HTML doc (<html>) and before the body section (<body>) of the code.
Other Users - Add your code in whatever method your website type allows you add it.
If you have made it to the end of this lesson, congratulations! You are well on your way to making your website shop look amazing. Yay!!!
Here's a list of resources used for this tutorial:
Plus, grab FREE downloads for the style sheets and codes for all of the examples pictured here!
Thanks for visiting today! Tell me what you thought about the eighth lesson of the series by commenting below or giving this a rating...
Additionally, please let me know if you have any questions or concerns. I will be happy to help in any way I can. Comment below, or visit my Website Shop 101 facebook support group...
Be sure to check out the intro to this series for upcoming lessons or lessons you may have missed! Wishing you a terrific day. See you again soon for lesson 9, where we'll learn how to make "about product" tabs for your store...  

Hello Visitor and Welcome to Rebeckah's Treasures... I am a Norwegian/Canadian currently studying Midwifery in the UK. I love to crochet! At Rebeckah's Treasures, I share my crochet patterns and treasures. I hope they inspire you to crochet your own little treasures too... 
Comments
|


Hello, my name is Rebeckah.
I hope my crochet inspires you to create your very own treasures! Learn more about me... Categories
All
Archives
October 2021
© 2012-2021 Rebeckah Ferger
All rights reserved. Disclaimer: This website makes use of sponsored and/or affiliate links. Please see this page for more information.
|
- Home
-
-
- Special Offers
- New Releases
- Accessory Crochet Patterns
- Afghan Square Crochet Patterns
- Amigurumi Crochet Patterns
- Applique Crochet Patterns
- Baby Crochet Patterns
- Dolly Crochet Patterns
- Fashion Doll Crochet Patterns
- Free Downloads
- Holiday Crochet Patterns
- Tapestry Crochet Patterns
- Under the Sea Crochet Patterns
- Wedding Crochet Patterns
- Disclaimer and FAQs
-
-
- Free Crochet Patterns
- New Free Releases
- Free Accessory Crochet Patterns
- Free Afghan Square Crochet Patterns
- Free Amigurumi Crochet Patterns
- Free Applique Crochet Patterns
- Free Baby Crochet Patterns
- Free Dolly Crochet Patterns
- Free Fashion Doll Crochet Patterns
- Free Guest Crochet Patterns
- Free Holiday Crochet Patterns
- Free Tapestry Crochet Patterns
- Free Under the Sea Crochet Patterns
- Free Wedding Crochet Patterns
- Free Crochet Patterns Coming Soon
Welcome Visitor! I hope you enjoy my treasures.


 RSS Feed
