|
Disclaimer: This website makes use of sponsored and/or affiliate links. Please see this page for more information.
Welcome to lesson seven of the Website Shop 101 tutorial series for crafters. It's always handy to have a tool that allows users to search your site. Not all website builders come with them, or if they do, it's an additional cost. This lesson will show you how to can create a custom search engine on your site using Google's handy tool. BONUS: if you are AdSense approved, I'll also share how to monetize your search engines!
There are two free ways to add Google custom search engines to your site.
This first is free for everyone to use and is great for websites that are not approved for AdSense. The second is only for those who have an approved Google AdSense account. AdSense for Search is a great way to make a few more pennies or more each day. If you don't already have a Google AdSense account you can learn more about it here. If you start with the first option and later get approved for Google AdSense, you can update the search engines you created with the first option to monetize them. See instructions for adding a normal search engine first, or jump straight to AdSense for Search... How to Add a Normal Google Search Engine onto Your Website:
Go to https://cse.google.com/cse and sign into your Google Account (if you're not already signed in).
Click on the blue button at the top-right of the page that says "Sign in to Custom Search Engine" to sign in.
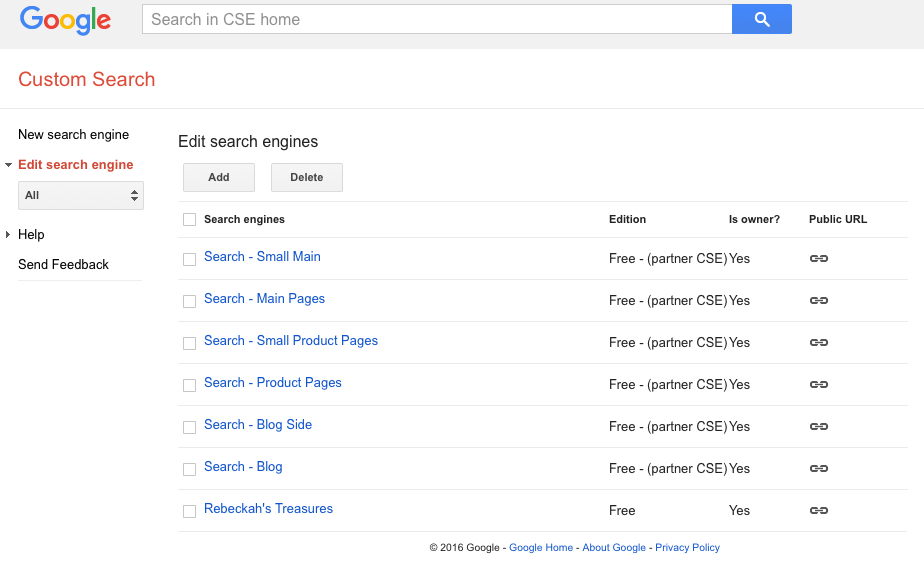
Once you are signed in, or if you were already signed in, you'll be directed to the home page for your Google Custom Search Engines.
Here you will be able to see all of your search engines, create new ones and edit old ones. If this is your first time, you will won't have a list of search engines yet. You'll here that I have several. The top six ones were created with Google AdSense and have been monetized – hence it saying (partner CSE) under the edition. More on those ones later. The last one, however, is the very first custom engine I created before I started with AdSense.
Now it's time to make a custom search engine (CSE) for your website(s).
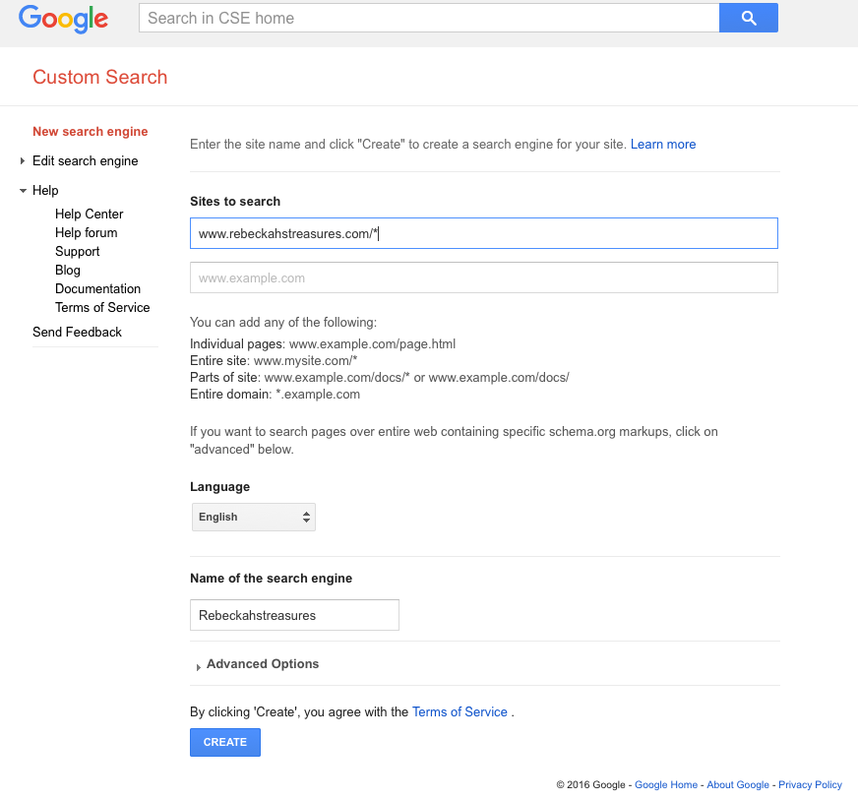
So go ahead and click on either the Add button or New search engine. It will take you to a page that looks like this...
You'll see I've already typed in my website above.
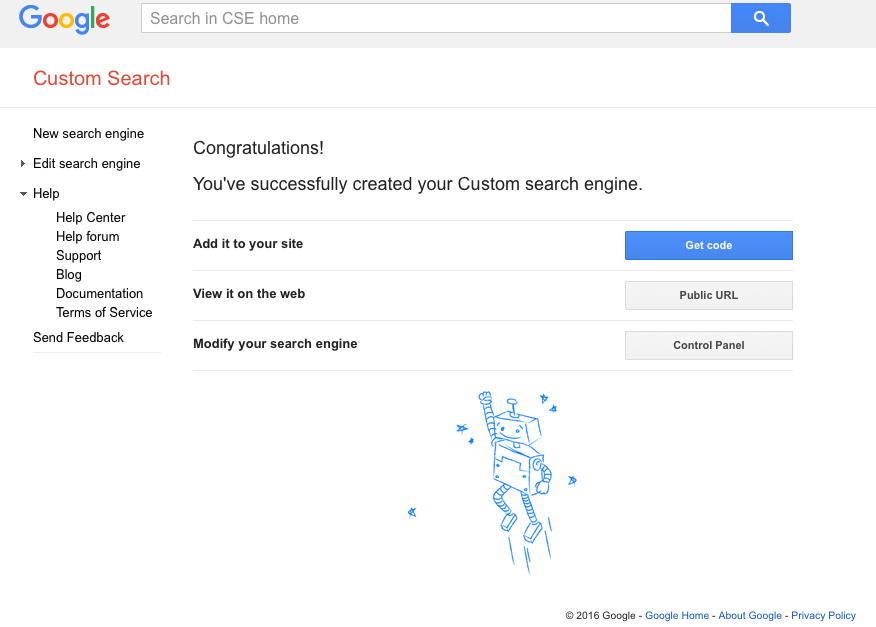
You can make your search engine search more than one website. This is really handy if you have more than one. As soon as you add one website, a new line will appear to add another. Next, select the language for your CSE and adjust the name of your CSE. If you would like some advanced options, expand the arrow to see them. Otherwise, click on the blue button at the bottom that says "create" and you'll be directed to this next page...
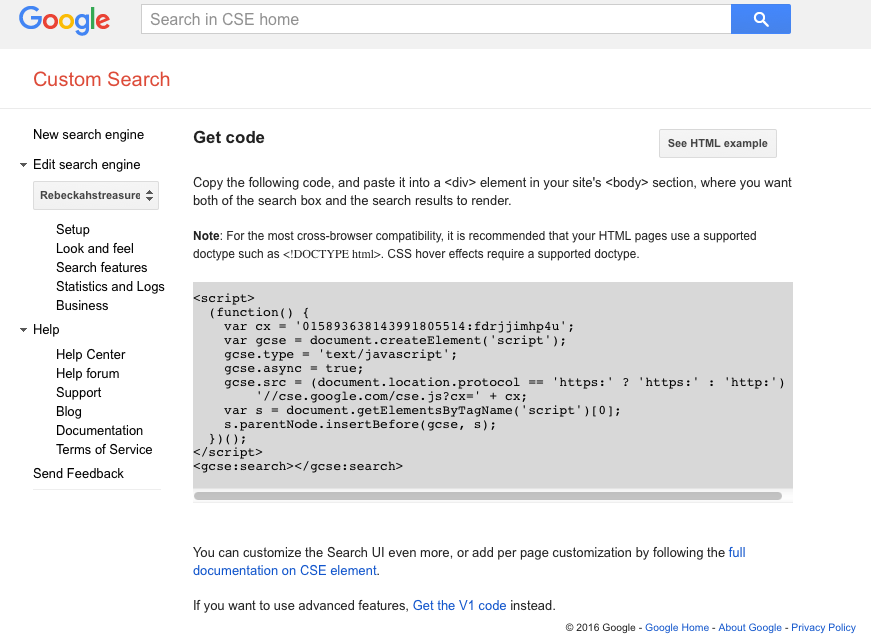
Unless, you wish to make some extra modifications, all you have to do is click on the blue button that says "Get code". This will take you to this page where you can copy the code and place it wherever you'd like it to go on your website. It looks like this...
Simply copy the code and add it wherever you'd like the search engine to appear on your site.
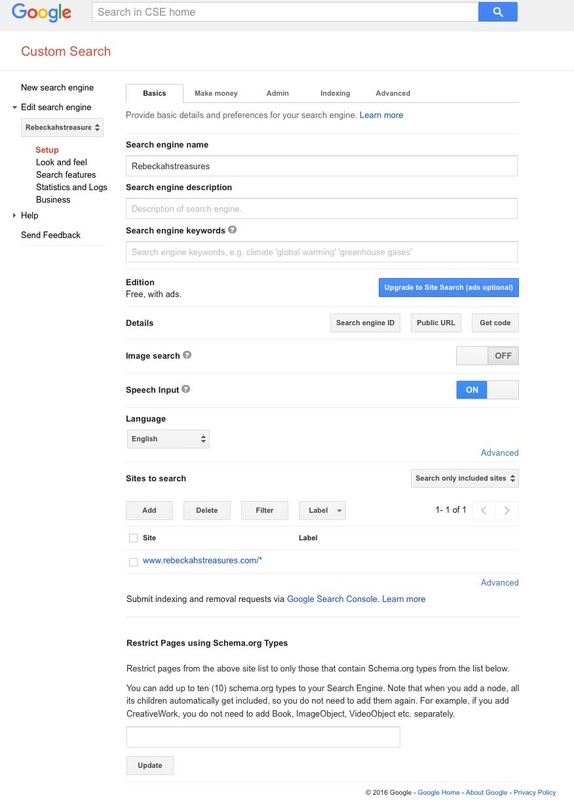
However, if you'd like to customize the look and/or settings, you can either expand the Edit search engine on the left and click on Setup or click on the gray button that says "Control Panel". Either way, you'll be directed to the Setup Basics...
Here you can make any changes to you CSE and get the code again.
Click on each of the tabs and pick the settings you'd like your search to have. When you're finished, remember to click on the gray button at the bottom that says "Update". You can also change the look and feel of your search engine by clicking on that tab to the left.
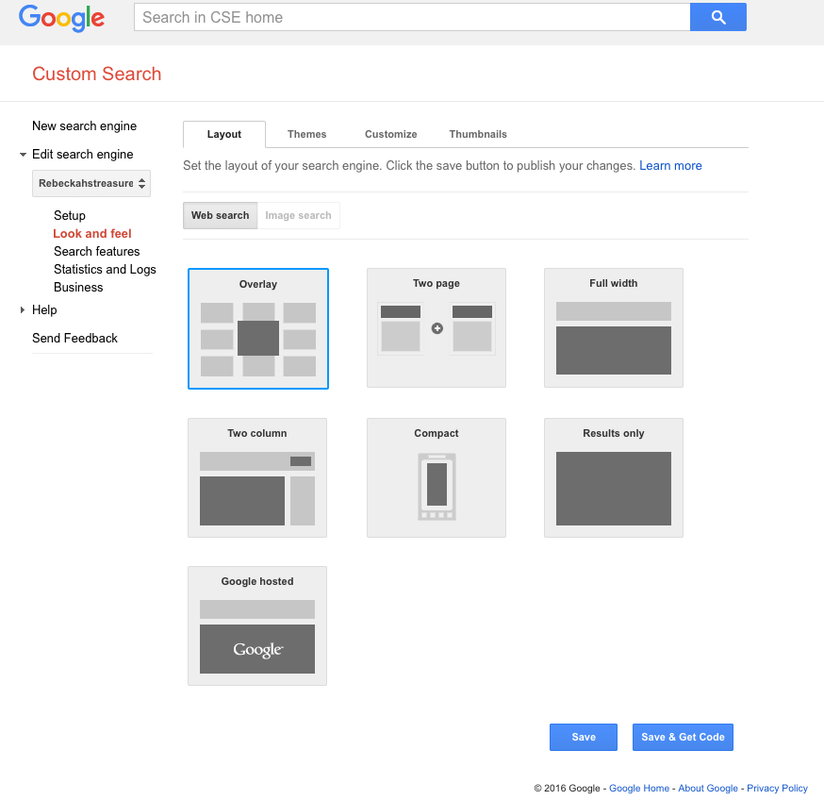
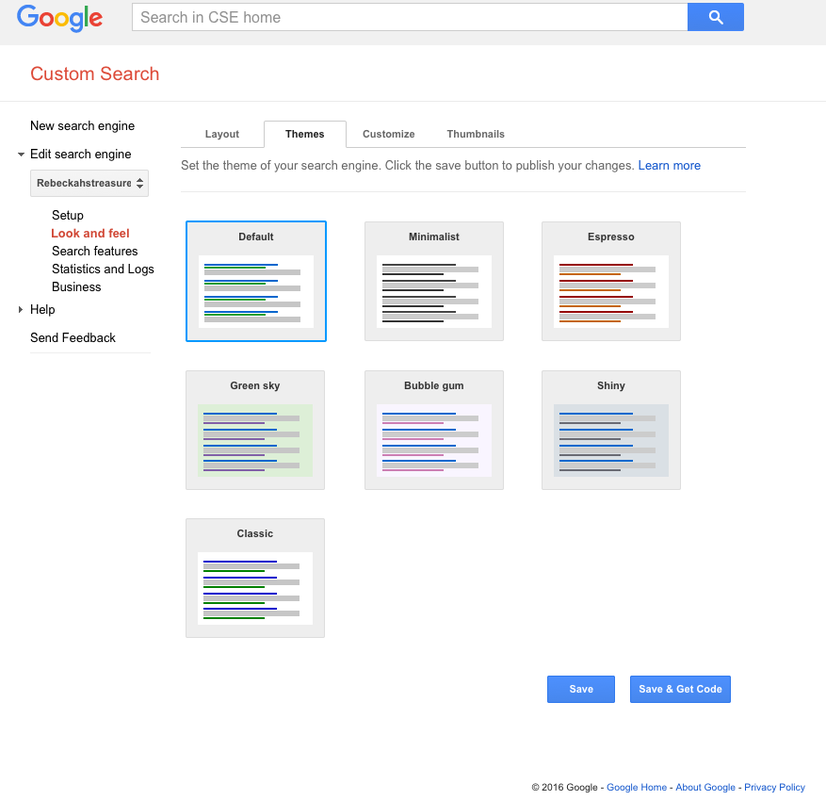
You'll see that there are many separate categories and alterations you can do. Above is what the Layout tab looks like and below is what the Themes tab looks like...
On the right you'll see a preview of the search button! Simply click on the different options until you find the one you like, or go to the customize tab to explore more options.
Remember to click on the blue button that says "Save" to save your changes, or the other one that says "Save & Get Code" to add it to your site right away!
At anytime, you can go in to edit your custom search engines, delete them, or add new ones. They can be as simple or complex as you like. Either way, you now have a free search engine to add to your website! Just one little side note: Whenever someone does a search through your CSE with this free version, the results will show up in a pop-up window. If you'd like more control with this, you'll either need to upgrade to a pay account, or use the AdSense version below... How to Add AdSense for Search onto Your Website:
Now let's see how you can get your search engines to earn you extra pennies with Google AdSense!
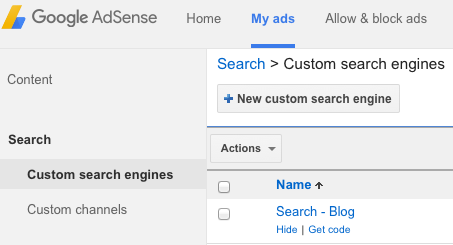
First, sign into your AdSense account and go to the "My ads" tab up at the top. From there, click on the "Search" tab on the left side of the page. This will take you to the page where you can create, edit or delete monetized custom search engines...
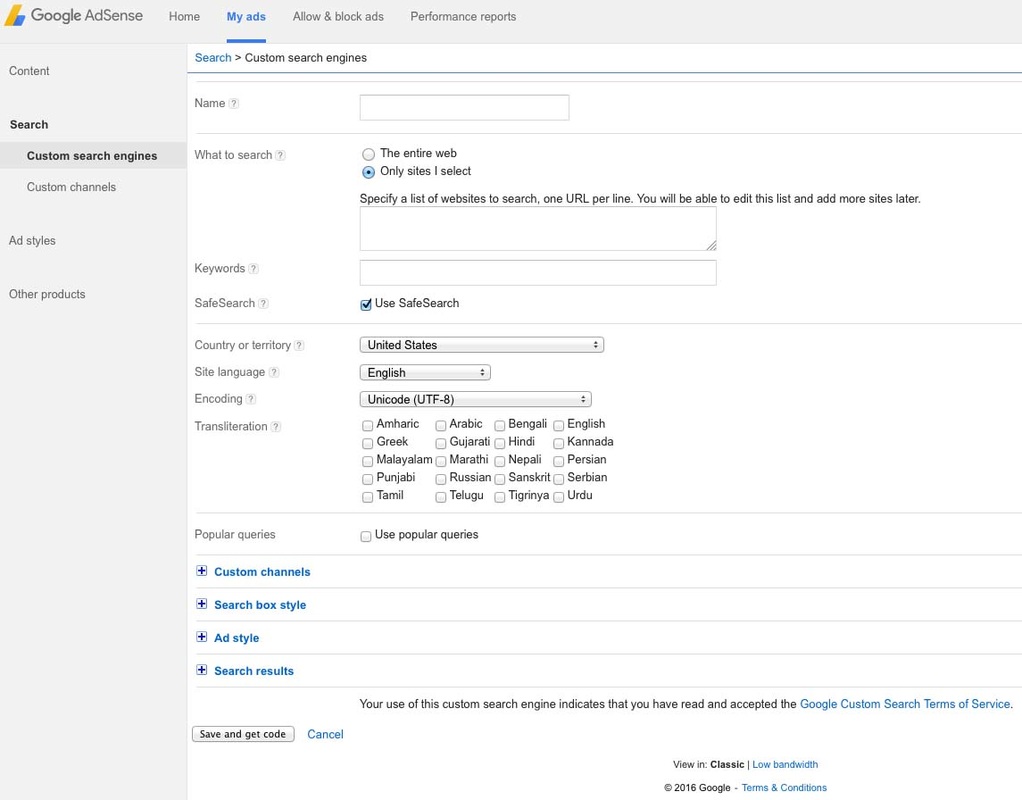
To make a brand new search engine, simply click on the gray button at the top that says "New custom search engine". It will take you to a page that looks like this...
TIP: Hover over the question mark (?) next to each section to learn more about each one.
Step One: Pick a name for your CSE. Make it recognizable by calling it something to do with where you will be placing it on your site. For instance, I have two on my blog. One is called "Search - Blog" – this one rests up at the top of all my blog pages. The other is called "Search - Blog Side" – this one rests in my blog's sidebar. Step Two: Select whether this search engine will search the entire web or only sites you select. I recommend the later for obvious reasons. Step Three: Type in some Keywords to help tell Google what type of ads would be good to display above the search results. Some great keywords to have are any that relate to the content you have on your site. You can list as many or as few as you like, or you can even leave it blank. Though, I don't recommend leaving it blank since you want to better target your audience. For instance, I choose keywords like "crochet", "amigurumi", "barbie" and "pattern" because those are type of content I have on my own site. You'll also want to check the "Use SafeSearch" if you'd like to keep pornographic or sexual content out of your search results page. Step Four: Select the country or territory, language, etc. to define your search according to your preferences. Step Five: Choose whether or not you'd like to "Use popular queries". This gives your users a chance to see what others are searching for on your site. I have mine set to 10, but you can make yours whatever number you'd like to have or have none at all. Step Six: Expand "Custom channels" to add one or more channels to this CSE. Custom channels basically makes it easier to keep track of stats based on size or location, and also makes it possible target advertisers for those channels. You can learn more about it here...
Step Seven:
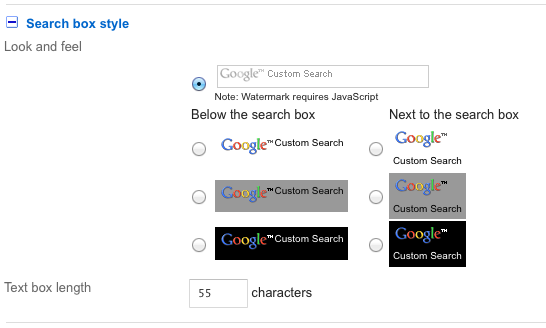
Expand the "Search box style" to adjust the look, feel and size of the actual engine. There are 7 options for the look and feel: Select the one you prefer
The Text box length determines the width of the search box. The standard is 55 characters. Simply adjust the number of characters to the width you need. To give you a better idea of the sizing, I have the one at the top of my blog set to the standard 55 characters and the one for my blog's sidebar set at 25 instead.
Step Eight:
Now it's time to decide the Ad style. Expand it to make your selection from the list or use the custom settings in the next tab.
Step Nine:
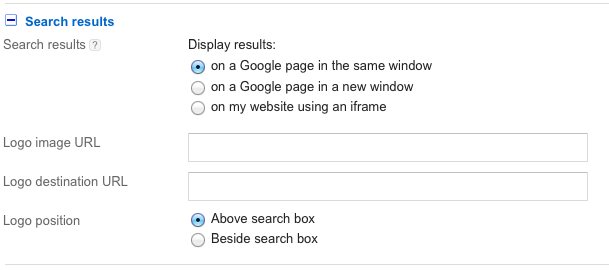
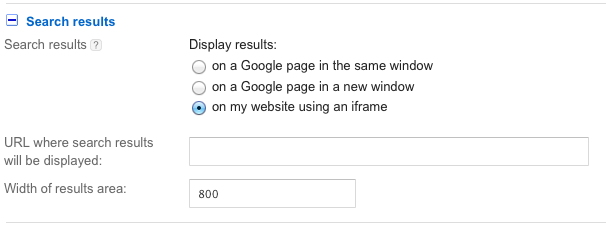
All that remains before you can get the code is to determine where the search results will be displayed. You have three options to choose from:
Options #1 and #2: If you would prefer one of the first two options, you can add a Logo image (such as your business logo) and a destination for your user to go should they click on it. Simply copy the image address or URL and paste it into the Logo image URL field. Then, type in the website address you'd like to direct people to such as your home page into the Logo destination URL. Finally, decide whether you would prefer the logo to be placed above or beside the search box.
Option #3:
The third option for displaying the search results is the one I recommend since it will keep your users on your website. For this option, create a page on your website where you can display the results. Copy the URL of this page and paste it into the URL where search results will be displayed field. Finally, adjust the pixel width of the results area by adjusting the number in the Width of results area field. The standard is 800, but your website page may be wider or narrower.
Step Ten:
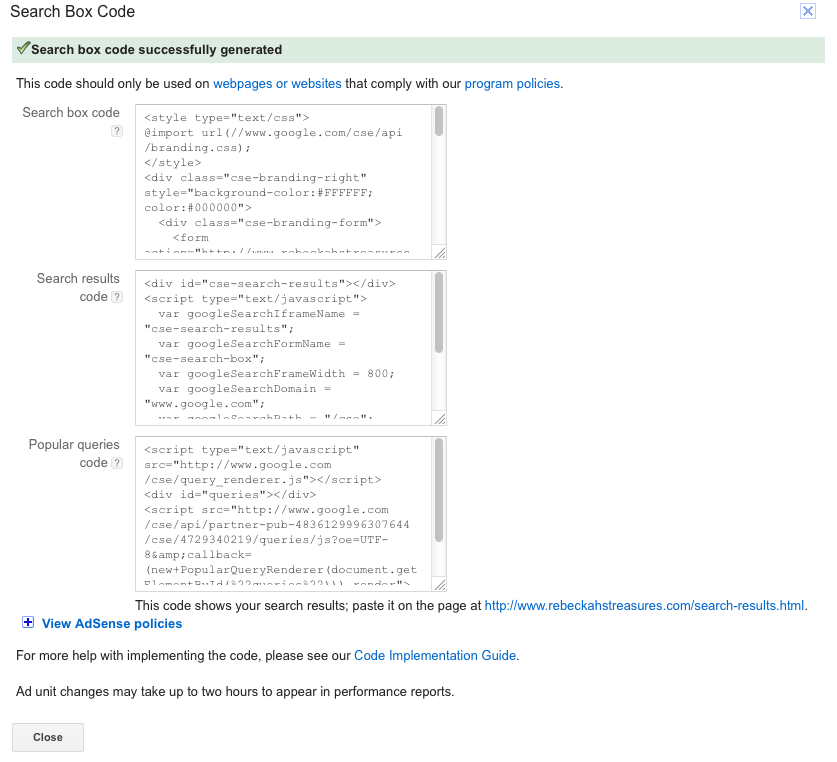
Now it's time to add your search engine code to your site! Depending on the settings you chose for your Search Box Code, you may see 1-3 boxes of code like shown below...
The first box of code called the "Search box code" is the actual search engine. You'll want to place this code wherever you want the search engine to appear.
The second box of code called the "Search results code" is for those of you who elected the third option of embedding the results directly onto a page on your website. You'll need to add this code onto the page you created for displaying the search results, and you'll do this for each search engine you create. The third box of code called the "Popular queries code" is also for those who will display the search results on your own website. Like for the search results code, you'll add this code onto the same search results page you created for your website and do the same for each search engine you make. And that's all there is to it! A Few Important Notes About Google AdSense CSE:
You can learn more by visiting the resources below...
Resources Used in this Tutorial:
Thanks so much for visiting today! Tell me what you thought about the seventh lesson of the series by commenting below or giving this a rating...
Additionally, please let me know if you have any questions or concerns. I will be happy to help in any way I can. Comment below, or visit my Website Shop 101 facebook support group...
Be sure to check out the intro to this series for upcoming lessons or lessons you may have missed! Wishing you a marvelous day. See you again soon for lesson 8, where we'll learn how to make Product Blocks... 
Hello Visitor and Welcome to Rebeckah's Treasures... I am a Norwegian/Canadian currently studying Midwifery in the UK. I love to crochet! At Rebeckah's Treasures, I share my crochet patterns and treasures. I hope they inspire you to crochet your own little treasures too... 
Comments
|
Hello, my name is Rebeckah.
I hope my crochet inspires you to create your very own treasures! Learn more about me... Categories
All
Archives
October 2021
© 2012-2021 Rebeckah Ferger
All rights reserved. Disclaimer: This website makes use of sponsored and/or affiliate links. Please see this page for more information.
|
- Home
-
-
- Special Offers
- New Releases
- Accessory Crochet Patterns
- Afghan Square Crochet Patterns
- Amigurumi Crochet Patterns
- Applique Crochet Patterns
- Baby Crochet Patterns
- Dolly Crochet Patterns
- Fashion Doll Crochet Patterns
- Free Downloads
- Holiday Crochet Patterns
- Tapestry Crochet Patterns
- Under the Sea Crochet Patterns
- Wedding Crochet Patterns
- Disclaimer and FAQs
-
-
- Free Crochet Patterns
- New Free Releases
- Free Accessory Crochet Patterns
- Free Afghan Square Crochet Patterns
- Free Amigurumi Crochet Patterns
- Free Applique Crochet Patterns
- Free Baby Crochet Patterns
- Free Dolly Crochet Patterns
- Free Fashion Doll Crochet Patterns
- Free Guest Crochet Patterns
- Free Holiday Crochet Patterns
- Free Tapestry Crochet Patterns
- Free Under the Sea Crochet Patterns
- Free Wedding Crochet Patterns
- Free Crochet Patterns Coming Soon
Welcome Visitor! I hope you enjoy my treasures.














 RSS Feed
