|
Disclaimer: This website makes use of sponsored and/or affiliate links. Please see this page for more information.
Welcome to lesson five of the Website Shop 101 tutorial series for crafters. This next part will help you to create download buttons that are best suited for digital files you'd like to offer for free. In addition to this, you will also learn how to add Google tracking to them, so you can keep track of how many times it has been downloaded in your Google Analytics account.
This lesson assumes that you've already designed your shop buttons from lesson 2 and that you have your download button image uploaded to your website already.
If you haven't created a download button image yet, or if you haven't uploaded said image onto your site, go and do this now. Then, proceed with this lesson... Getting Started:
In order to create a downloadable button, you'll need a few things...
The first step is to create digital goods your customers can download. These can be PDFs, JPGs, PNGs, GIFs, ZIP files, or whatever digital good you'd like to offer. Next, you'll need to upload these files onto your website.  file element file element
Weebly Users:
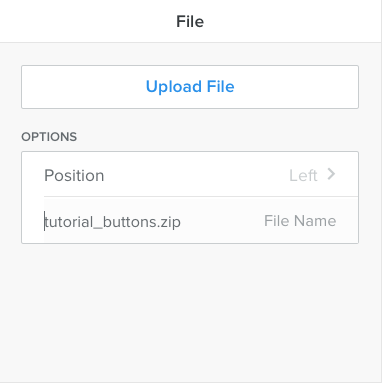
You'll need to create a page, where you can drag the FILE element onto it. When you create your page, make sure you CHECK the "Hide page in navigation" BOX to hide this page from the navigation menu and your users, and in the Advanced Settings for the page, you'll also need to CHECK the "Hide this page from search engines" BOX to keep others from finding the page accidentally. Now that you have your page created, click Save then click on the BUILD tab in the navigation menu. From here, drag the FILE element onto the page and UPLOAD your file. Repeat for each file. Publish your site and go to the page you created on your site by typing in the URL of the page (it will be www.mywebsite.com/page-title, simply change mywebsite to your website and change page-title to the title you gave your page, remember to add a hyphen - in between each word in the title). From here, click on the "download file" link. This will open any image or PDF file in a new page (note this doesn't work for zip files, but you can still grab the URL of zip files by changing the link from another file you have uploaded); here you'll need to copy the file's page URL. Once you have one file URL, you don't need to go to this published page again to grab the others. Instead, you will take the URL you already have and change the ending of the link which is the file's name to whatever the name of the other files are. Here's an example of what a PDF URL from my own site would look like: http://www.rebeckahstreasures.com/uploads/1/4/3/9/14399682/crochet_pattern.pdf Yours will be similar. Only, the website, the unique set of numbers and the file name will be different. Once you have your first file URL, all you need to change on yours for the next one is the file name. This is how you can get the URL for zip files too! When you click on the file in your editor, the following pop up will appear, simply copy the file name and replace the file name of the first URL with the new one for each of your remaining files.
Once you have your links, paste and save each URL to a spreadsheet or notepad along with the special short tracking name for future reference. Proceed to the next step below...
Wordpress Users: You guys have it easy. Go to the Media section of your editor, click Add New and UPLOAD your files. Next, click on each one and copy the image URL from the URL field. Paste and save each URL to a spreadsheet or notepad along with the special short tracking name for future reference. Proceed to the next step below... Other Users: If you have a place to upload your media or files like Wordpress users, do it this way. Otherwise, create a page where you can place your files, copy the URL of each and save it to a spreadsheet or notepad along with the special short tracking name for future reference. Proceed to the next step below... Creating Your Download Button Code:
Now that you have your file URLs, it's time to take a look at the basic download code!
Here's what it looks like...
<a href="URLofFILE" download>
<img src="DownloadButtonImageURL" alt="Download" border="0" width="144" height="53" /> </a>
Here's the download code breakdown:
Note: Make sure you use the full address of the URLs in question. Now let's see some examples of this code!
Example #1:
<a href="http://www.rebeckahstreasures.com/uploads/1/4/3/9/14399682/4517361_orig.png" download> <img src="http://www.rebeckahstreasures.com/uploads/1/4/3/9/14399682/4517361_orig.png" alt="Download" border="0" width="144" height="53" /> </a>
Example #2:
<a href="http://www.rebeckahstreasures.com/uploads/1/4/3/9/14399682/4517361_orig.png" download> <img src="http://www.rebeckahstreasures.com/uploads/1/4/3/9/14399682/4517361_orig.png" alt="Download" border="0" width="238" /> </a>
Example #3:
<a href="http://www.rebeckahstreasures.com/uploads/1/4/3/9/14399682/4517361_orig.png" download> <img src="http://www.rebeckahstreasures.com/uploads/1/4/3/9/14399682/4517361_orig.png" alt="Download" border="0" width="238" height="88" /> </a>
Examples #2 and #3 look and are the same, but I included the height in the later.
*If you click on any of these download buttons above, you'll download the image you see. Learn more about download buttons, images and links on w3schools.comhere OR practice making a download link on w3schools.com here. If you don't care about tracking the number of downloads your download buttons generate, then all you need to do is add this download code with your changes wherever you would like to have it on your site. I recommend that you only have one place to download a particular item, otherwise you'll go crazy looking for all of them to edit if you need to update the file. However, if you do care about keeping track of things, continue with the rest of this tutorial... Adding Google Event Tracking to Your Download Code:
You've got your download button code ready. Now it's time to add Google Analytics tracking, so you can keep track of how many downloads have taken place!
Let's see what the code for Google Tracking looks like...
onClick="ga('send', 'event', { eventCategory: 'Patterns', eventAction: 'Download', eventLabel: 'Pattern Title'});"
Here's the breakdown of the Google Event Tracking code:
Now let's see where you add this code into the download code!
<a href="URLofFILE" download onClick="ga('send', 'event', { eventCategory: 'Patterns', eventAction: 'Download', eventLabel: 'Pattern Title'});">
<img src="DownloadButtonImageURL" alt="Download" border="0" width="144" height="53" /> </a>
Can you see where the Google Event Tracking code was added?
It was added right after download and before the > that closes the a href section of the download code. Easy, right? Now let's see some examples of the full download code with the tracking!
Example #1:
<a href="http://www.rebeckahstreasures.com/uploads/1/4/3/9/14399682/4517361_orig.png" download onClick="ga('send', 'event', { eventCategory: 'Button', eventAction: 'Download', eventLabel: 'Download Button 144'});"> <img src="http://www.rebeckahstreasures.com/uploads/1/4/3/9/14399682/4517361_orig.png" alt="Download" border="0" width="144" height="53" /> </a>
Example #2:
<a href="http://www.rebeckahstreasures.com/uploads/1/4/3/9/14399682/4517361_orig.png" download onClick="ga('send', 'event', { eventCategory: 'Button', eventAction: 'Download', eventLabel: 'Download Button 238'});"> <img src="http://www.rebeckahstreasures.com/uploads/1/4/3/9/14399682/4517361_orig.png" alt="Download" border="0" width="238" /> </a>
*Again, if you click on any of these download buttons above, you'll download the image you see.
There is an addition fourth event option that can be added, but it is optional and I don't use it personally, so I didn't include it. You can learn more about Google Event Tracking here. Plus, here's a handy tool you can use to create your Google Event Tracking codes! It includes some more useful tips too. Add your download code with tracking wherever you'd like it to appear. Adding Google Tracking to Your Website:
Before the event tracking portion of the code will start to work, you need to add a special code to your website header code. Here's how!
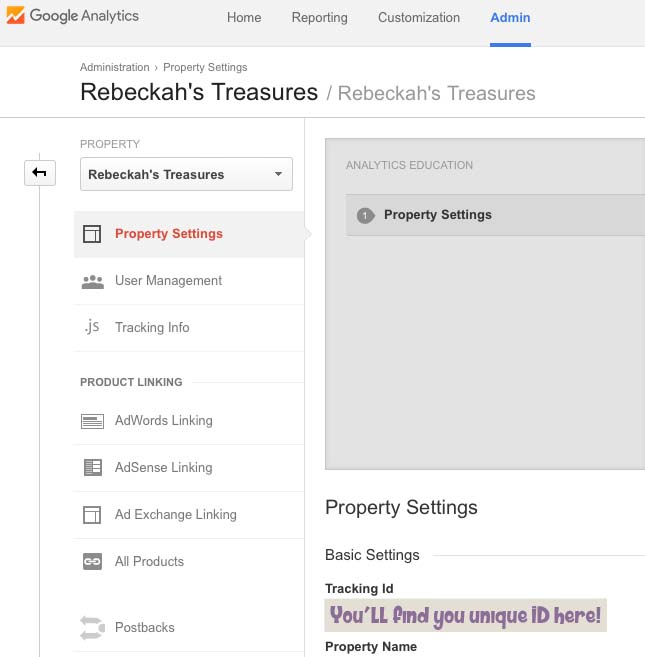
The first bit of info you'll need is your unique tracking ID. You can find this by going to your Google Analytics Admin Console and selecting "Property Settings".
Once you're in the Property Settings, you'll find your unique tracking ID.
It will look something like this 'UA-XXXXX-Y'. Copy it and save it for the next step.
Now it's time to grab the special code from Google Analytics! You can find it here.
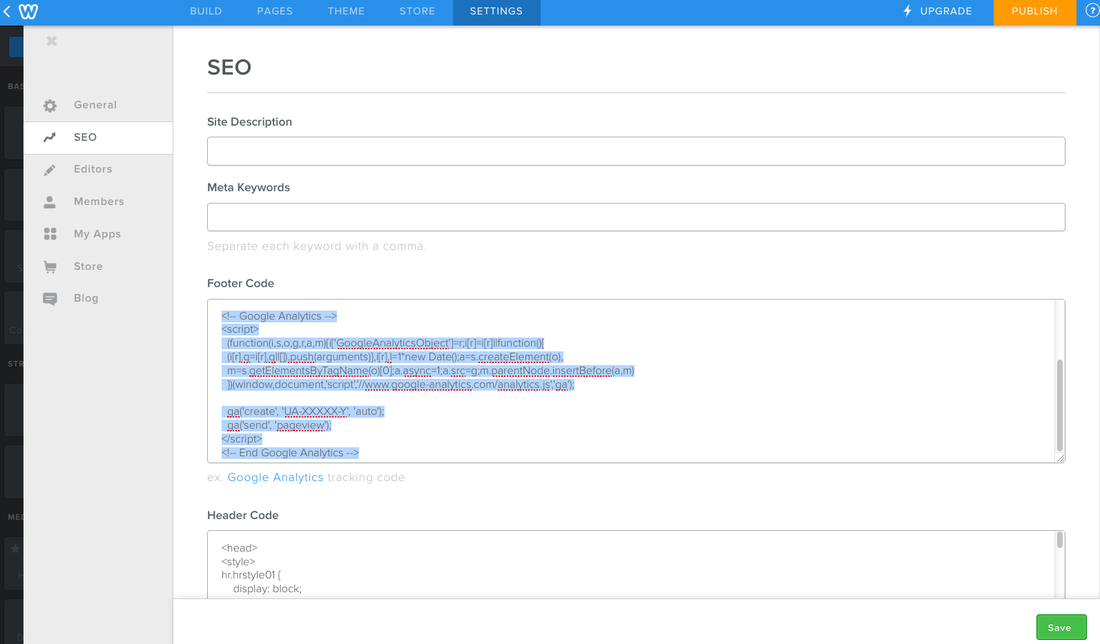
It's the first script section you see at the top of the page. You'll want to copy from <!-- Google Analytics --> to <!-- End Google Analytics -->, and paste it into your website HTML before the </head> tag (Weebly specifies a place to put it, see below). Replace the tracking ID 'UA-XXXXX-Y' in the script code with your unique tracking ID. Save and Publish your site again with this addition. Weebly Users - Here's where you'll paste this code:
Now you'll start collecting data from your downloads each time someone clicks on it!
Resources used for this tutorial:
Thanks so much for visiting today! Tell me what you thought about the fifth lesson of the series by commenting below or giving this a rating...
Additionally, please let me know if you have any questions or concerns. I will be happy to help in any way I can. Comment below, or visit my Website Shop 101 facebook support group...
Be sure to check out the intro to this series for upcoming lessons or lessons you may have missed! Wishing you a fantastic day. See you again soon for lesson 6, where we'll make Return Buttons for your store... 
Hello Visitor and Welcome to Rebeckah's Treasures... I am a Norwegian/Canadian currently studying Midwifery in the UK. I love to crochet! At Rebeckah's Treasures, I share my crochet patterns and treasures. I hope they inspire you to crochet your own little treasures too... 
Comments
|
Hello, my name is Rebeckah.
I hope my crochet inspires you to create your very own treasures! Learn more about me... Categories
All
Archives
October 2021
© 2012-2021 Rebeckah Ferger
All rights reserved. Disclaimer: This website makes use of sponsored and/or affiliate links. Please see this page for more information.
|
- Home
-
-
- Special Offers
- New Releases
- Accessory Crochet Patterns
- Afghan Square Crochet Patterns
- Amigurumi Crochet Patterns
- Applique Crochet Patterns
- Baby Crochet Patterns
- Dolly Crochet Patterns
- Fashion Doll Crochet Patterns
- Free Downloads
- Holiday Crochet Patterns
- Tapestry Crochet Patterns
- Under the Sea Crochet Patterns
- Wedding Crochet Patterns
- Disclaimer and FAQs
-
-
- Free Crochet Patterns
- New Free Releases
- Free Accessory Crochet Patterns
- Free Afghan Square Crochet Patterns
- Free Amigurumi Crochet Patterns
- Free Applique Crochet Patterns
- Free Baby Crochet Patterns
- Free Dolly Crochet Patterns
- Free Fashion Doll Crochet Patterns
- Free Guest Crochet Patterns
- Free Holiday Crochet Patterns
- Free Tapestry Crochet Patterns
- Free Under the Sea Crochet Patterns
- Free Wedding Crochet Patterns
- Free Crochet Patterns Coming Soon
Welcome Visitor! I hope you enjoy my treasures.







 RSS Feed
