|
Disclaimer: This website makes use of sponsored and/or affiliate links. Please see this page for more information. 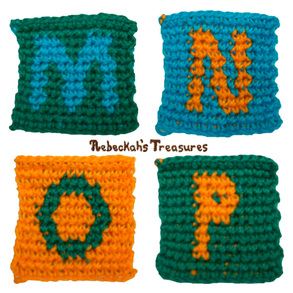
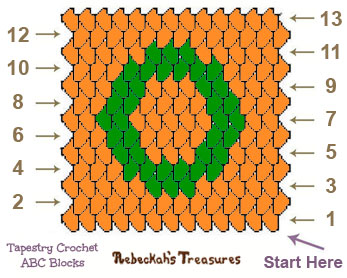
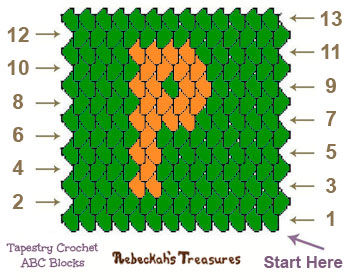
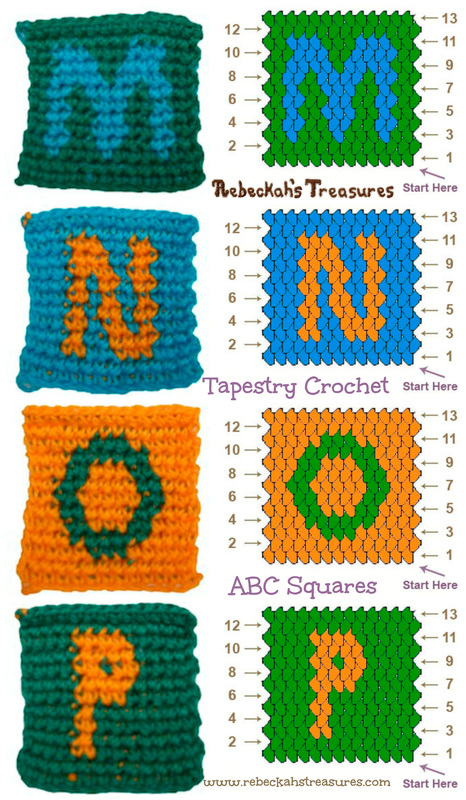
Part Four of the ABC Block Series shows you how to tapestry crochet the letters M, N, O and P as little squares.
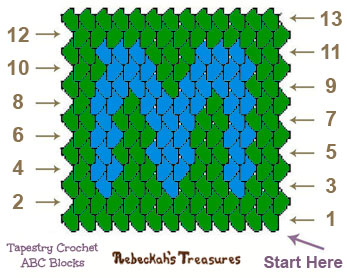
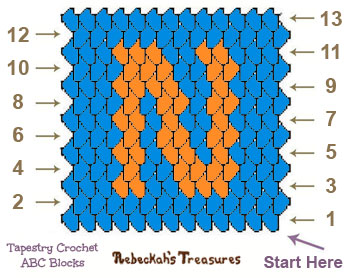
Each of these squares include both tapestry graphs and written word charts. Additionally, I have made a video tutorial that will show you how to crochet these squares (included below). So if you're new to tapestry crochet, you'll be able to make these squares with great ease. You don't have to turn these squares into blocks later. You may like to make a fun doll quilt with them instead, or perhaps you want to combine the letters to spell out names, phases or words in your very own creative tapestry crochet project. Have fun with these and let your imagination go wild!
This pattern is copyrighted to Rebeckah Ferger of www.rebeckahstreasures.com. It is for personal use only. No part of this pattern may be copied or distributed in any way. If you sell what you make from this pattern, please credit me as the designer. All rights reserved, 2015.
Pattern Notes & Tips:
Return to Table of Contents Instructions for Each Square:
ch 14 in A
row 1: insert hook into 2nd ch from hook, grab tail of B and hold it under working yarn but above the hook, yo, pull though ch, grab other side of B, fold towards tail, yo, complete first sc, give a slight tug on both ends of B to lock into place, sc in each rem ch across – carrying both tails of B under sts, ch 1, turn (13 sts) row 2: mirror sc 13 – carrying 2nd yarn under sts, ch 1, turn row 3: sc 13 – carrying 2nd yarn under sts, ch 1, turn row 4-13: rep rows 2 & 3 alternatively changing colours as necessary, f/o Return to Table of Contents
*Please Note: This video tutorial uses Square W for the Demo, but you can still use it to see how these tapestry crochet squares are worked. Plus, at the end of the tutorial you will see the difference between using the mirror sc technique for even rows (recommended) versus using normal sc.
Table of Contents for Video *Clicking the following video links will take you to YouTube... This Section is the Same for ALL Squares: 0:00 - Intro 0:17 - Supplies & Techniques 0:56 - Starting Chains / Row 1 / How to start carrying the second yarn... 4:31 - Row 2 (first look at the mirror sc technique) Colour Changing Rows (each square is different - follow charts): 9:03 - Row 3 (first look at switching colours on ODD rows) 12:22 - Row 4 (first look at switching colours of EVEN rows) 15:55 - Row 5 18:32 - Row 6 (how to start an EVEN row with only 1 stitch in Colour A) 21:25 - Skipping Ahead to Row 11 21:53 - Row 11 (how to start an ODD row with only 1 stitch in Colour A) This Section is the Same for ALL Squares: 24:14 - Row 12 25:58 - Row 13 27:03 - Fastening Off / Finishing Your Square Compare Squares: 27:39 - Comparison of Square W Worked with the Mirror Single Crochet Technique for even rows (recommended) versus Single Crocheting Normally instead. Return to Table of Contents
More in the Tapestry Crochet ABC Baby Blocks Series:
Hello Visitor and Welcome to Rebeckah's Treasures... I am a Norwegian/Canadian currently studying Midwifery in the UK. I love to crochet! At Rebeckah's Treasures, I share my crochet patterns and treasures. I hope they inspire you to crochet your own little treasures too... 
Comments
|
Hello, my name is Rebeckah.
I hope my crochet inspires you to create your very own treasures! Learn more about me... Categories
All
Archives
October 2021
© 2012-2021 Rebeckah Ferger
All rights reserved. Disclaimer: This website makes use of sponsored and/or affiliate links. Please see this page for more information.
|
- Home
-
-
- Special Offers
- New Releases
- Accessory Crochet Patterns
- Afghan Square Crochet Patterns
- Amigurumi Crochet Patterns
- Applique Crochet Patterns
- Baby Crochet Patterns
- Dolly Crochet Patterns
- Fashion Doll Crochet Patterns
- Free Downloads
- Holiday Crochet Patterns
- Tapestry Crochet Patterns
- Under the Sea Crochet Patterns
- Wedding Crochet Patterns
- Disclaimer and FAQs
-
-
- Free Crochet Patterns
- New Free Releases
- Free Accessory Crochet Patterns
- Free Afghan Square Crochet Patterns
- Free Amigurumi Crochet Patterns
- Free Applique Crochet Patterns
- Free Baby Crochet Patterns
- Free Dolly Crochet Patterns
- Free Fashion Doll Crochet Patterns
- Free Guest Crochet Patterns
- Free Holiday Crochet Patterns
- Free Tapestry Crochet Patterns
- Free Under the Sea Crochet Patterns
- Free Wedding Crochet Patterns
- Free Crochet Patterns Coming Soon
Welcome Visitor! I hope you enjoy my treasures.












 RSS Feed
