|
Disclaimer: This website makes use of sponsored and/or affiliate links. Please see this page for more information. 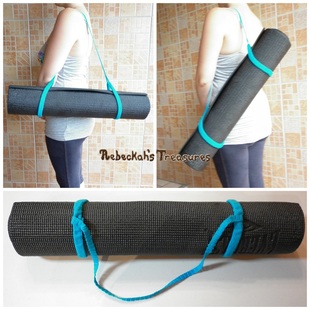 My SIL also asked me to make her a simple carrier for her yoga mat. She picked a turquoise colour to match her car, and this is what I came up with. It has a stretchy headband-like tube for either end, which are joined together by strap. I demo two methods to hold the yoga mat carrier to the left. If you would like to make something similar, continue reading below... To make the yoga mat carrier like pictured above, you'll need yarn or thread, a crochet hook, a yarn or tapestry needle, two 10"-12" (25-30cm) length elastic bands (width is not important), sewing thread, a sewing needle, and 2-4 large safety pins. I used cotton thread #10, a 2.1mm hook and 1/2" (1cm) width elastic.
You will need to crochet two tubes in continuous single crochet rounds that are slightly wider than your elastic band to a length of 18" (45cm). After the final row, slip stitch join to first stitch of round and fasten off with a long tail. Next you will need to crochet the strap. Chain until you reach the desired width of your strap, then single crochet for just enough even rows to go around the tube you created earlier, press top and bottom rows together and single crochet over them to create a tube that you can insert the elastic tube into later. Next, continue doing rows of single crochet until you reach the full width of your yoga mat (or length when rolled up) when you stretch the strap. Do a few more rows as you did to start. Fasten off with a tail and use it to sew the last row of the strap to the strap to create another tube on this side like the first side. Weave in tails of strap. Now it is time to go back to the elastic tubes. With a safety pin on either side of the elastic band, pull the elastic through the tube - keep the crochet tube gathered for now with the elastics exposed on either end. Insert this full tube into the strap tube. Take each end of the elastic band, overlap them by at least 1/2" (1cm). With your sewing needle and thread, sew around the perimeter of the overlapped elastic. Next, using your tube's tail, sew the around the ends of the crochet tube to close them. Weave in ends and repeat for the second elastic tube. And that's all there is to it. :) Hope you have a lovely day! 
Hello Visitor and Welcome to Rebeckah's Treasures... I am a Norwegian/Canadian currently studying Midwifery in the UK. I love to crochet! At Rebeckah's Treasures, I share my crochet patterns and treasures. I hope they inspire you to crochet your own little treasures too... 
Comments
|
Hello, my name is Rebeckah.
I hope my crochet inspires you to create your very own treasures! Learn more about me... Categories
All
Archives
October 2021
© 2012-2021 Rebeckah Ferger
All rights reserved. Disclaimer: This website makes use of sponsored and/or affiliate links. Please see this page for more information.
|
- Home
-
-
- Special Offers
- New Releases
- Accessory Crochet Patterns
- Afghan Square Crochet Patterns
- Amigurumi Crochet Patterns
- Applique Crochet Patterns
- Baby Crochet Patterns
- Dolly Crochet Patterns
- Fashion Doll Crochet Patterns
- Free Downloads
- Holiday Crochet Patterns
- Tapestry Crochet Patterns
- Under the Sea Crochet Patterns
- Wedding Crochet Patterns
- Disclaimer and FAQs
-
-
- Free Crochet Patterns
- New Free Releases
- Free Accessory Crochet Patterns
- Free Afghan Square Crochet Patterns
- Free Amigurumi Crochet Patterns
- Free Applique Crochet Patterns
- Free Baby Crochet Patterns
- Free Dolly Crochet Patterns
- Free Fashion Doll Crochet Patterns
- Free Guest Crochet Patterns
- Free Holiday Crochet Patterns
- Free Tapestry Crochet Patterns
- Free Under the Sea Crochet Patterns
- Free Wedding Crochet Patterns
- Free Crochet Patterns Coming Soon
Welcome Visitor! I hope you enjoy my treasures.












 RSS Feed
