|
Disclaimer: This website makes use of sponsored and/or affiliate links. Please see this page for more information.
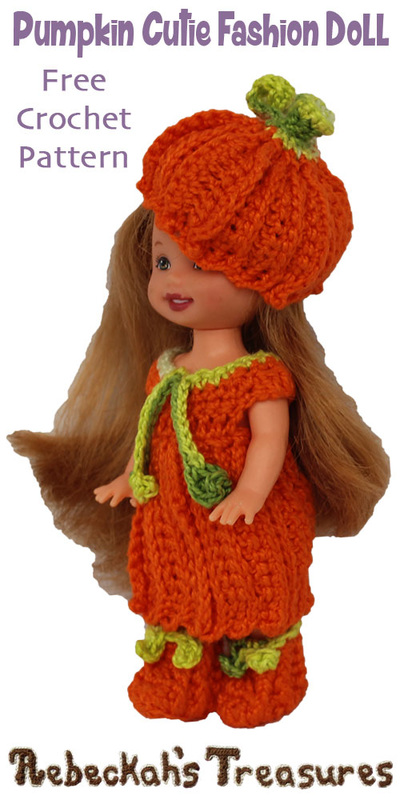
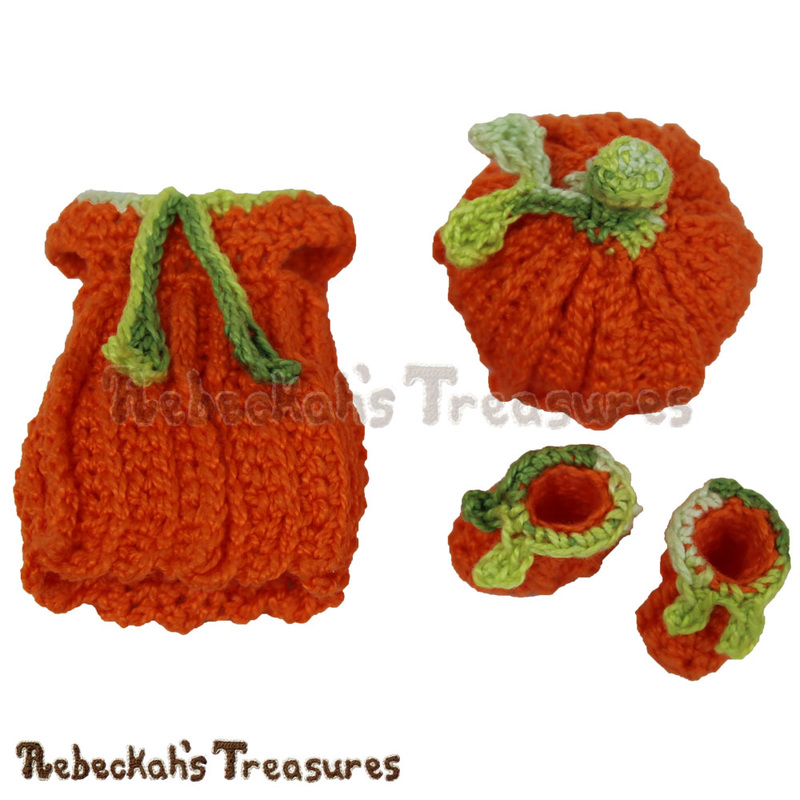
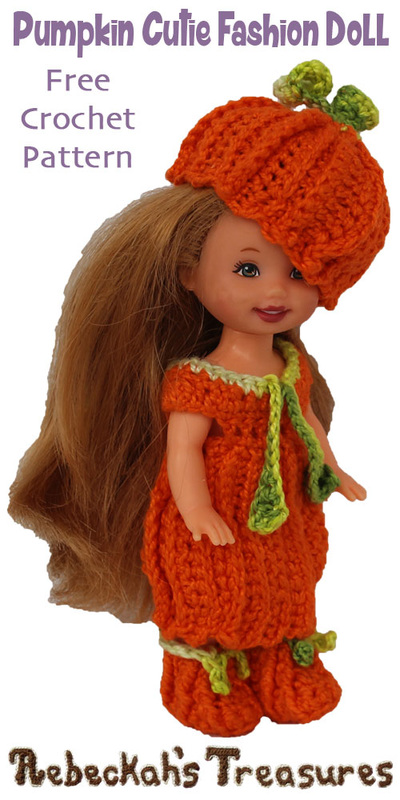
If you love pumpkins and little dolls, you’ll LOVE crocheting this adorably textured Pumpkin Cutie Child Fashion Doll pattern!
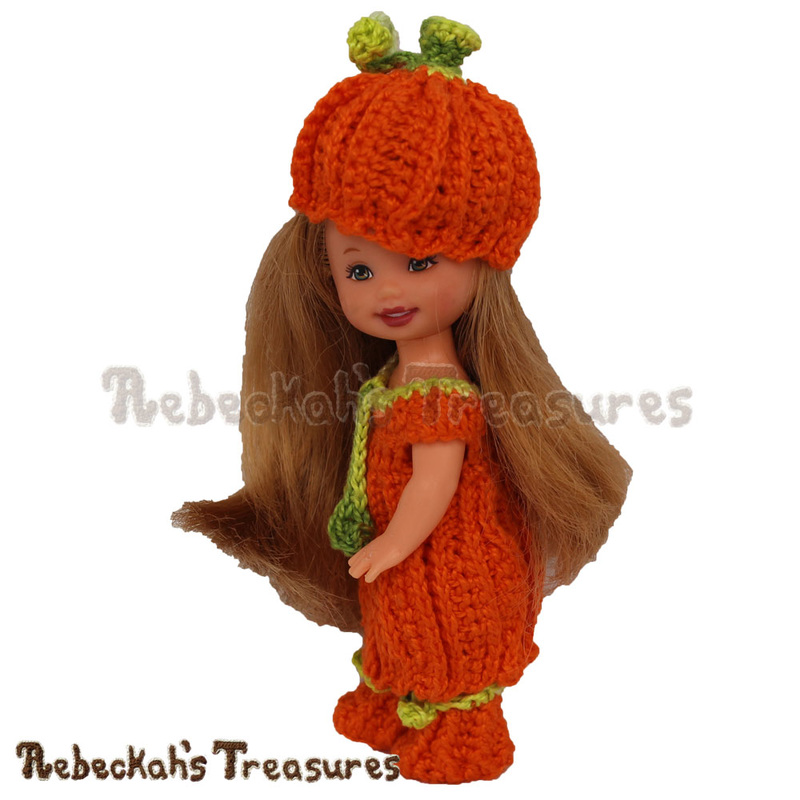
This fashion doll pattern includes written instructions, a 37 photo tutorial and 5 video tutorial clips for crocheting a cute pumpkin-themed outfit for child fashion dolls.
The set includes a hat, a dress and a pair of booties. Little girls everyone will be delighted with their pumpkin cuties! This project is my final contribution to the Designer's Potpourri CAL for October 2016, and is one of four free pumpkin patterns I shared this month. You can learn more about my pumpkin madness here and find all the crochet patterns now. I'll be back for the CAL with new designs in December. This pattern is also available as a printer friendly, 12-page PDF download. GRAB IT HERE for only $3.75 to show your support for Rebeckah's Treasures. Thank you! Queue it, LOVE it, and Add your Pumpkin Cutie projects to Ravelry here!
This pattern is copyrighted to Rebeckah Ferger of www.rebeckahstreasures.com. It is for personal use only. No part of this pattern may be copied or distributed in any way. If you sell what you make from this pattern, please credit me as the designer. All rights reserved, 2016

Supplies:
– less than 10m (11yd) in green
Special Abbreviations:
*BO of 2 (a.k.a. bobble of 2) = leaving the last 2 lps from each st on the hook, work 2 dc into the same st, yo & pull though all 3 lps. See how here...
*CL of 2 (a.k.a. cluster of 2 double crochet stitches or a variation of a dc2tog) = leaving the last 2 lps from each st on the hook, work 1 dc into each of the next 2 sts, yo & pull though all 3 lps. See how here... *CL of 3 (a.k.a. cluster of 3 double crochet stitches or a variations of a dc3tog) = leaving the last 2 lps from each st on the hook, work 1 dc into each of the next 3 sts, yo & pull though all 4 lps. *Note: This is worked just like a CL of 2 like in this video tutorial here, but over 3 sts instead of 2. *FPsc = When working the FPsc stitches on odd rows → insert your hook into the next st from front to back, then come back thru to the front by inserting your hook into the subsequent st from back to front – the hook is now wrapped around the post of the next st → work a normal sc here.
*FPdc = Work exactly like the FPsc, but use a dc stitch instead of a sc stitch.
Pattern Notes:
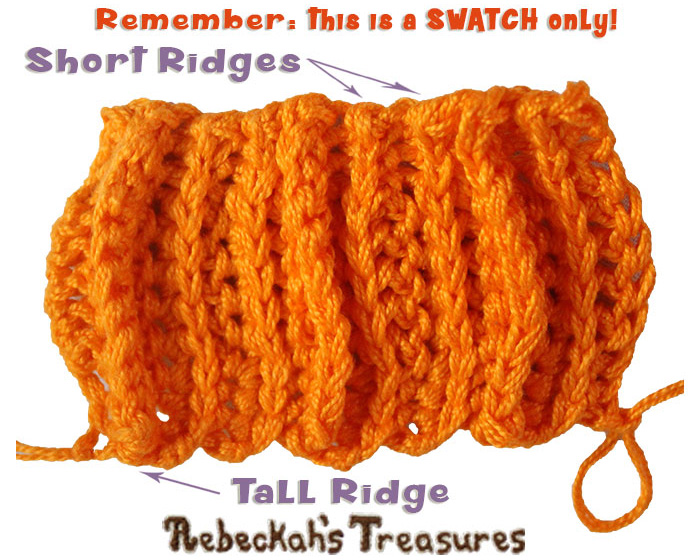
You should be familiar with basic crochet stitches (chs, sl sts, sc, hdc, dc), working in rows, rounds, front/back loops, front posts and how to do increases and decreases.
Special stitches you should be familiar with are the bobbles and clusters, since variations of both are used here. You should also know how to sc attach onto crochet pieces to start a new section. Decreases or tog sts are best worked by using the invisible decrease technique, where you only work in the front or back loops of a stitch. If you are unfamiliar with this technique, see my video tutorial here... On occasion, a recommended length for a starting or ending tail is suggested. This is the minimum length you will need because you will use these tails to stitch up seams. If you would like to make the tails longer just to be safe, you can do that too! If you run out of tail length for sewing, just cut some more thread and complete the seam. When a long tail is suggested instead of a specific length, simply fasten off where the wrapped thread reaches the side of your palm. When the number comes after the stitch, crochet across the stitches. However, when the number comes first, this is indicative of an increase, so work them into the same stitch or space as directed. Photo tutorial included here was created with a swatch, which is meant to guide you with stitch positioning for select rows. The exact stitch count is not shown in the photos, so be sure to follow the pattern correctly. The same is true for the video tutorial clips. You should also be familiar with hand sewing snaps or fasteners onto doll clothing. Additional notes are included as you come to them.
VERY IMPORTANT NOTES before you begin:
See Special Abbreviations for the FPsc and FPdc stitch instructions.
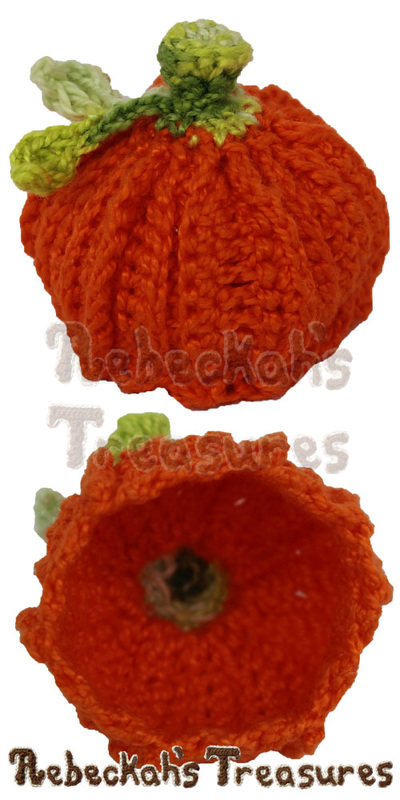
Ch 14 in orange...
Row 1: sc into the 2nd ch from hook & across the next 2 chs, dc 7, sc 3, ch 1, turn (13 sts). Row 2: sl st 3, sc 7, sl st 3, ch 1, turn (13 sts). *Rep for rows 8, 14, 20, 26 & 32. Row 3: work 2 rows down into the prev odd row (see tall ridge notes for more tips) → FPsc 3, FPdc 7, FPsc 3, ch 1, turn (13 sts). *Rep for rows 9, 15, 21, 27 & 33. *Click on images to enlarge them... 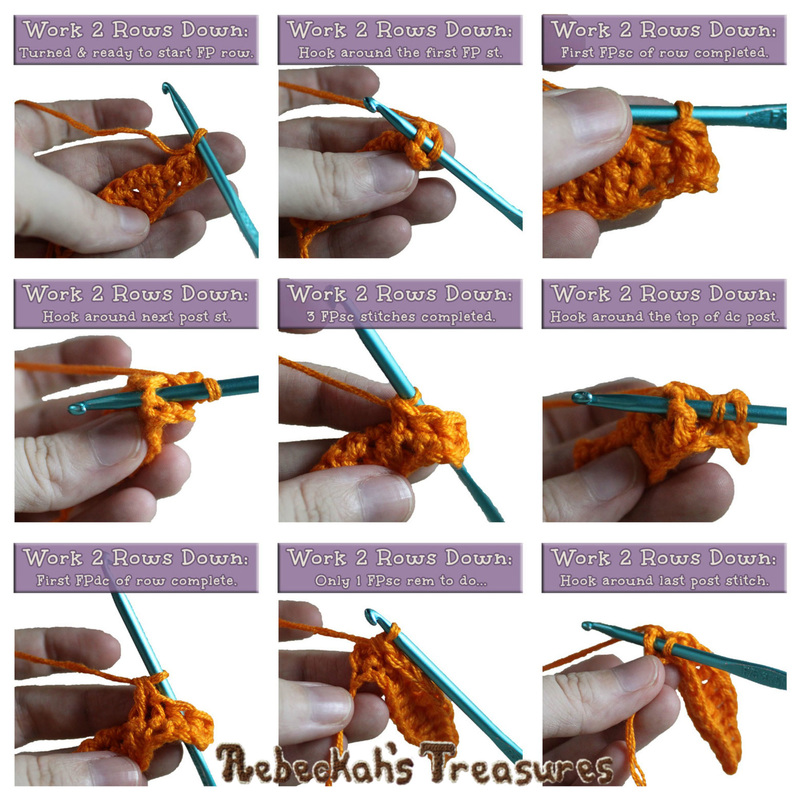
Row 4: sc 10, sl st 3, ch 1, turn (13 sts). *Rep for rows 6, 10, 12, 16, 18, 22, 24, 28, 30 & 34.
Row 5: work 1 row down into the prev row crocheted (see short ridge notes for more tips) → FPsc 3, FPdc 7, FPsc 3, ch 1, turn (13 sts). *Rep for rows 7, 11, 13, 17, 19, 23, 25, 29, 31 & 35. 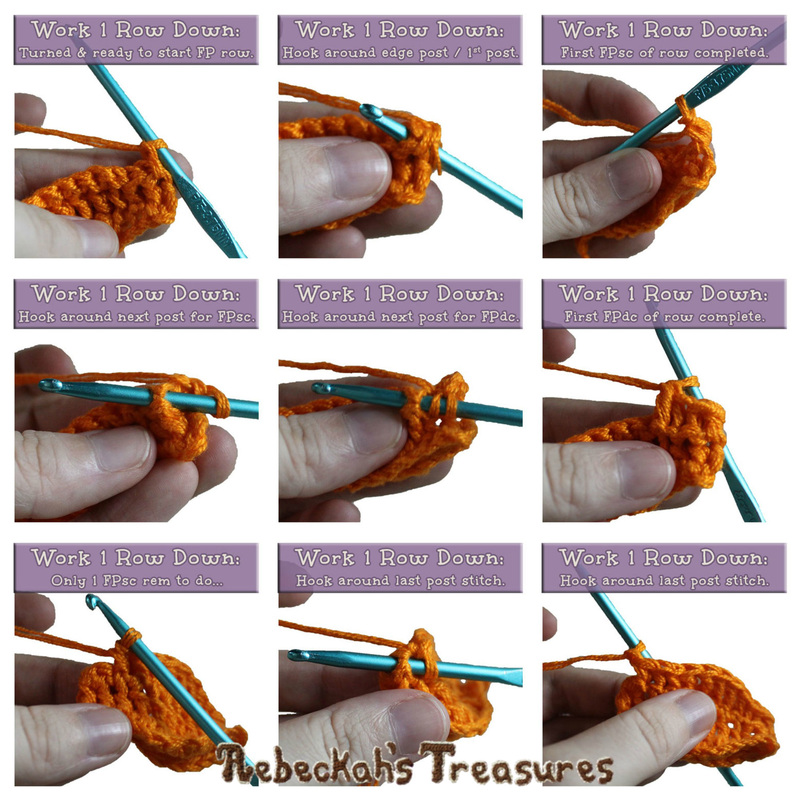
The final row of the pumpkin cutie hat body, will join the last row to the bottom of the first row and create a tube…
Row 36: working thru 2 sts at a time, insert hook into the next st on the last row made AND into the adjacent st on the bottom of the first row → sl st 3, sc 7, sl st 3, ch 1, do not turn (13sts). 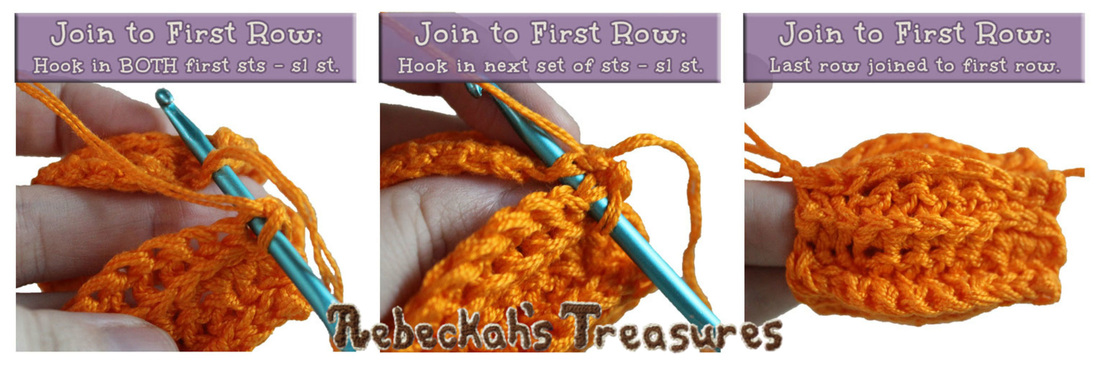
Part 2 – Close Up the Pumpkin Cutie Hat Instructions:
From here, you will switch from rows to rnds as you close up the top of the hat and start working the pumpkin stem and leaf vine. *ODD rows = RS.
VERY IMPORTANT Terminology before you continue to row 37:
Continuing where you left off, work rnd 37 along the top side edge of the pumpkin cutie hat body rows…
Rnd 37: RS faces you, sk the sps between ridges → sc 1 into each ridge st around, ending with the ridge from row 36, sl st join to the first st of the rnd – switch to green here, ch 1, turn (18 sts). 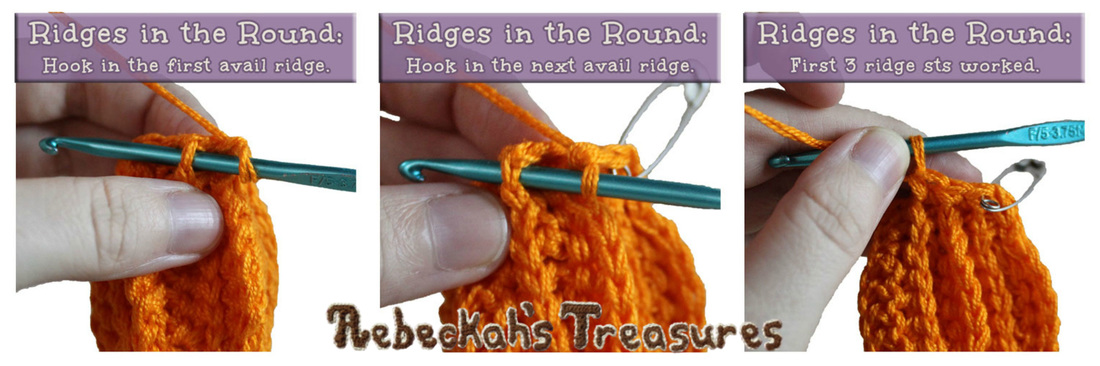
See Special Abbreviations for the CL of 3 stitch instructions
Rnd 38: work all sc2tog in BLO → sc 1, sc2tog, start leaf vine → *ch 12, sl st into the 2nd ch from hook, CL of 3, hdc 1, sc 1,** sl st 1, ch 8, rep from * to **, sl st 5 over rem chs – end leaf vine, [sc 1, sc2tog] 5 times, do not turn (12 sts + 1 leaf vine with 2 leaves).
From here, work in continuous rnds. Do not turn at the end of rnds. *Side facing you = WS. Rnd 39: work into BLO →, skipping over the leaf-vine section work → sc2tog around 6 times, ch 1, turn (6 sts). Rnd 40: work into BLO → sc 6, ch 1, turn (6 sts). Rnd 41-42: sc 6 – 2 rnds (6 sts). *OR for only ONE rnd for a shorter stem. Rnd 43: sc 2 into each st around (12 sts). *For a little dip at the top of the stem, omit the last rnd & end here. Rnd 44: work into FLO → sc2tog around 6 times, sl st join, f/o at the end of the last rnd with a small tail (6 sts). If you ended on rnd 44, use the small tail to close the opening of the stem. Otherwise, simply weave in all ends, and fold the leaf vine down so they rest against the Pumpkin Cutie Dress Instructions:
Ch 17 in orange...
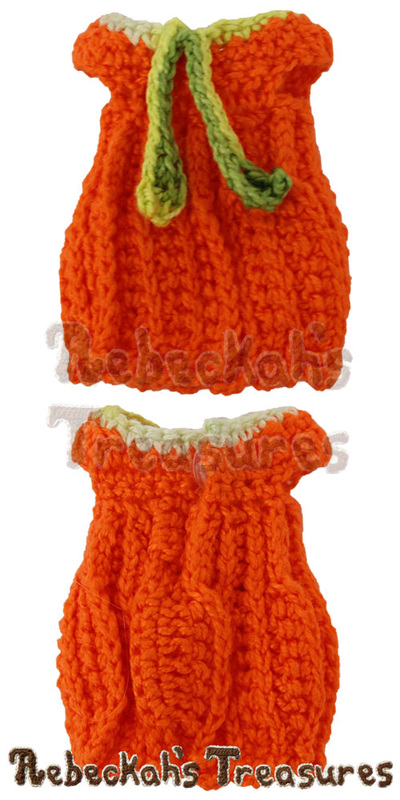
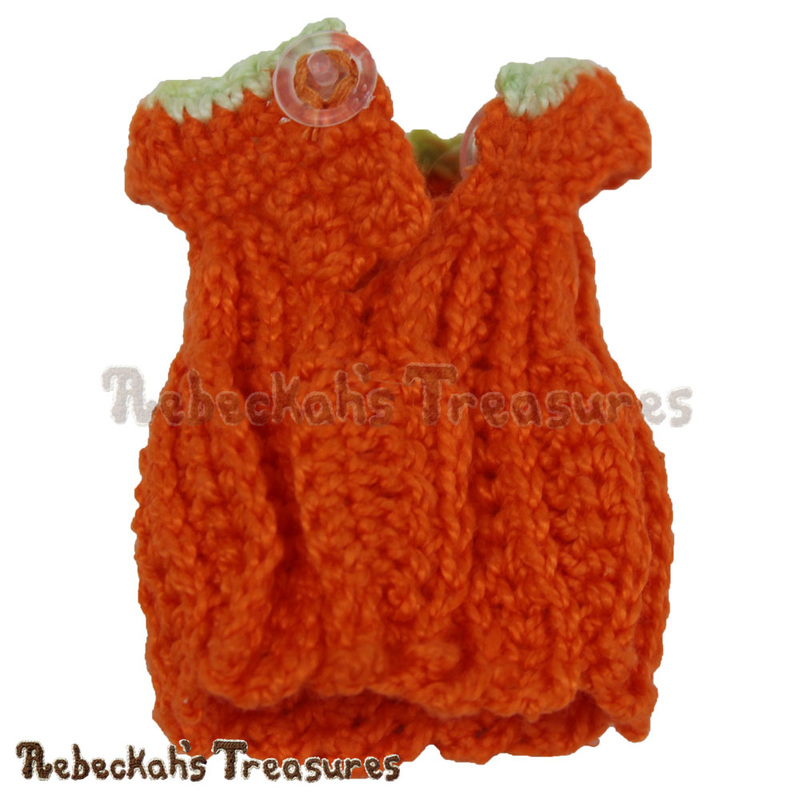
Row 1: sc into the 2nd ch from hook & across the next 5 chs, dc 7, sc 3, ch 1, turn (16 sts). Row 2: sl st 3, sc 7, sl st 6, ch 1, turn (16 sts). *Rep for rows 8, 14, 20, 26 & 32. Row 3: work 2 rows down into the prev odd row (see tall ridge notes for more tips) → FPsc 6, FPdc 7, FPsc 3, ch 1, turn (16 sts). *Rep for rows 9, 15, 21, 27 & 33. Row 4: sc 10, sl st 6, ch 1, turn (16 sts). *Rep for rows 6, 10, 12, 16, 18, 22, 24, 28, 30 & 34. Row 5: work 1 row down into the prev row crocheted (see short ridge notes for more tips) → FPsc 6, FPdc 7, FPsc 3, ch 1, turn (16 sts). *Rep for rows 7, 11, 13, 17, 19, 23, 25, 29, 31 & 35. Row 6-7: rep rows 4-5. *This set creates another short ridge. Row 8-35: rep rows 2-7 alternately. *TIP: Every 6 rows, you create one rep of 1-Tall & 2-Short ridges. The final row of the pumpkin cutie dress skirt, will join the beg of last row to the adjacent stitches along the bottom of the first row and create a tube with a slit… Row 36: working thru 2 sts at a time, insert hook into the next st on the last row made AND into the adjacent st on the bottom of the first row → sl st 3, sc 7, sl st 3, no join from here-onwards, work only into the last row → sc 3, ch 1, turn (16 sts). *The last 3 sts is the start of the dress’ bodice overlap for the fastener. Row 37-40: sc 3, ch 1, turn – 4 rows (3 sts). 
*This video tutorial is for working rows 36-41 of the Pumpkin Cutie Dress.
Part 2 – Pumpkin Cutie Dress Bodice Instructions:
From here, you will start working the pumpkin cutie dress bodice. *ODD rows = RS.
VERY IMPORTANT Terminology before you continue to row 41:
Continuing where you left off, work row 41 along the top side edge of the pumpkin cutie dress skirt base rows…
Row 41: RS faces you, sk the sps between ridges unless directed to work into them → sc 4 across the side edge of rows 39-36, sc 1 into the next avail ridge (on row 34), sc 1 into each of the next 2 avail ridges, sc 1 into sp between ridges (on row 29), *[sc 1 into the next avail ridge, sc 1 into sp between ridges] 2 times,** sc 1 into each of the next 6 ridges, sc 1 into sp between ridges, rep from * to **, sc 1 into each of the rem 4 ridges, securing the last one to the last side edge st, ch 1, turn (27 sts). 
Part 3 – Pumpkin Cutie Dress Trim Instructions:
Work one final row to create the leaf-vine trim of the pumpkin cutie dress bodice. *Side facing you = WS. See Special Abbreviations for the CL of 3 stitch instructions.
Row 45: make a slip knot in green & with WS facing you → sc attach to the last st made in row 44, sc 11, start leaf vines → ch 12, sl st into the 2nd ch from hook, 3 dc into the next ch, *hdc 1, sc 1, sl st 7,** ch 14, sl st into the 2nd ch from hook, CL of 3, rep from * to ** – end leaf vines, sc 15, ch 1, f/o (27 sts + 2 leaf vines).
Weave in all ends. Fold vines down, so they rest against the dress. Sew snaps or fastener of choosing onto the top-back, 3 overlapping sts of the dress.
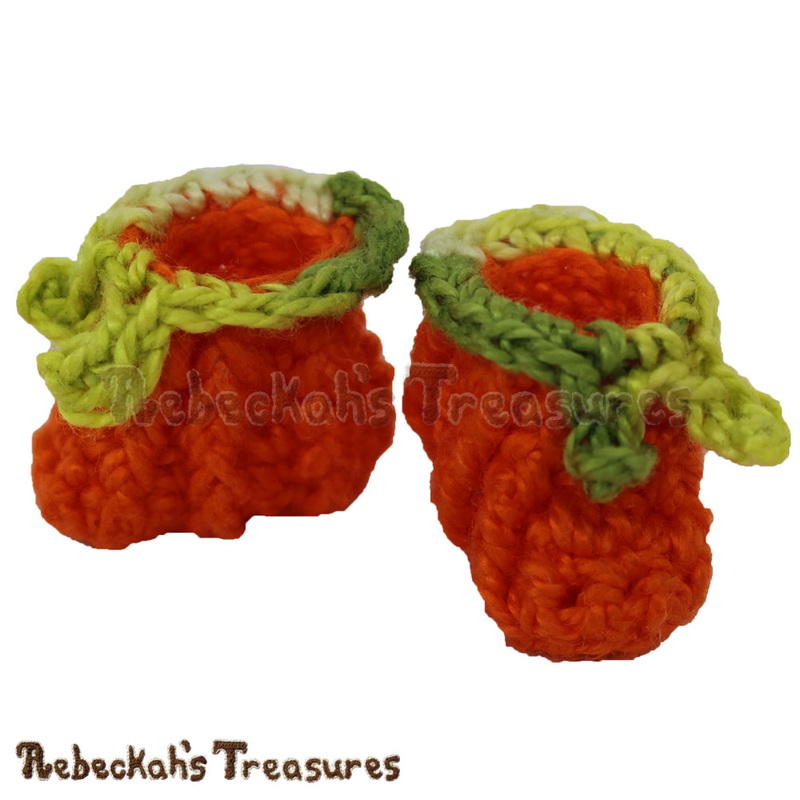
Part 1 – Pumpkin Cutie Bootie Base Instructions:
The first 2 rnds of the booties create the sole. *ODD rows = RS. Ch 7 in orange... Rnd 1: work into BLO of chs → 2 sc into the 2nd ch from hook, sc 4, 2 sc into the last ch, work into the unworked FL of chs → 2 sc into the first ch, sc 4, 2 sc into the last ch, sl st join to the first st of rnd, ch 1, turn (16 sts). Rnd 2: work into FLO → sc 16, sl st join, ch 1, turn (16 sts).
Part 2 – Pumpkin Cutie Bootie Body Instructions:
The next 5 rnds of the booties create the body of the boot. From here, do not turn at the end of rnds, work the first st of each rnd into the same st as the sl st join, and the side facing you = RS. VERY IMPORTANT Notes before you continue to rnd 3: The FPdc stitches of these booties are the exception to the rule for FPdc stitches instructions above. This time, you will work around the prev dc post like a normal FPdc, rather than at the top of the post into the stitches like is done above for the hat and dress. See Special Abbreviations for the CL of 2 stitch instructions.
Rnd 3: *[sc 1, FPdc 1, sk 1 st] 2 times, sc 1,** FPdc 1, sk 2 sts, sc 2, FPdc 1, sk 2 sts, rep from * to **, sl st join, ch 1, do not turn (14 sts).
Rnd 4: [sc 1, FPdc 1 around FPdc st from prev rnd, sk 1 st] 2 times, *FPdc 1 around FPdc st from prev rnd, sk 2 sts,** CL of 2, rep from * to **, [FPdc 1 around FPdc st from prev rnd, sk 1 st, sc 1] 2 times, sl st join, ch 1 (11 sts). Rnd 5-7: [sc 1, *FPdc 1 around FPdc st from prev rnd, sk 1 st**] 2 times, rep from * to **, sc 1, rep from * to ** twice, sc 1, rep from * to **, sc 1, sl st join, ch 1 – 3 rnds, f/o at the end of the last rnd (11 sts).
Part 3 – Pumpkin Cutie Bootie Trim Instructions:
The final rnd of the booties create a leaf-vine trim. *Side facing you = WS. Rnd 8: make a slip knot in green, with WS facing you & working in BLO → sc attach to the last sc made in rnd 7, sc 4, *start leaf vine → ch 4, sc into the 2nd ch from hook, sl st 2 over rem chs – end leaf vine,** sc 1, rep from * to **, sc 4, 2 sc into the last st, sc 1 into the first st sp again, sl st join, f/o (13 sts + 2 leaf vines). Weave in all ends. Instructions to Dress the Doll:
Step 1: Lift the doll’s arms upwards.
Step 2: Fold the top part of the dress with the arm-holes downwards to expose the dress-skirt opening. Insert the doll’s legs into this opening and push up to the doll’s waist. Step 3: Bend the doll’s arms down and insert each one into their respective armholes. Push the dress up and close the fastening. Make any necessary adjustments to the dress. Step 4: Separate the doll’s legs and insert one foot at a time into their respective booties. Step 5: Place the hat onto the doll’s head, however you would like to see it.
Thanks Margie E. and Theresa P. for your help tech editing this Pumpkin Cutie doll pattern!
Thanks so much for visiting today! If you have any questions, or need pattern help, comment below OR visit my one of my groups / communities on Facebook, Google+ or Ravelry. Have a happy, spooky Halloween!!! And, be sure to checkout this year's Fall into Christmas Crochet Contest! Submissions end 12-04-16.  
Hello Visitor and Welcome to Rebeckah's Treasures... I am a Norwegian/Canadian currently studying Midwifery in the UK. I love to crochet! At Rebeckah's Treasures, I share my crochet patterns and treasures. I hope they inspire you to crochet your own little treasures too... 
Comments
|


Hello, my name is Rebeckah.
I hope my crochet inspires you to create your very own treasures! Learn more about me... Categories
All
Archives
October 2021
© 2012-2021 Rebeckah Ferger
All rights reserved. Disclaimer: This website makes use of sponsored and/or affiliate links. Please see this page for more information.
|
- Home
-
-
- Special Offers
- New Releases
- Accessory Crochet Patterns
- Afghan Square Crochet Patterns
- Amigurumi Crochet Patterns
- Applique Crochet Patterns
- Baby Crochet Patterns
- Dolly Crochet Patterns
- Fashion Doll Crochet Patterns
- Free Downloads
- Holiday Crochet Patterns
- Tapestry Crochet Patterns
- Under the Sea Crochet Patterns
- Wedding Crochet Patterns
- Disclaimer and FAQs
-
-
- Free Crochet Patterns
- New Free Releases
- Free Accessory Crochet Patterns
- Free Afghan Square Crochet Patterns
- Free Amigurumi Crochet Patterns
- Free Applique Crochet Patterns
- Free Baby Crochet Patterns
- Free Dolly Crochet Patterns
- Free Fashion Doll Crochet Patterns
- Free Guest Crochet Patterns
- Free Holiday Crochet Patterns
- Free Tapestry Crochet Patterns
- Free Under the Sea Crochet Patterns
- Free Wedding Crochet Patterns
- Free Crochet Patterns Coming Soon
Welcome Visitor! I hope you enjoy my treasures.


 RSS Feed
