|
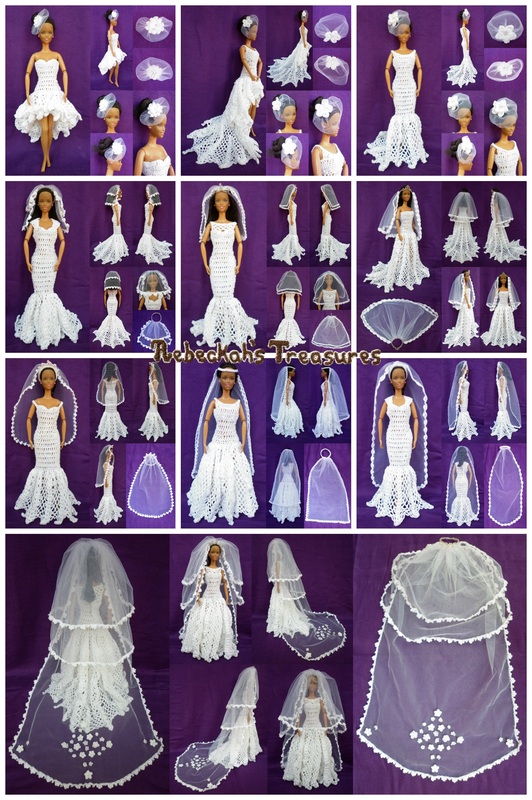
Disclaimer: This website makes use of sponsored and/or affiliate links. Please see this page for more information.  After all the craziness last week, I am happy to say that I am finally finished with the veils and their pattern! This pattern is a guideline for making all sorts of stylish veils for fashion dolls like Barbie. It includes instructions for re-creating the veils pictured, plus how to design your own in all 8 of the different veil lengths (cage, shoulder, elbow, wrist, fingertip, intermission, chapel and cathedral), how to assemble them, and several crochet edgings or trims that you can use on your veils. Continue below for the pattern... This pattern is copyrighted to Rebeckah Ferger of www.rebeckahstreasures.com. It is for personal use only. No part of this pattern may be copied or distributed in any way. If you sell what you make from this pattern, please credit me as the designer. All rights reserved, 2014. You’ll Need: |
| ch sl st sc dc RS WS st(s) sp sk yo f/o shell double V picot floral picot | chain slip stitch single crochet double crochet right side wrong side stitch(es) space skip yarn over fasten off dc 5 into the same st (dc 2, ch 1, dc 2) into the same st ch 3, then insert your hook into the v of last sc and down the front of that st, yo, pull all the way though. see 1st example in this video tutorial by Moogly just like the picot, only you will do the picot 3 times into the same st |
Pattern Notes & Choices:
Before you can actually get started on your veil, there are are few things you need to do first:
Return to Table of Contents
- Pick your Veil Length, how many Tiers you would like it to have, and whether you will have a straight or curved edging.
- Pick the Headpiece (for all veil lengths minus the cage) or Flower (for cage veil only) you will use as your Veil Base.
- Pick the Edging or Trim you would like to use on your Veil either from one below or your own choosing.
- Decide whether or not you will use any embellishments like the floral appliques here. (You can always decide if you want this later).
- Once you've made all your decisions, then you can go to the veil instructions!
Return to Table of Contents
Veil Lengths & Tier Notes:
There are 8 veil lengths, and from shortest to longest, they are called Cage, Shoulder, Elbow, Wrist, Fingertip, Intermission, Chapel and Cathedral. Several are named in accordance to what part of the body they reach. Each can have as many tiers as you like, though I recommend 1-3 tiers.
Depending on how dramatic or simple you would like your veil to be, I recommend a width of at least 5” to a max of 15” (12.5 cm - 38 cm), respectively. For most of the examples below, I used a width of 6” or 12” (15 cm - 30 cm). If you will only do 1 tier, it is best to stick to the shorter widths. If you do 2 or more tiers, you can make them wider. See each of the veil length below for recommended lengths and how to make each one pictured.
Return to Table of Contents
Cage Veil Notes & Instructions:
A cage veil covers just a part of the head or face.
Length: 2” (5 cm) for the doubled up shorter cage veil (pictured to the left) and the regular cage veil (pictured to the bottom left), or 4” (10 cm) if doing the longer cage veil doubled up (pictured to the bottom right).
Width: 5”- 5.25” (12.5 cm - 13.5 cm)
1) Cut tulle.
2) With scrap yarn (same as the one you used to make the statement flower) and a yarn needle, weave the yarn though one of the width sides of the piece. Then crossover to the starting side and weave the yarn down that side. Put tail from the first corner into the needle and repeat to the opposite side. You should now have the top long side and the two shorted sides weaved.
3) Pull tight on both ends and tie a knot to fasten it closed. (You will use the tails to attach flower soon...)
4) Take jewelry wire and cut it to about 1” (2 or 3 cm). Fold it in half and insert into center of statement flower and into the tulle where you tightened it.
5) Sew flower into place, making sure to sew in between the 2 prongs of the wire too. Tie a knot and weave tails into the flower a few times.
6) Trim ends of wire (if need be), so that they are even and and each prong is no longer than 0.5” (1 cm).
- The first cage veil above, uses the 15 Picot Flower and the doubled up short veil lengths.
- The next cage veil to the bottom left, uses the Double Rnd 2 - 5 Picot Flower and the regular veil length.
- The last cage veil to the bottom right, uses the Double Rnd 2 - 5 Petal Flower and the doubled up long veil length.
Have fun experimenting with different sizes and flowers!
 |  |
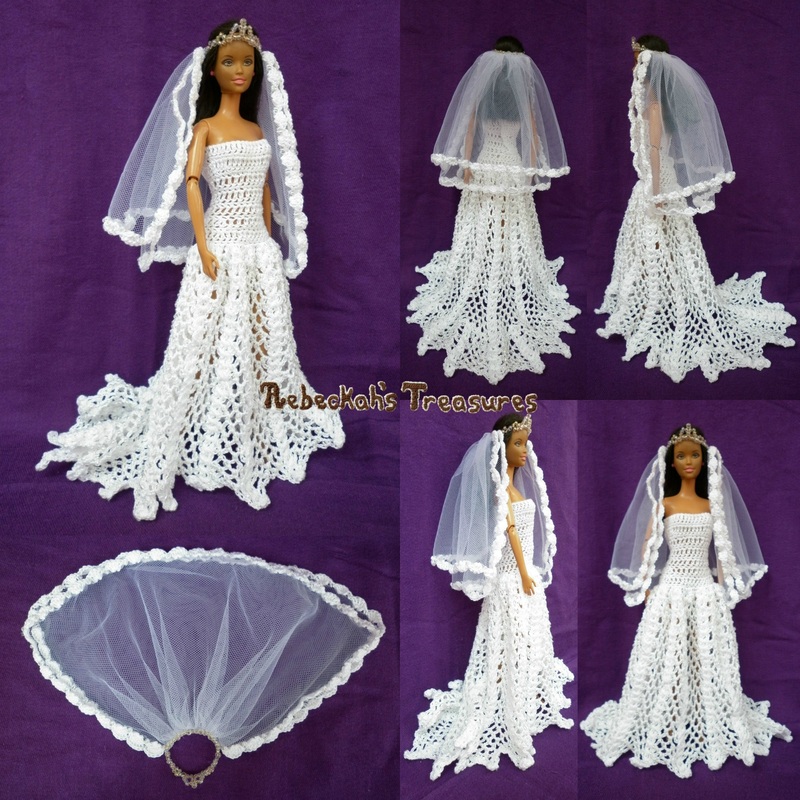
Shoulder Veil Notes:

A shoulder veil goes only as far as the shoulders.
Length: 3.5” (9 cm) (pictured to the left)
Tiers: 1-2 (2 tiers pictured to the left)
For this shoulder veil pictured: Straight Corners
Cotton Thread #10 and a 1.05mm hook were used.
Cut a piece of tulle to 6” x 6” (15 cm x 15 cm).
Length = 3.5” (shoulder tier) + 2.5” (top tier) (9 cm + 6 cm)
Width = 6” (15 cm)
Crochet Edging = Floral Picot - Variation: omit the picots
Headpiece = Beaded Headband
Top of veil is gathered to 1.25” (3 cm) and is sewn next to 9 of the 36 beads, or over 1/4 of the headpiece.
Return to Table of Contents
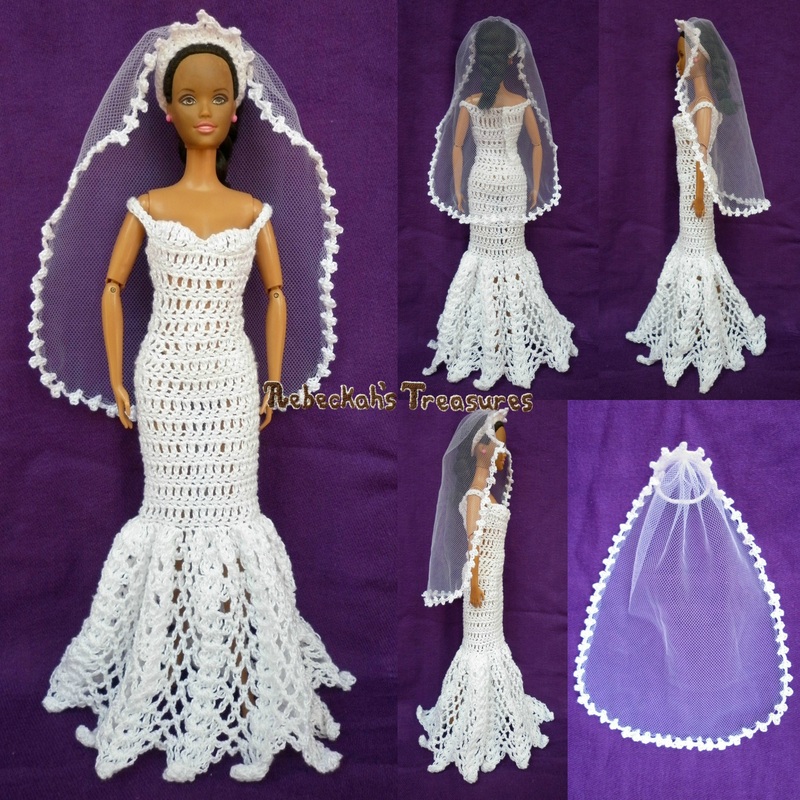
Elbow Veil Notes:
An elbow veil goes only as far as the elbows.
Length: 4.5” (11.5 cm) (pictured to the left)
Tiers: 1-2 (2 tiers pictured to the left)
For this elbow veil pictured: Straight Corners
Cotton Thread #60 and a 0.6mm hook were used.
Cut a piece of tulle to 9.25” x 6” (23.5 cm x 15 cm).
Length = 4.75” (elbow tier) + 4.5” (top tier) (12 cm + 11.5 cm)
Width = 6” (15 cm)
Crochet Edging = Picot - Variation: none
Headpiece = Renaissance Tiara
Top of veil is gathered all the way, and is sewn to the center peak of the tiara.
Return to Table of Contents
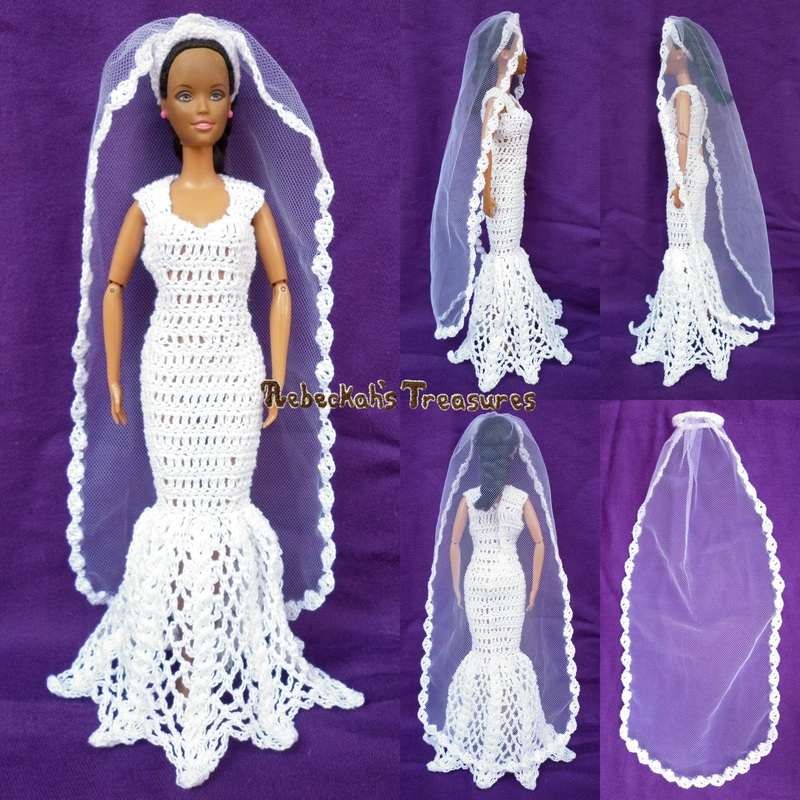
Wrist Veil Notes:
A wrist veil goes only as far as the wrists.
Length: 6” (15 cm) (pictured to the left)
Tiers: 1-2 (2 tiers pictured to the left)
For this wrist veil pictured: Straight Corners
Cotton Thread #10 and a 1.05mm hook were used.
Cut a piece of tulle to 12” x 12” (30 cm x 30 cm).
Length = 6” (wrist tier) + 6” (top tier) (15 cm + 15 cm)
Width = 12” (30 cm)
Crochet Edging = Shell - Variation: one 2mm seed bead for each sc apart from the first and last sc of each tier (about 80 beads are needed)
Headpiece = Royal Tiara
Top of veil is gathered to 2.25” (5.5 cm) and is sewn next to 18 beads, or over about half of the center back portion of the tiara.
Return to Table of Contents
Fingertip Veil Notes:
A fingertip veil goes only as far as the fingertips.
Length: 7.5” (19 cm) (pictured to the left)
Tiers: 1-2 (1 tier pictured to the left)
For this fingertip veil pictured: Curved Corners
Cotton Thread #10 and a 1.05mm hook were used.
Cut a piece of tulle to 7.5” x 6” (19 cm x 15 cm).
Length = 7.5” (19 cm)
Width = 6” (15 cm)
Crochet Edging = Chains - Variation: add a picot before chs
Headpiece = Crochet Picot Tiara 2
Top of veil is gathered all the way. Sew veil over all 5 peaks of the tiara - you’ll need to sew parts of the side of the veil to get the right length.
Return to Table of Contents
Intermission Veil Notes:

An intermission veil goes to the knee approximately.
Length: 9” (23 cm) (pictured to the left)
Tiers: 1-2 (2 tiers pictured to the left)
For this pictured intermission veil: Straight Corners
Cotton Thread #10 and a 1.05mm hook were used.
Cut a piece of tulle to 18” x 6” (46 cm x 15 cm).
Length = 9” (intermission tier) + 9” (top tier) (23 + 23 cm)
Width = 6” (15 cm)
Crochet Edging = Chains - Variation: none
Headpiece = Crochet Headband
Top of veil is gathered to 0.5” (1 cm) and is sewn over the back 5 stitches of the headband.
Return to Table of Contents
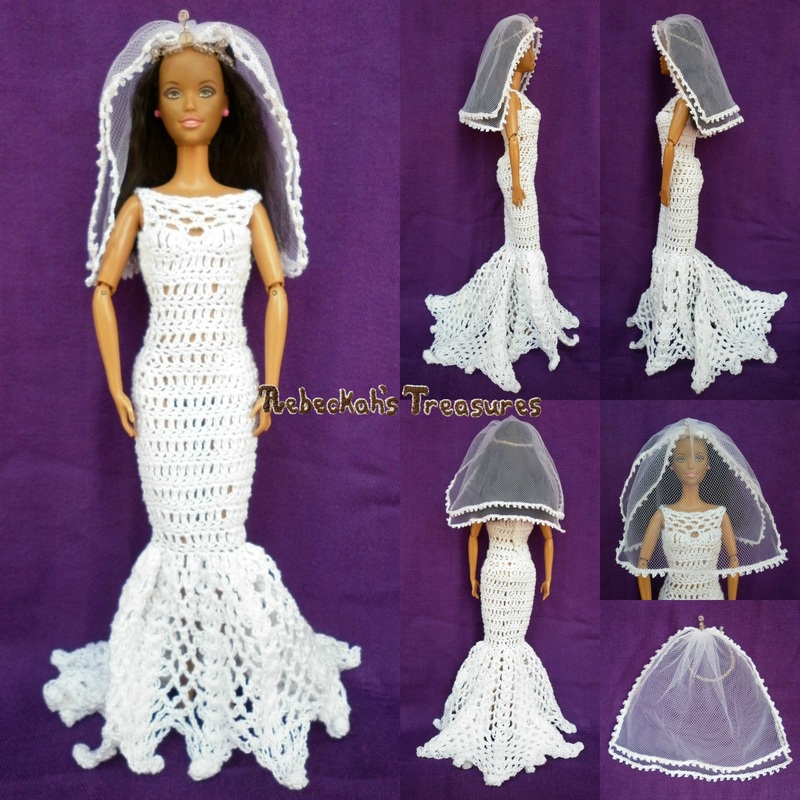
Chapel Veil Notes:
A chapel veil reaches the heels or just passed them.
Length: 13” (33 cm) (pictured to the left)
Tiers: 1-3 (1 tier pictured to the left)
For this chapel veil pictured: Curved Corners
Cotton Thread #10 and a 1.05mm hook were used.
Cut a piece of tulle to 13” x 6” (33 cm x 15 cm).
Length = 13” (33 cm)
Width = 6” (15 cm)
Crochet Edging = Shell - Variation: switch shells to double V sts. Start and end with 4 sc sts.
Headpiece = Crochet Double-V & Shell Tiara
Top of veil is gathered to 0.5” (1 cm) and is sewn over the front 5 stitches of the tiara.
Return to Table of Contents
Cathedral Veil Notes:
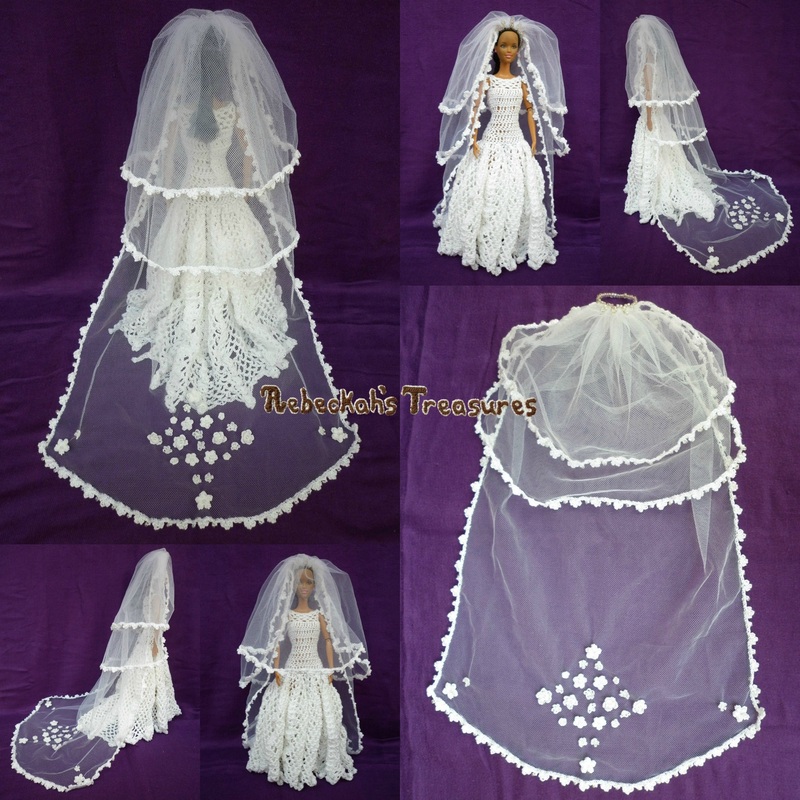
A cathedral veil extends way passed the heels.
Length: 15”-18” (38-45 cm) (pictured to the left)
Tiers: 1-3 (3 tiers pictured to the left)
For this cathedral veil pictured: Curved Corners
Cotton Thread #10 and a 1.05mm hook were used.
Cut a piece of tulle to 6” x 12” (15 cm x 30 cm), and another to 6” x 12” (15 cm x 30 cm).
Length 1 = 18” (cathedral tier) + 7” (top tier) (45 + 18 cm)
Length 2 = 9” (middle tier) (23 cm)
Width = 12” (30 cm)
Crochet Edging = Floral Picot - Variation: switch picots to ch 1 picots with a 2mm seed bead (approximately 120 beads) start & end with 7 sc before doing the first & last floral picots per tier, and do 3 sc between each floral picot and picot.
Headpiece = Regal Tiara
Top of veil is gathered to 1.25” (3 cm) and is sewn next to the front portion of the tiara from peak 1 to peak 5. 28 various floral appliques are used, and a few of them have beads sewn to the center of the flower as I sewed them to the veil.
Return to Table of Contents
Crochet Edging / Trim Notes:
Below, there are 4 crochet edgings, each with several variations, that you can choose from to crochet the around the edge of your veils. You can crochet with beads for each variation too (thread beads before crocheting). Choose from one of these, invent your own, or use your favourite edging (edging should have 1 rnd only). Note: you may like to do several sc before starting the edgings to keep it smaller at the base (around the crown) of the veils.
The hook and yarn sizes are pretty flexible. You can use any cotton thread between sizes 10 and 60, and any hook size between 0.6mm and 1.05mm. Personally, I prefer using thread #10 with a 1.05mm hook, but use whichever sizes you prefer. Take a small swatch of tulle and test your edging on it to see how it will look and how many tulle squares you need to skip (if any) in order to keep the edge straight. (In the swatches below, I have done one side with thread #10 + 1.05mm hook, one corner with thread #60 + 0.6mm hook, and the last corner with thread #20 + 0.6mm hook)
Return to Table of Contents
The hook and yarn sizes are pretty flexible. You can use any cotton thread between sizes 10 and 60, and any hook size between 0.6mm and 1.05mm. Personally, I prefer using thread #10 with a 1.05mm hook, but use whichever sizes you prefer. Take a small swatch of tulle and test your edging on it to see how it will look and how many tulle squares you need to skip (if any) in order to keep the edge straight. (In the swatches below, I have done one side with thread #10 + 1.05mm hook, one corner with thread #60 + 0.6mm hook, and the last corner with thread #20 + 0.6mm hook)
- If you use the smallest thread size #60, then EACH tulle square is equivalent to ONE stitch space. This means that if you were to do a single crochet edging around the whole piece, you would do one single crochet stitch in every tulle square around the boarder.
- If you use the largest thread size #10, then TWO tulle squares are equivalent to ONE stitch space. This means that if you were to do a single crochet edging around the whole piece, you would do one single crochet stitch in every other tulle square around the boarder. In other words, single crochet in one tulle square and skip the next.
- If you use any thread size in between those two like #20, then every 1-2 tulle squares is equivalent to ONE stitch space (smaller hooks: EACH tulle square = ONE stitch space AND larger hooks: TWO tulle squares = ONE stitch space).
Return to Table of Contents
Chains Edging Instructions: | Picot Edging Instructions: |
Floral Picot Edging Instructions: | Shells Edging Instructions: |
Getting Started & Veil Instructions:
Once you have got the general idea for how you want to make your veil, here is the gist of what you’ll do for all the veils minus the cage veil:
1) Cut the tulle to the appropriate size. You’ll want to make sure you are cutting the tulle straight and in line with the tulle squares. Use the little tulle squares as a guide.
3) Mark the top horizontal line of the tulle with some scrap cotton thread and yarn needle. If length is longer for 2 tiers, you’ll mark the dividing line between them.
4) Mark the perimeter where you would like your crochet edging to go with some scrap cotton thread and yarn needle. You’ll want to start at the bottom center of each tier and work your way evenly to either side. You’ll also need to leave at least 3 tulle squares around the boarder as a sort of seam allowance. Depending on the crochet edging, hook and yarn size you’ve chosen, I recommend you skip a certain number of squares and just mark where the signature part of the design will go (see crochet edgings for more details). You could omit this step, but it is easier to make the crochet edging even and precise when you do this.
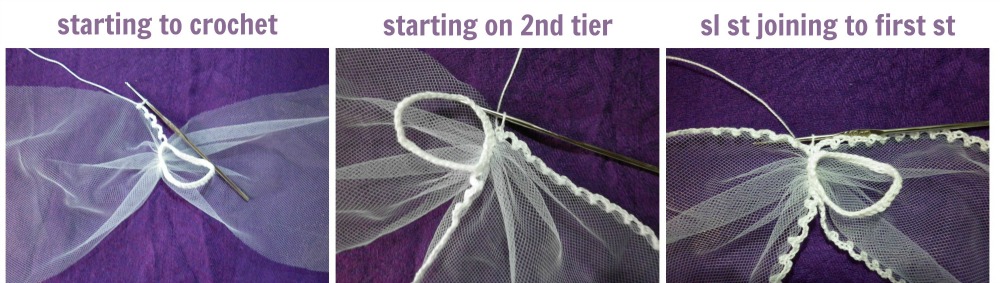
6) Crochet the Trim. With RS facing you, and starting on the top left side, crochet around the edge of your tier with your chosen trim right into the places you marked. If doing more that 1 tier, always start with the longest or bottom tier, work you way around to the top tier, sl st join to first stitch, ch 1 - fasten off here if doing 2 tiers, or continue to work your way around the middle tier, sl st joining to the last stitch of the bottom tier, ch 1, fasten off, weave in all ends.
7) Add any embellishments. Make sure to fasten off with a tail long enough to sew each applique to the veil.
Return to Table of Contents
1) Cut the tulle to the appropriate size. You’ll want to make sure you are cutting the tulle straight and in line with the tulle squares. Use the little tulle squares as a guide.
- For 1 Tier, cut it to the recommended length x width of your choosing.
- For 2 Tiers, cut it as one piece adding both recommended lengths together x width of your choosing.
- For 3 Tiers, cut the first and last tiers as one piece like for 2 Tiers, and the middle tier like for 1 Tier.
3) Mark the top horizontal line of the tulle with some scrap cotton thread and yarn needle. If length is longer for 2 tiers, you’ll mark the dividing line between them.
4) Mark the perimeter where you would like your crochet edging to go with some scrap cotton thread and yarn needle. You’ll want to start at the bottom center of each tier and work your way evenly to either side. You’ll also need to leave at least 3 tulle squares around the boarder as a sort of seam allowance. Depending on the crochet edging, hook and yarn size you’ve chosen, I recommend you skip a certain number of squares and just mark where the signature part of the design will go (see crochet edgings for more details). You could omit this step, but it is easier to make the crochet edging even and precise when you do this.
- Extra Step for Curved Edges... Cut the excess tulle away leaving the recommended seam allowance.
- Extra Step for 3 Tiers... Line up the top horizontal line of the middle tier to the dividing line of the first and last tiers so that the top 2 tiers are to the one side and the longer bottom tier is to the other. You’ll need to re-trace the horizontal line with a scrap cotton thread (for crochet headpieces) or nylon thread (for beaded crochet pieces), so that you are “sewing them” together.
6) Crochet the Trim. With RS facing you, and starting on the top left side, crochet around the edge of your tier with your chosen trim right into the places you marked. If doing more that 1 tier, always start with the longest or bottom tier, work you way around to the top tier, sl st join to first stitch, ch 1 - fasten off here if doing 2 tiers, or continue to work your way around the middle tier, sl st joining to the last stitch of the bottom tier, ch 1, fasten off, weave in all ends.
7) Add any embellishments. Make sure to fasten off with a tail long enough to sew each applique to the veil.
Return to Table of Contents
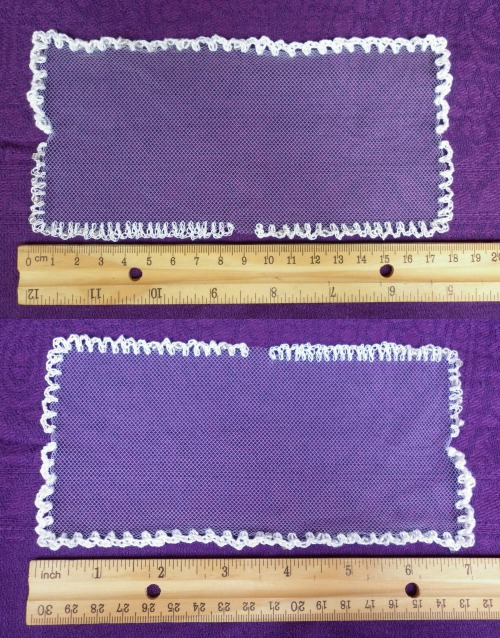
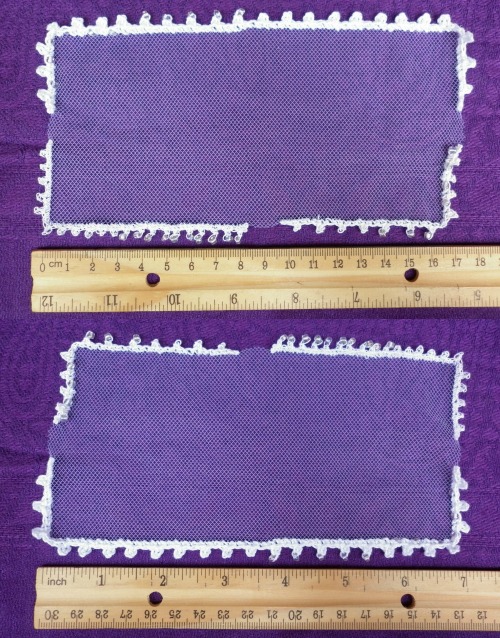
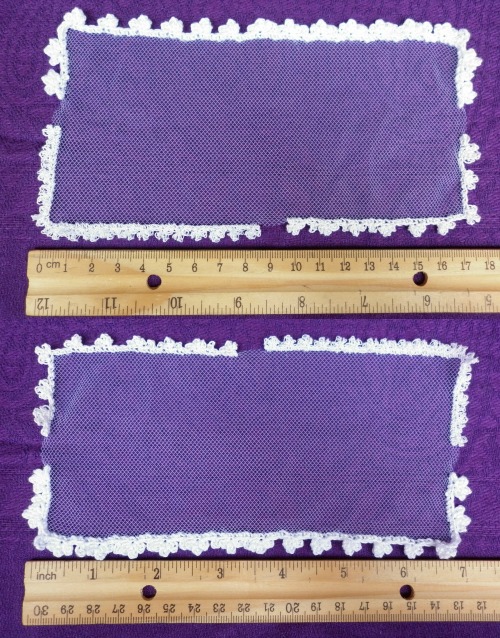
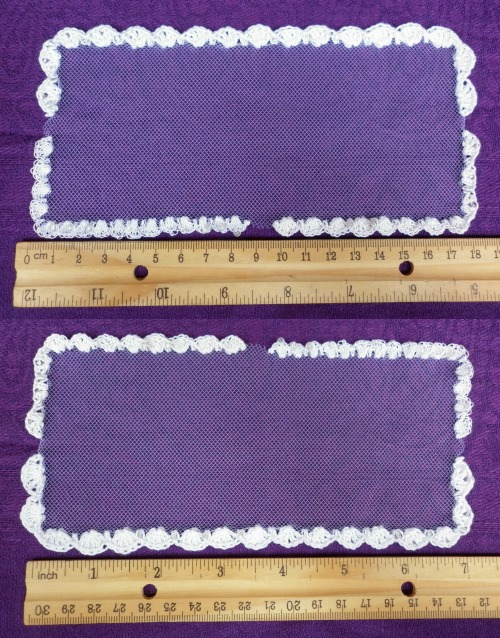
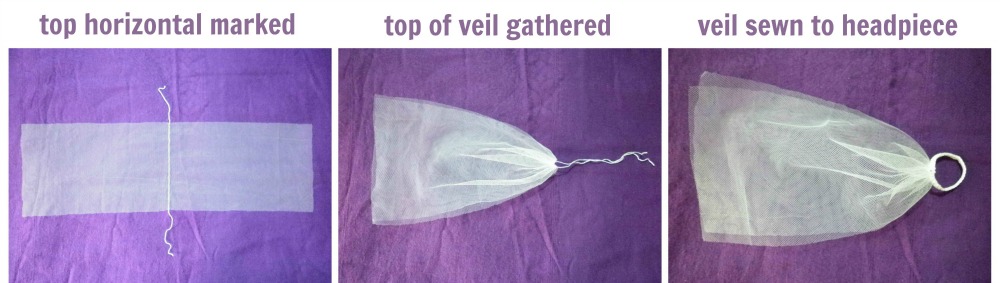
Veil Work-in-Progress Pictures:
The following group of 6 pictures is the WIP of the Intermission Veil. Because I used a very simple edging, I didn’t bother marking all the way around the perimeter of the veil, nor did I mark the vertical center. You can use the following WIP Pics as a general guide to making your veils...
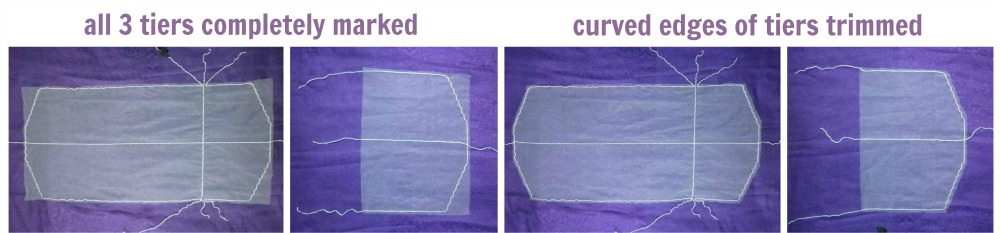
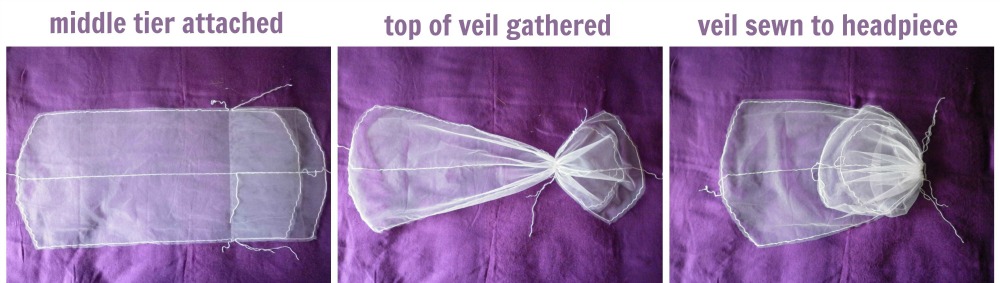
The next group of 7 pictures is the WIP of the Cathedral Veil. I show you this one, so that you may see how to make curved corners, how to make a 3 tier veil and how to mark the tulle completely.
More in the Wedding Accessory Series:
- Part 1: Headpieces - crowns, tiaras and headbands.
- Part 2: Floral Appliques - for accessorizing your veils and dresses.
- Part 3: Veils - styles, lengths, attaching to headpieces, adding crochet trims, etc. (This Post)
- Part 4: Bouquets - like the ones I did for my wedding sets.
- Part 5: Finishing Touches - like Garters and Necklaces.
 |   I hope you’ve enjoyed this FREE Crochet Pattern. Please share so others can enjoy it too! *If you have any questions, or need help with this pattern, feel free to contact me, or leave a comment below. I will be more than happy to help you! |

This wedding accessories pattern series was created to compliment my "Happily Ever After" Crochet Pattern for Fashion Dolls, which is currently on sale for a few more days.
With this pattern you can become a designer too, when you mix and match all the different necklines and silhouettes available for thousands of possibilities. Learn more here...
With this pattern you can become a designer too, when you mix and match all the different necklines and silhouettes available for thousands of possibilities. Learn more here...


Hello Visitor and Welcome to Rebeckah's Treasures...
I am a Norwegian/Canadian currently studying Midwifery in the UK. I love to crochet!
At Rebeckah's Treasures, I share my crochet patterns and treasures. I hope they inspire you to crochet your own little treasures too...

Comments


Hello, my name is Rebeckah.
I hope my crochet inspires you to create your very own treasures!
Learn more about me...
I hope my crochet inspires you to create your very own treasures!
Learn more about me...


Categories
All
Accessory
Afghan Squares
Amigurumi
Apparel
Applique
Articles & Resources
Baby Apparel
Bags & Wallets
Barbie
Barbie Furniture
Barbie's Friends
Bookbinding
Cakes & Baked Goods
CAL Crochet A Longs
Chess
Christmas
Contest
Craft
Crochet
Crochet Stitches
Crochet With Beads
Crochet With Wire
Disney Inspired
Doll
Easter
Flower
Free Pattern
Friday Features
Get Stuffed Magazine
Giveaways & Special Offers
Greybriar's Travels Magazine
Guest Post
Halloween
Holiday
Home
How To Tutorials
Interviews
Midwifery
Pay Patterns
Photo Tips
Recipes
Reviews
Round Ups
Saturday Link Party
Sewing
Shop Updates
Social
Survey
Tapestry Crochet
Toys
Tuesday Treasures
Tutorial Video
Tyc-magazine
Under The Sea
Updates
Valentines
Website Shop 101
Wedding
Wip
Archives
October 2021
August 2021
August 2017
June 2017
May 2017
April 2017
March 2017
February 2017
January 2017
December 2016
November 2016
October 2016
September 2016
August 2016
July 2016
June 2016
May 2016
April 2016
March 2016
February 2016
January 2016
December 2015
November 2015
October 2015
September 2015
August 2015
July 2015
June 2015
May 2015
April 2015
March 2015
February 2015
December 2014
November 2014
October 2014
September 2014
August 2014
July 2014
June 2014
May 2014
April 2014
March 2014
February 2014
January 2014
December 2013
November 2013
October 2013
September 2013
August 2013
July 2013
June 2013
May 2013
April 2013
March 2013
December 2012
 RSS Feed
© 2012-2021 Rebeckah Ferger
All rights reserved.
All rights reserved.
Disclaimer: This website makes use of sponsored and/or affiliate links. Please see this page for more information.
