Rebeckah's Treasures
  • Home
  • About
    • Who Am I?
    • My Crochet Story
    • Mission
    • Disclosure Policy
    • Skill Levels
  • Store
    • Crochet Patterns
      • Special Offers
      • New Releases
      • Accessory Crochet Patterns
      • Afghan Square Crochet Patterns
      • Amigurumi Crochet Patterns
      • Applique Crochet Patterns
      • Baby Crochet Patterns
      • Dolly Crochet Patterns
      • Fashion Doll Crochet Patterns
      • Free Downloads
      • Holiday Crochet Patterns
      • Tapestry Crochet Patterns
      • Under the Sea Crochet Patterns
      • Wedding Crochet Patterns
    • Loyalty Program
      • List of Loyalty Program Patterns
    • Disclaimer and FAQs
  • Blog
    • Blog Archive
    • Crochet Resources
    • Crochet Stitches
    • Get Your Crochet Patterns Featured!
  • Free
    • Free Crochet Patterns
    • New Free Releases
    • Free Accessory Crochet Patterns
    • Free Afghan Square Crochet Patterns
    • Free Amigurumi Crochet Patterns
    • Free Applique Crochet Patterns
    • Free Baby Crochet Patterns
    • Free Dolly Crochet Patterns
    • Free Fashion Doll Crochet Patterns
    • Free Guest Crochet Patterns
    • Free Holiday Crochet Patterns
    • Free Tapestry Crochet Patterns
    • Free Under the Sea Crochet Patterns
    • Free Wedding Crochet Patterns
    • Free Crochet Patterns Coming Soon
  • Contact
    • Newsletter
    • Suggest a Crochet Pattern
    • Testing Opportunities
Welcome Visitor! I hope you enjoy my treasures.

Disclaimer: This website makes use of sponsored and/or affiliate links. Please see this page for more information.

Part 1 - Wedding Accessories - Headpieces

11/6/2014

Comments

 
The Headpieces ~ Wedding Accessories for Fashion Dolls ~ Free Crochet Pattern & How-to
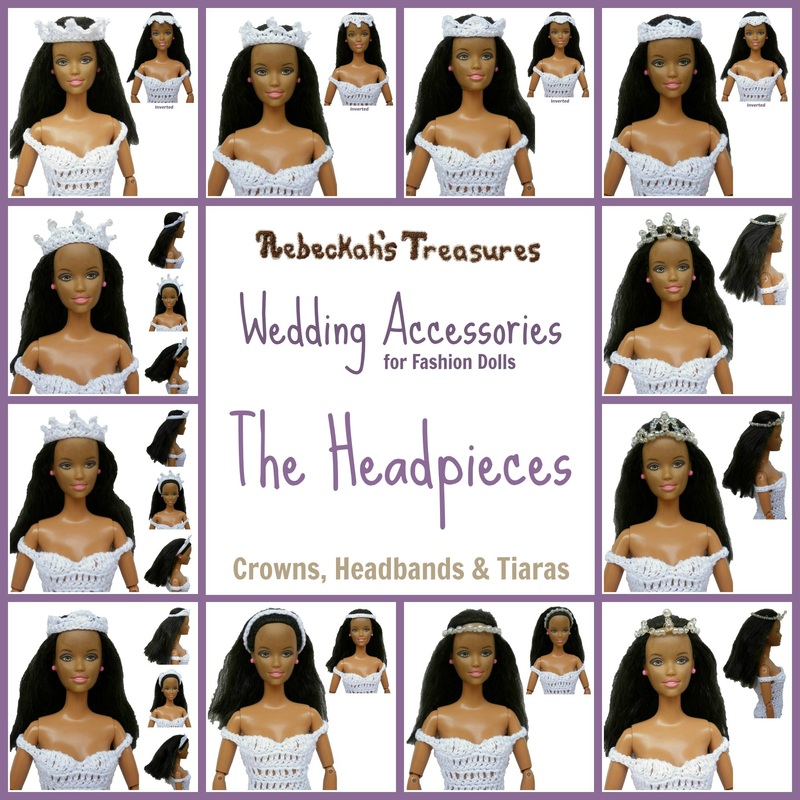
Here's the first part of five in the Wedding Accessory series for Fashion Dolls.

This how-to-tutorial includes written instructions to make several types of headpieces such as crowns, tiaras and headbands, and how you can come up with some of your very own designs too.

There are 8 crochet versions and 4 wire-beaded versions in this tutorial.  Each of the crochet version can also be crocheted with beads (if you need a video tutorial for this, let me know, and I will see what I can do).  Each of the wire-beaded versions come with their very own video tutorials below.

These headpieces can be used on their own as a stylish accessory for your fashion doll outfits, or you can use them to fasten the veils (now available here) into place for your barbie weddings.


The Headpieces ~ Wedding Accessories for Fashion Dolls ~ Free Crochet Pattern & How-to via @beckastreasures
This pattern is copyrighted to Rebeckah Ferger of www.rebeckahstreasures.com.  It is for personal use only.  No part of this pattern may be copied or distributed in any way.  If you sell what you make from this pattern, please credit me as the designer.  All rights reserved, 2014.

Table of Contents:

Crochet Versions - Notes, Supplies, Abbreviations and Gauge
  • Headband Crochet Pattern
  • 12 Picot Crown Crochet Pattern
  • 9 Picot Crown Crochet Pattern
  • Shell Crown Crochet Pattern
  • Double-V Crown Crochet Pattern
  • Picot Tiara 1 Crochet Pattern
  • Picot Tiara 2 Crochet Pattern
  • Double-V & Shell Tiara Crochet Pattern

Bead & Wire Versions - Notes, Supplies, etc.
  • Beaded Headband Tutorial
  • Regal Tiara Tutorial
  • Royal Tiara Tutorial
  • Renaissance Tiara Tutorial

Headpiece Video Demo - how to put the tiaras, headbands and crowns onto the dolls

More in the Wedding Accessory Series

PDF Download of this pattern

ADD to Ravelry

Crochet Versions

Crochet headbands, crowns and tiaras are very simple and quick to make.  I have included several styles and ideas here - all can be done with or without beads, but feel free to use your imagination and play with all sorts of stitches to come up with a style you really love!

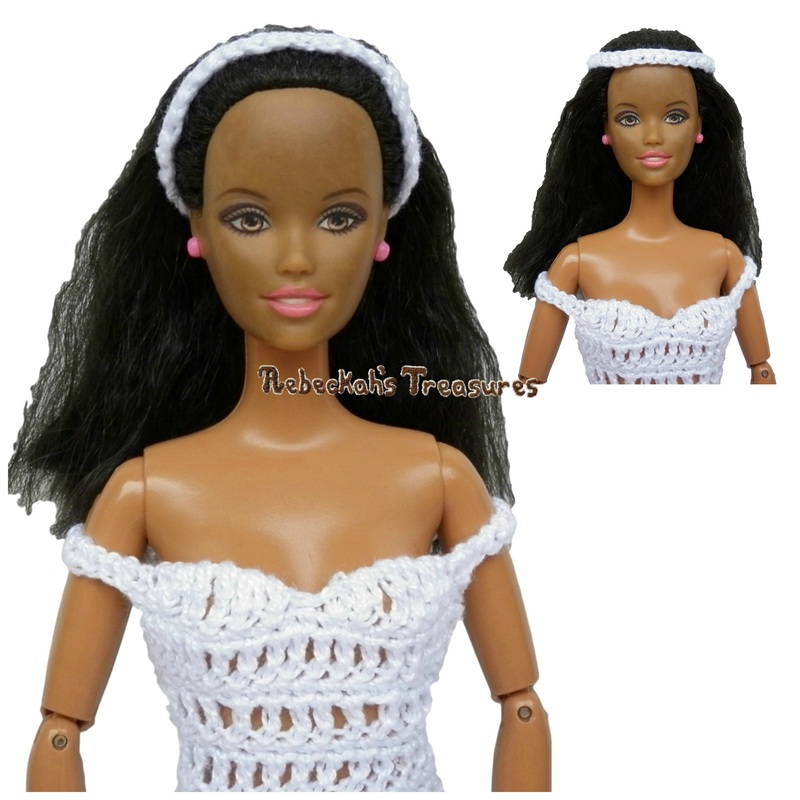
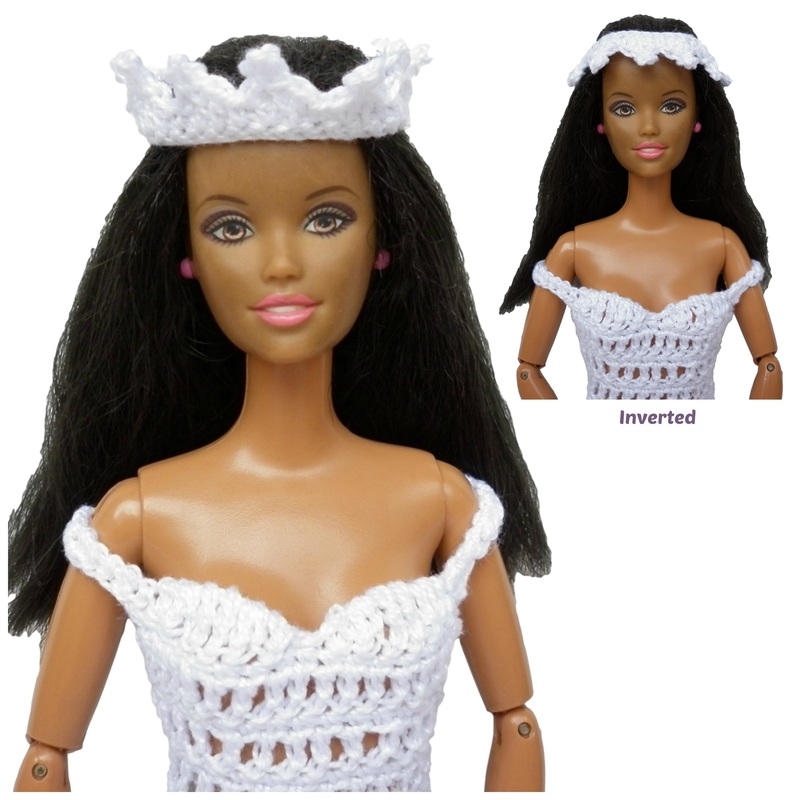
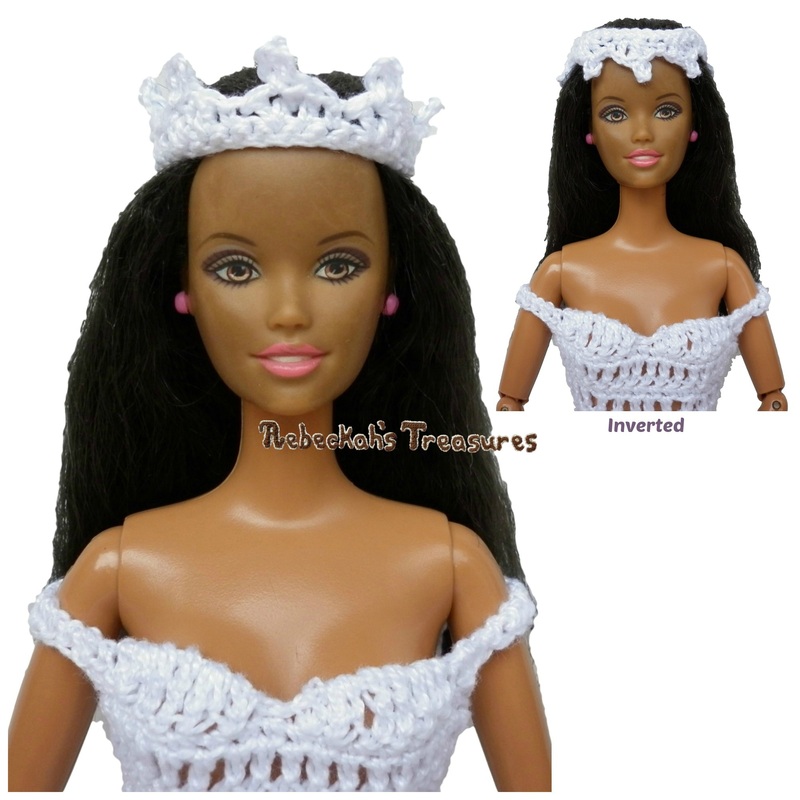
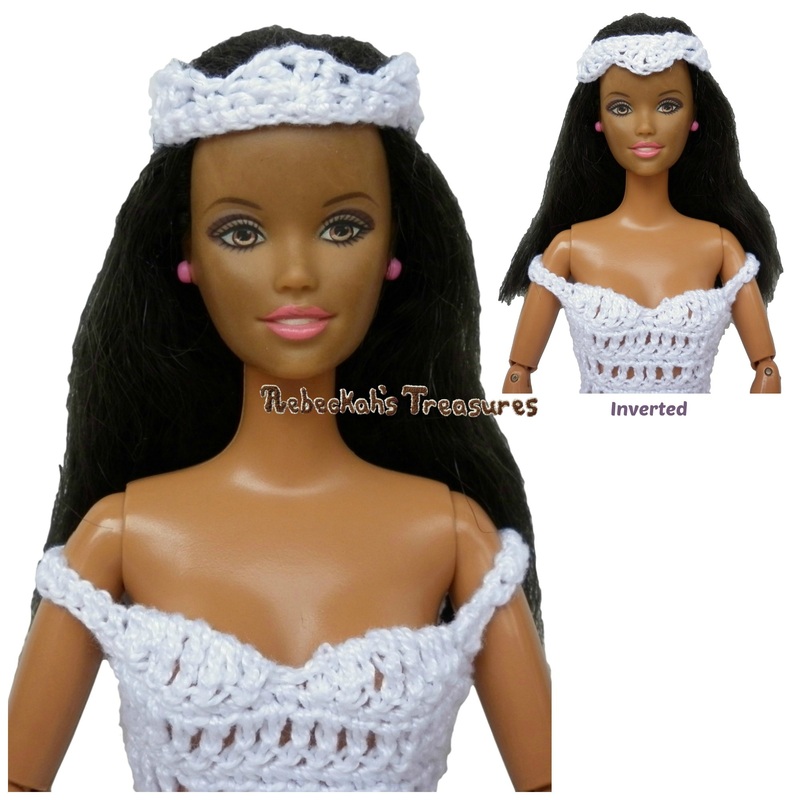
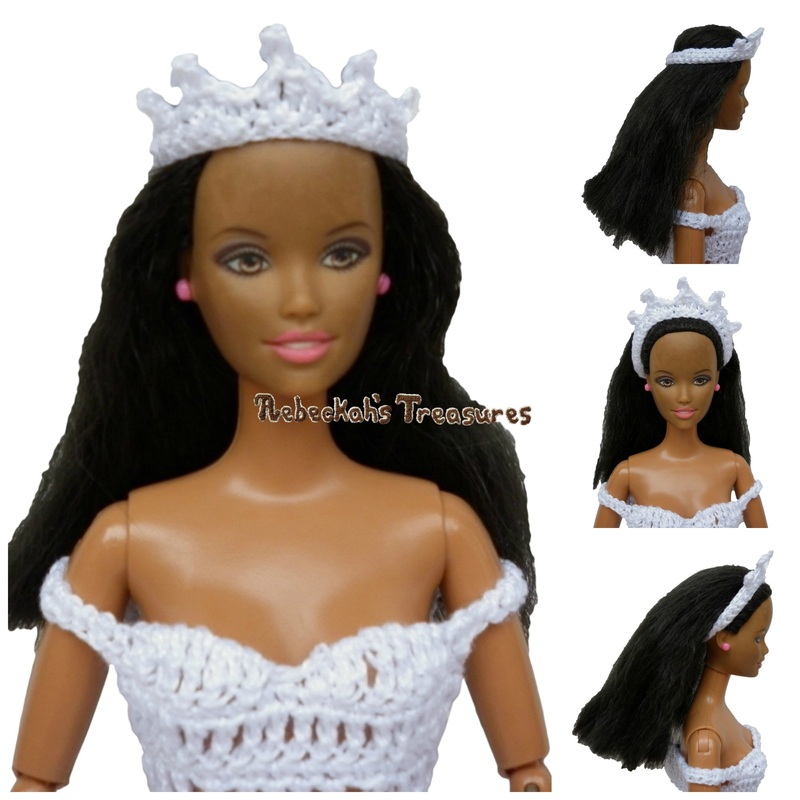
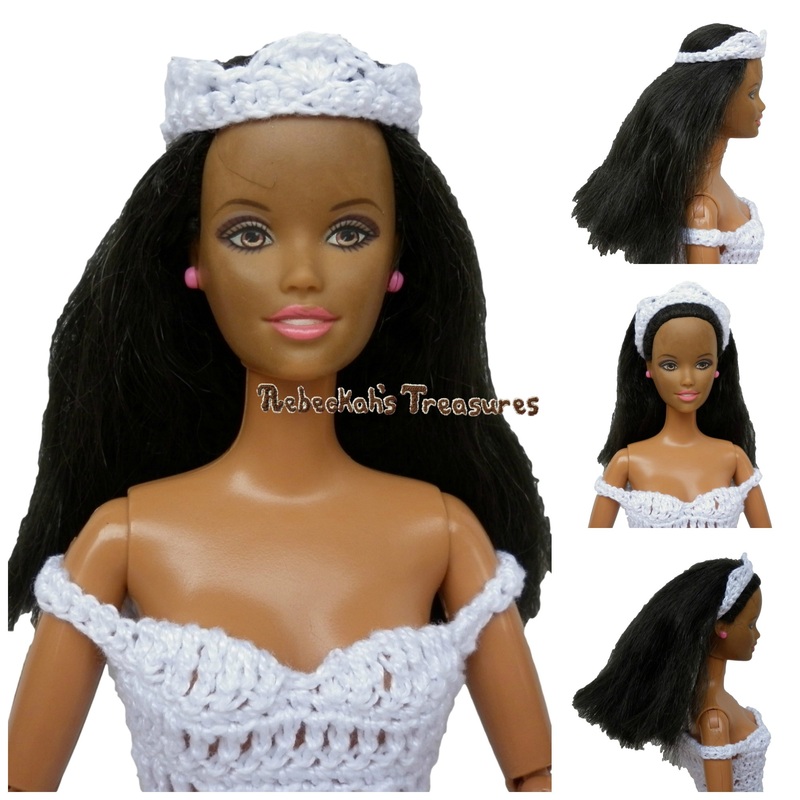
There is 1 crochet headband style, which is the base for all crochet tiaras and crowns. There are 3 tiaras, and 4 crowns.  Plus, with each, you can invert them for a different look - this would look really great with the veils!

NOTE: These crochet versions are more suitable if you are planning to gift a wedding set to a younger child than the ones made with beads and wire below as they are much more flexible, easier to put on the dolls, and less likely to break from rough use.  However, none of these accessories are suitable for children under the age of 3, OR for children who still put things in their mouths, etc.

You'll Need:

  • crochet cotton thread #10 (I use Circulo Clea) - a very small amount
  • 1.05mm hook
  • tapestry yarn needle
  • 6-36 of 2-4mm beads - optional - if using beads, make sure you string them onto your thread in the reverse order you'll be using them before you begin crocheting

Abbreviations: ~ USA TERMS ~

ch
sl st
sc
dc
tr
chain
slip stitch
single crochet
double crochet
treble crochet
sk
st(s)
rep
f/o
skip
stitch(es)
repeat
fasten off
double V-st
picot
into 1 stitch: dc 2, ch 1, dc 2
ch 3, insert hook into the "V" and ridge of the stitch, yarn over, pull all the way through ~ *if you need help with this, see the first example in this video tutorial by Moogly

Gauge:

1 row of 36 sc = 4 inches (10 cm) - this is the diameter needed for the doll's head.  It can be slightly longer or shorter but no more than 1/4 of an inch (half a cm) either way.  

*These will fit the Barbie Doll and even the other Mattel barbie dolls like Kelly, Stacey and Skipper.

Return to the Table of Contents

Free Crochet Headband for Fashion Dolls

Headband Crochet Pattern

ch 36, slst join to first ch, ch 1,  turn
row 1:
sc 36 in bottom loops, sl st join, ch 1, f/o, weave in ends.
Tips / Ideas you may like to try:
  • Crochet this as a base for your own tiara or crown designs.
  • Add a second row and follow your favourite edging to make a pretty crown.
  • Add one or more crochet flowers or mini appliques to add some flare. (All sorts of mini flowers are coming soon...  Stay tuned!)
  • Do alternate single crochet stitches with beads - every 3rd or 4th stitch works too! (18 beads for alternate stitches, 12 beads for every 3rd, and 9 beads for every 4th)

Return to the Table of Contents

Free Crochet 12 Picot Crown for Fashion Dolls

12 Picot Crown Crochet Pattern

ch 36, slst join to first ch, ch 1, turn
row 1:
row 2:
sc 36 over bottom loops, sl st join, ch 1, turn
(sc, dc, dc-picot, dc in same st) x 12, sl st join, ch 1, f/o, weave in ends.
Tips / Ideas you may like to try:
  • Change the dc-picot to a tr-picot, or a sc-picot to give them different heights. (if switching to a sc-picot, you'll want to change the other dc sts to sc sts instead)
  • Do alternate single crochet stitches with beads for the first row - every 3rd or 4th stitch works too! (18 beads for alternate stitches, 12 beads for every 3rd, and 9 beads for every 4th)
  • For the 2nd row, you may like to put a bead into the first half of the dc sts that proceed the picots, or into the 2nd ch of the picot sts, or even into the sc sts.  Have fun playing with different bead sizes and positions...

Return to the Table of Contents

Free Crochet 9 Picot Crown for Fashion Dolls

9 Picot Crown Crochet Pattern

ch 36, slst join to first ch, ch 1, turn
row 1:
row 2:
sc 36 over bottom loops, sl st join, ch 1, turn
(sc, dc, dc-picot, dc in same st, sk st) x 9, sl st join, ch 1, f/o, weave in ends.
Tips / Ideas you may like to try:
  • Change the dc-picot to a tr-picot to give them different heights.
  • Do alternate single crochet stitches with beads for the first row - every 3rd or 4th stitch works too! (18 beads for alternate stitches, 12 beads for every 3rd, and 9 beads for every 4th)
  • For the 2nd row, you may like to put a bead into the first half of the dc sts that proceed the picots, or into the 2nd ch of the picot sts, or even into the sc sts.  Have fun playing with different bead sizes and positions...

Return to the Table of Contents

Free Crochet Shell Crown for Fashion Dolls

Shell Crown Crochet Pattern

ch 36, slst join to first ch, ch 1, turn
row 1:
row 2:
sc 36 over bottom loops, sl st join, ch 1, turn
(sc, sk 2 st, dc 2 + tr + dc 2 in same st, sk 2 st) x 6, sl st join, ch 1, f/o, weave in ends.
Tips / Ideas you may like to try:
  • Change the dc 2 + tr + dc 2 to a regular shell of dc 5 instead.
  • Do alternate single crochet stitches with beads for the first row - every 3rd or 4th stitch works too! (18 beads for alternate stitches, 12 beads for every 3rd, and 9 beads for every 4th)
  • Or for the 2nd row, you may like to crochet the beads into each sc st.

Return to the Table of Contents

Free Crochet Double-V Crown for Fashion Dolls

Double-V Crown Crochet Pattern

ch 36, slst join to first ch, ch 1, turn
row 1:
row 2:
sc 36 over bottom loops, sl st join, ch 1, turn
(sc, sk 2 st, double V-st, sk 2 st) x 6, sl st join, ch 1, f/o, weave in ends.
Tips / Ideas you may like to try:
  • Change the center 2 dc sts of the double V-st to tr sts instead to give it more height and definition.
  • Do alternate single crochet stitches with beads for the first row - every 3rd or 4th stitch works too! (18 beads for alternate stitches, 12 beads for every 3rd, and 9 beads for every 4th)
  • Or for the 2nd row, you may like to crochet the beads into each sc st, or into the ch st of the double V-st.

Return to the Table of Contents

Picot Free Crochet Tiara for Fashion Dolls Version 1

Picot Tiara 1 Crochet Pattern

ch 36, slst join to first ch, ch 1, turn
row 1:
row 2:
sc 36 over bottom loops, sl st join, ch 1, turn
sl st 5, sc 8, picot, sc in same st, *sc, dc, dc-picot, dc in same st,* sc, dc, tr-picot, dc in same st, rep*, sc 2, picot, sc in same st, sc 7, sl st 5, sl st join, ch 1, f/o, weave in ends.
Tips / Ideas you may like to try:
  • Do alternate single crochet stitches with beads for the first row - every 3rd or 4th stitch works too! (18 beads for alternate stitches, 12 beads for every 3rd, and 9 beads for every 4th)
  • For the 2nd row, you may like to put a bead into the first half of the dc & tr sts that proceed the picots, or into the 2nd ch of the picot sts, or even into the sc sts.  Have fun playing with different bead sizes and positions...

*For the one pictured, I threaded 2 different types of small beads onto the thread - alternating between the bigger and smaller ones for a total of 10 beads.  Then, I crocheted the smaller ones onto the the first half of the dc & tr sts that proceed the picots and I crocheted the larger ones into the middle chain of the picot sts.

Return to the Table of Contents

Picot Free Crochet Tiara for Fashion Dolls Version 2

Picot Tiara 2 Crochet Pattern

row 1:
row 2:
sc 36 over bottom loops, sl st join, ch 1, turn
sl st 10, sc 3, picot, sc in same st, *sc, dc, dc-picot, dc in same st,* sc, dc, tr-picot, dc in same st, rep*, sc 2, picot, sc in same st, sc 2, sl st 10, sl st join, ch 1, f/o, weave in ends.
ch 36, slst join to first ch, ch 1, turn
Tips / Ideas you may like to try:
  • Do alternate single crochet stitches with beads for the first row - every 3rd or 4th stitch works too! (18 beads for alternate stitches, 12 beads for every 3rd, and 9 beads for every 4th)
  • For the 2nd row, you may like to put a bead into the first half of the dc & tr sts that proceed the picots, or into the 2nd ch of the picot sts, or even into the sc sts.  Have fun playing with different bead sizes and positions...
*This one is exactly the same as the first crochet tiara - only there are more sl sts and less sc sts to either side of the center of the tiara making it slightly more narrow in the back.

Return to the Table of Contents

Double-V & Shells Free Crochet Tiara

Double-V & Shell Tiara Crochet Pattern

ch 36, slst join to first ch, ch 1, turn
row 1:
row 2:
sc 36 over bottom loops, sl st join, ch 1, turn
*sc, sk 2 st, double V-st,  sk 2 st,* sc, sk 2 st, dc 2 + tr + dc 2 in same st, sk 2 st, rep*, sc, sl st, ch 1, f/o, weave in ends.
Tips / Ideas you may like to try:
  • Switch the double V-st to dc 2 + tr + dc 2, or visa versa.
  • Or follow the same tips and ideas for either crochet crown 3 (shell) or 4 (double V).

Return to the Table of Contents

Working with Beads & Wire Instead

Working with beads and wire lends itself to some really neat and sparkly designs.  Follow the instructions for the following designs, or come up with some of your own...

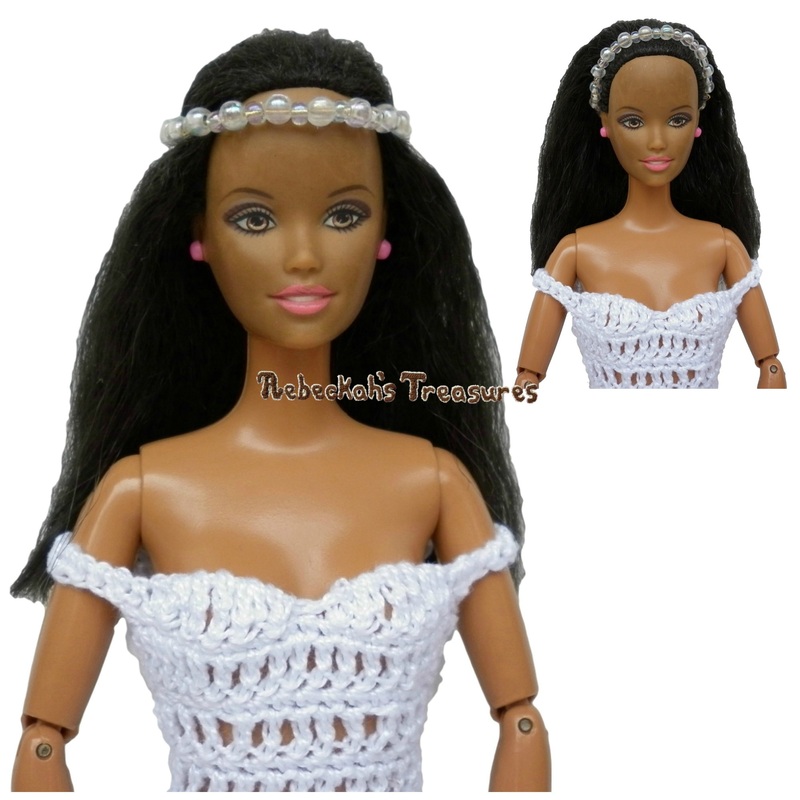
Below, there are instructions for 1 headband style, and 3 tiaras that use wire and beads.

NOTE: None of the following styles are suitable for young children as they are a choking hazard.

You'll Need:

  • 12-24" (30-60 cm) of 0.4mm or 0.5mm copper wire / jewelry wire in colour of choosing per headpiece - gold or silver look best. *The size of the wire is pretty flexible - so long as you can insert the wire into your bead choice up to 4 times, you're good to go.  I prefer the 0.4mm wire.
  • 36-60 of 2-4mm seed beads and/or other miscellaneous small beads in any colour you like - I like using the clear sparkly ones that have a tint of colour to them.
  • jewelry pliers - I prefer using the round ones to prevent denting the wire too much
  • jewelry wire cutters

Some Notes before you get started:

You'll need a finished length of 4" (10 cm) for each style below, and any that you will design on your own.  Just like for the crochet versions they can be slightly longer or shorter but no more than 1/4 of an inch (half a cm) either way.  These also fit the smaller mattel dolls like Kelly, Stacey and Skipper.

For all of these, you will start from the center, and work evenly to each side until you get to the right length.  The only exception is the simple headband version.

The wires are cut long so that you have extra to work with.  It makes it much easier to complete the designs and lock them into place once finished.  The basic rule of thumb is the more elaborate the design, the longer wire you will need to start with.

Return to the Table of Contents

Beaded Headband Project Tutorial

Beaded Headband ~ Free How-to for Fashion Dolls
cut wire to 12" (30 cm)

Beads Used:
  • 18 of 2mm seed beads
  • 18 of 3mm sphere beads
This one is the Easiest one to do!
  1. Thread seed beads alternately with sphere beads onto the wire. More if you haven't reached 4", or less it it is too long.
  2. Close into a circle by inserting each wire ends into the opposite sides until you get to the halfway point on either side, or at least through several of the beads.
  3. Next, lock it into place by taking the wire back over one bead, and inserting the wire through the same beads again, but in the opposite direction this time. Do this for both sides. You may need to use the pliers to help pull it tight and work your way through as many beads as possible.
  4. Lastly, trim off the excess, and use your pliers to push the ends that are still sticking out under the beads.
Tips / Ideas you may like to try:
  • Pull the wire snuggly throughout to ensure that the beads don't move around too much.
  • If the ends get too bendy and impossible to work with, snip the ends of the wire with your wire cutters.
  • Use the pliers to help pull the wire snuggly, or to grasp the wire.
  • Play with other smaller bead sized 2mm-4mm. 
  • Use 1 size bead only.
  • Play with colours.

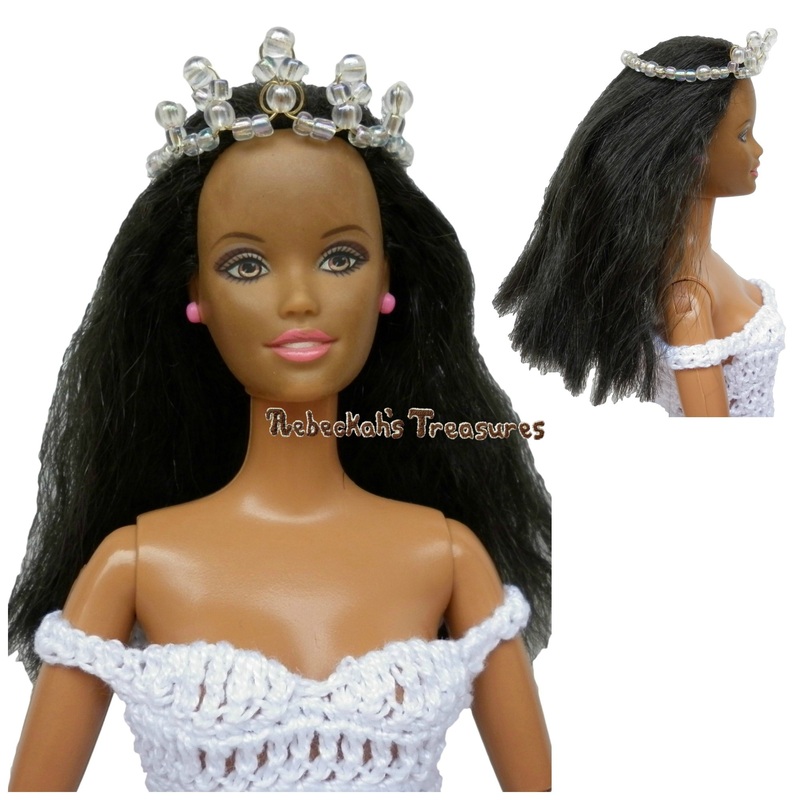
Return to the Table of Contents

Regal Tiara Project Tutorial

Regal Tiara ~ Free How-to for Fashion Dolls
cut wire to 24" (60 cm)

Beads Used:
  • 40 of 2mm seed beads
  • 14 of 3mm sphere beads
Tips / Ideas you may like to try:
  • Same as for the Beaded Headband.
  1. Start by putting one seed bead, one sphere bead and one seed bead onto the wire.
  2. Fold in half as you insert both ends of the wire through one sphere bead. Push beads until it is snug with the first one.
  3. Take both ends of the wire back through the sphere bead again, one at a time and to either side of the bead.  This will lock it into place and make it pretty.  The center is completed.  

Now you will work the following instructions to either side of this piece.

  1. Place two seed beads, one sphere bead, one seed bead, one sphere bead and one seed bead onto the wire.  
  2. Skip over the last three beads you just finished putting on the hook, and insert wire into the next sphere bead from opposite direction.  Pull tight and make sure it says snuggly close to the center section.  This creates the first peaks to either side of the center.
  3. Place three seed beads, and one sphere bead onto the wire.  
  4. Skip over the last sphere bead, and insert wire into the next seed bead from the opposite direction.  Pull tight and make sure it says snuggly close to the center section.  This creates the final peaks to either side of the center.
  5. Place two seed beads, one sphere bead, and two seed beads (in that order) three times onto the wire before proceeding to close into a circle and lock into place like you do for the Beaded Headband.

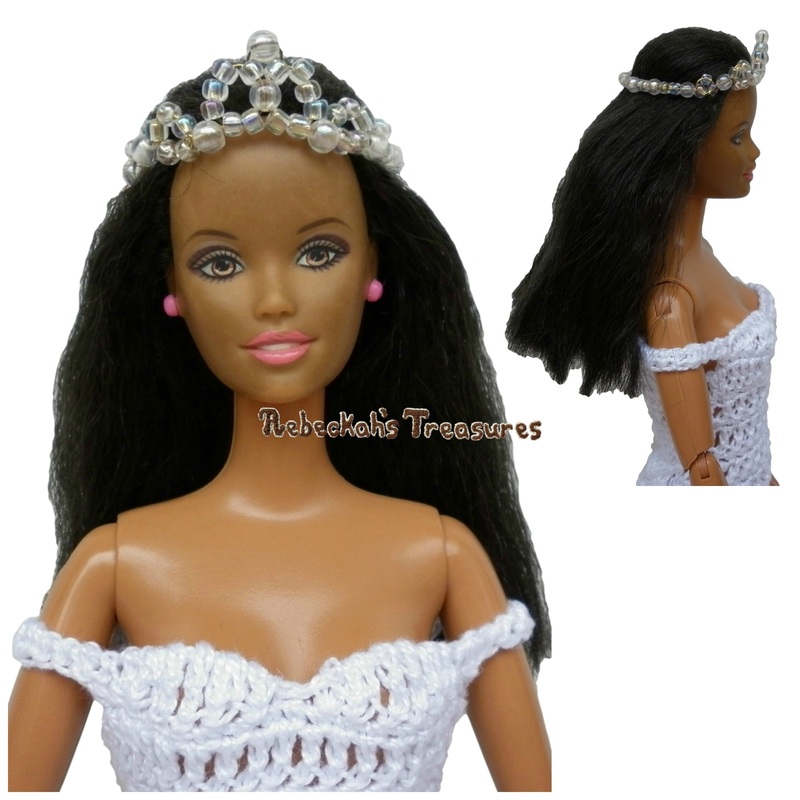
Return to the Table of Contents

Royal Tiara Project Tutorial

Royal Tiara ~ Free How-to for Fashion Dolls
cut wire to 24" (60 cm)

Beads Used:
  • 42 of 2mm seed beads
  • 14 of 3mm sphere beads
Tips / Ideas you may like to try:
  • Same as for the Beaded Headband.
  • Make this one a little bit smaller in length for a cute tiara to rest on top of head or around a bun.
  1. Start by putting one seed bead, one sphere bead and one seed bead onto the wire.
  2. Fold in half as you insert both ends of the wire through one sphere bead. Push beads until it is snug with the first one.

Now you will work the following instructions to either side of this piece.

  1. Place five seed beads onto the wire.  Form into a circle by inserting the wire through the very first seed bead of the center piece, the last sphere bead, and the next two seed beads (the first two of the five you just put onto the wire). This completes the center piece of the tiara.
  2. Place one sphere bead, and five seed beads onto the wire.  Form into a circle by inserting the wire through the first two seed beads you just placed onto the wire.  Pull tight and make sure it says snuggly close to the center section.  This creates the first circles to either side of the center.
  3. Place one sphere bead, and three seed beads onto the wire.  Form into a circle by inserting the wire through the first two seed beads you just placed onto the wire.  Pull tight and make sure it says snuggly close to the center section.  This creates the final circles to either side of the center.
  4. Place one sphere bead, and two seed beads (in that order) three times onto the wire, followed by one more sphere bead and one more seed bead before proceeding to close into a circle and lock into place like you do for the Beaded Headband.

Return to the Table of Contents

Renaissance Tiara Project Tutorial

Renaissance Tiara ~ Free How-to for Fashion Dolls
cut wire to 18" (45 cm)

Beads Used:
  • 41 of 2mm seed beads
  • 4 of 3mm sphere beads
Tips / Ideas you may like to try:
  • Same as for the Beaded Headband.
  1. Start by inserting one sphere bead onto the center of the wire.
  2. Fold in half as you insert both ends of the wire through one seed bead and one sphere bead. Push beads until it is snug with the first one.
  3. Take both ends of the wire back through the sphere bead again, one at a time and to either side of the bead.  This will lock it into place and make it pretty.  The center is completed.  

Now you will work the following instructions to either side of this piece.
  1. Place three seed beads onto the wire, and take the wire back through the last one again.  
  2. Place one sphere bead followed by one seed bead onto the wire next, and thread the wire through that same sphere bead again going in from the opposite direction.  This creates the next peaks to either side of the center one.
  3. Place another seed bead onto the wire, and take the wire back through it again.
  4. Place three seed beads onto the wire, and take the wire back through the last one again.  Repeat this one more time for a total of two times.
  5. Lastly place nine more seed beads onto the wire before proceeding to close into a circle and lock into place like you do for the Beaded Headband.

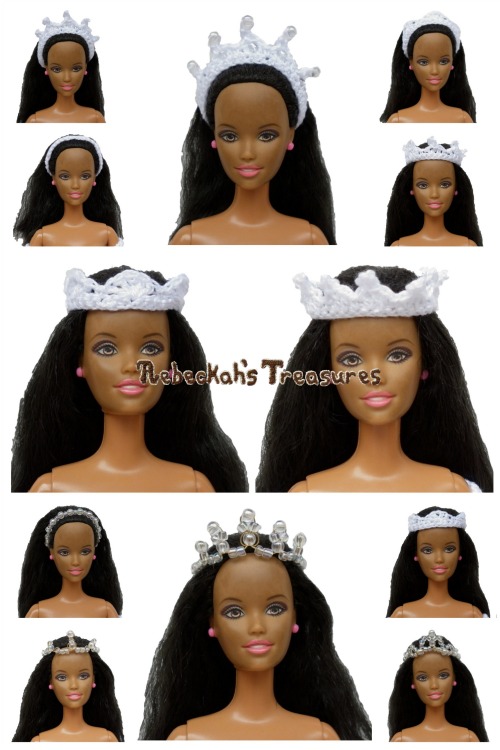
Return to the Table of Contents

Lastly, here's a Demo of the Dolls wearing the tiaras...

All the headpieces in this tutorial - crowns, headbands & tiaras - wire or crocheted, can be placed on the doll's head in the same fashion that is demonstrated below...

More in the Wedding Accessory Series:

  • Part 1: Headpieces - crowns, tiaras and headbands. (This Post)
  • Part 2: Floral Appliques - for accessorizing your veils and dresses. 
  • Part 3: Veils - styles, lengths, attaching to headpieces, adding crochet trims, etc.  
  • Part 4: Bouquets - like the ones I did for my wedding sets.
  • Part 5: Finishing Touches - like Garters and Necklaces.
  • *As each new part is created, a new link to it will be formed here...

The Headpieces ~ Wedding Accessories for Fashion Dolls ~ Free Crochet Pattern & How-to
$1.50 Printer Friendly PDF Download

Favourite on Ravelry

I hope you’ve enjoyed this FREE Crochet Pattern.  Feel free share so others can enjoy it too!
See More FREE Crochet Patterns Here!
*If you have any questions, or need help with this pattern, feel free to contact me, or leave a comment below.  I am always happy to help you!

Happily Ever After Crochet Pattern
This wedding accessories pattern series was created to compliment my "Happily Ever After" Crochet Pattern for Fashion Dolls, which is currently on sale for the rest of this month.

With this pattern you can become a designer too, when you mix and match all the different necklines and silhouettes available for thousands of possibilities. Learn more here...


Hello Visitor and Welcome to Rebeckah's Treasures...

I am a Norwegian/Canadian currently studying Midwifery in the UK. I love to crochet!

At Rebeckah's Treasures, I share my crochet patterns and treasures. I hope they inspire you to crochet your own little treasures too...

Comments
comments powered by Disqus
    Rebeckah's Treasures' Logo

    Shop Crochet Patterns!


    Rebeckah of Rebeckah's Treasures
    Hello, my name is Rebeckah. 
    I hope my crochet inspires you to create your very own treasures!
    Learn more about me...


    Connect with Us!


    Tweets by beckastreasures
    All Free Crochet


    Categories

    All
    Accessory
    Afghan Squares
    Amigurumi
    Apparel
    Applique
    Articles & Resources
    Baby Apparel
    Bags & Wallets
    Barbie
    Barbie Furniture
    Barbie's Friends
    Bookbinding
    Cakes & Baked Goods
    CAL Crochet A Longs
    Chess
    Christmas
    Contest
    Craft
    Crochet
    Crochet Stitches
    Crochet With Beads
    Crochet With Wire
    Disney Inspired
    Doll
    Easter
    Flower
    Free Pattern
    Friday Features
    Get Stuffed Magazine
    Giveaways & Special Offers
    Greybriar's Travels Magazine
    Guest Post
    Halloween
    Holiday
    Home
    How To Tutorials
    Interviews
    Midwifery
    Pay Patterns
    Photo Tips
    Recipes
    Reviews
    Round Ups
    Saturday Link Party
    Sewing
    Shop Updates
    Social
    Survey
    Tapestry Crochet
    Toys
    Tuesday Treasures
    Tutorial Video
    Tyc-magazine
    Under The Sea
    Updates
    Valentines
    Website Shop 101
    Wedding
    Wip


    Archives

    October 2021
    August 2021
    August 2017
    June 2017
    May 2017
    April 2017
    March 2017
    February 2017
    January 2017
    December 2016
    November 2016
    October 2016
    September 2016
    August 2016
    July 2016
    June 2016
    May 2016
    April 2016
    March 2016
    February 2016
    January 2016
    December 2015
    November 2015
    October 2015
    September 2015
    August 2015
    July 2015
    June 2015
    May 2015
    April 2015
    March 2015
    February 2015
    December 2014
    November 2014
    October 2014
    September 2014
    August 2014
    July 2014
    June 2014
    May 2014
    April 2014
    March 2014
    February 2014
    January 2014
    December 2013
    November 2013
    October 2013
    September 2013
    August 2013
    July 2013
    June 2013
    May 2013
    April 2013
    March 2013
    December 2012


    RSS Feed


    © 2012-2021 Rebeckah Ferger
    All rights reserved. 

    Disclaimer: This website makes use of sponsored and/or affiliate links. Please see this page for more information.
Powered by Create your own unique website with customizable templates.
  • Home
  • About
    • Who Am I?
    • My Crochet Story
    • Mission
    • Disclosure Policy
    • Skill Levels
  • Store
    • Crochet Patterns
      • Special Offers
      • New Releases
      • Accessory Crochet Patterns
      • Afghan Square Crochet Patterns
      • Amigurumi Crochet Patterns
      • Applique Crochet Patterns
      • Baby Crochet Patterns
      • Dolly Crochet Patterns
      • Fashion Doll Crochet Patterns
      • Free Downloads
      • Holiday Crochet Patterns
      • Tapestry Crochet Patterns
      • Under the Sea Crochet Patterns
      • Wedding Crochet Patterns
    • Loyalty Program
      • List of Loyalty Program Patterns
    • Disclaimer and FAQs
  • Blog
    • Blog Archive
    • Crochet Resources
    • Crochet Stitches
    • Get Your Crochet Patterns Featured!
  • Free
    • Free Crochet Patterns
    • New Free Releases
    • Free Accessory Crochet Patterns
    • Free Afghan Square Crochet Patterns
    • Free Amigurumi Crochet Patterns
    • Free Applique Crochet Patterns
    • Free Baby Crochet Patterns
    • Free Dolly Crochet Patterns
    • Free Fashion Doll Crochet Patterns
    • Free Guest Crochet Patterns
    • Free Holiday Crochet Patterns
    • Free Tapestry Crochet Patterns
    • Free Under the Sea Crochet Patterns
    • Free Wedding Crochet Patterns
    • Free Crochet Patterns Coming Soon
  • Contact
    • Newsletter
    • Suggest a Crochet Pattern
    • Testing Opportunities