|
Disclaimer: This website makes use of sponsored and/or affiliate links. Please see this page for more information.
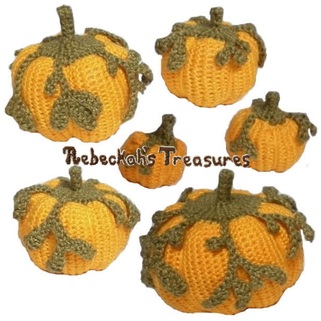
From Tuesday last week until this last Tuesday, you all were asked to vote for your most favourite pumpkin to become the free pattern. You all voted and the results are in.
The winning free pumpkin pattern is: 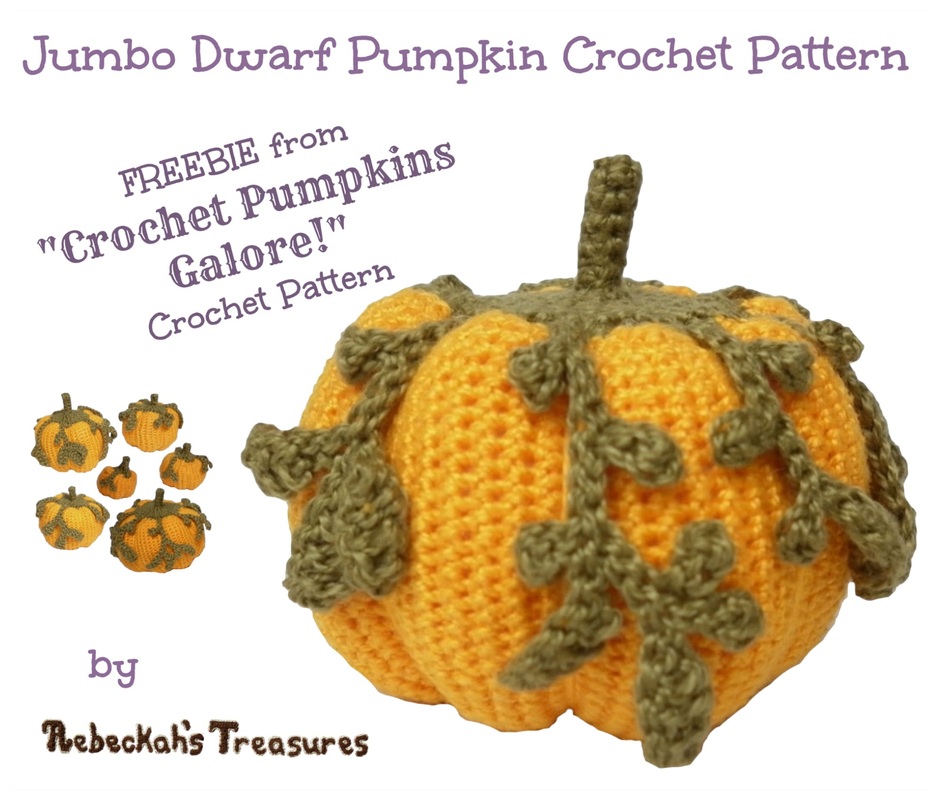
Continue reading below for the pattern and to see the total votes for each pumpkin, or visit Crochet Pumpkins Galore! Patterns to purchase all six crochet pumpkin patterns and variations.
The total votes for each pumpkin are as follows:
This pattern is copyrighted to Rebeckah Ferger of www.rebeckahstreasures.com. It is for personal use only. No part of this pattern may be copied or distributed in any way. If you sell what you make from this pattern, please credit me as the designer. All rights reserved, 2013.
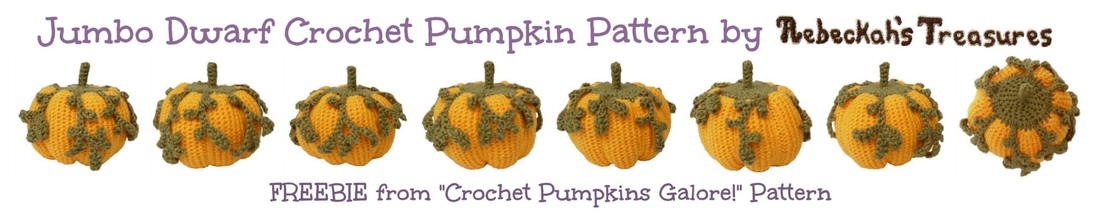
This crochet pumpkin pattern has written instructions on how to crochet the Jumbo Dwarf Crochet Pumpkin from Crochet Pumpkins Galore! It also has pictures detailing how to sew the creases of the pumpkin. You can easily omit the leaves of the pumpkin if you would like to.
Amigurumi is such a fun beginner’s technique. It is so flexible when it comes to yarn and hook choices. If you want to make this bigger, or you simply don’t have crochet thread or small hook sizes, you can use worsted weight or sport yarn. Just be sure to use the hook size that produces tight stitches with the yarn you have chosen and visa versa.
Special Notes: This pattern is extremely flexible! If you make a mistake, leave it as it is, and fix it in the current rnd your are in (e.i. say you did a sc instead of a sl st, just ignore it, or say you did too many increases, decrease in the first rnd above it when you notice it). Remember, no pumpkin is perfectly symmetrical. You can also give it more character by increasing/decreasing the height of your pumpkin. You can do this by adding or subtracting the number of repeat rnds from rnd 6-30, or by how much tension you use to sew the creases at the end.
*Work in continuous rnds unless specified to do otherwise Crochet Pumpkin Body: Make 1
Before you start to crochet this pumpkin, cut a long strand of orange yarn, up to about 60” (150 cm), more if not using thread yarn. Set aside. You will need this to sew the creases of the pumpkin before you are finished crocheting the pumpkin body.
Tip: After you crochet rnd 31, weave a contrasting strand of yarn around the rnd, so that it is easier to see where you will need to sew the stem base to the pumpkin. Without further ado... with Orange... rnd 1: sc 8 into a magic circle (8 sts) rnd 2: (sc 2 in next st) x 8 (16 sts) rnd 3: [sl st, sc 3 in next st] x 8 (32 sts) rnd 4: [sl st, sc, sc 3 in next st, sc] x 8 (48 sts) rnd 5: [sl st, sc 2, sc 3 in next st, sc 2] x 8 (64 sts) rnd 6-30: [sl st, sc 7] x 8 for 25 rows rnd 31: [sl st, sc 2, sc3tog, sc 2] x 8 (48 sts) rnd 32: [sl st, sc, sc3tog, sc] x 8 (32 sts) rnd 33: [sl st, sc 3] x 8 rnd 34: [sl st, sc3tog] x 8 (16 sts) rnd 35: [sl st, sc] x 8 Pause here to sew creases onto the pumpkin... Use stitch marker to hold your work. Creases will be sewn along the outside above where the slip stitches were worked. Thread the yarn you set aside onto the tapestry needle just like you would if you were going to be sewing. Attach thread into first slip stitch spaces of rnd 35 and 34. Insert needle through same stitches again. Follow down to magic circle. Insert needle into the first stitch space and the stitch above it that lines up with the slip stitches. Tighten the threads as much as you like (the more you tighten, the more pronounced and shorter it will be). Insert needle back into first stitch space from magic circle and back out into the next magic circle stitch space. Next, insert hook into the stitch above that lines up with the next line of slip stitches and back out to the last stitch space. Follow along the slip stitches up to the slip stitch space of rnd 35. Insert though space down to space from rnd 34. Tighten the threads like before. Insert needle back into stitch space of rnd 35. Cross over to next slip stitch line and repeat from * around the pumpkin, so that each slip stitch line has been sewn over. It will look strange now, but it will look fine soon. Use photos below as a guide... 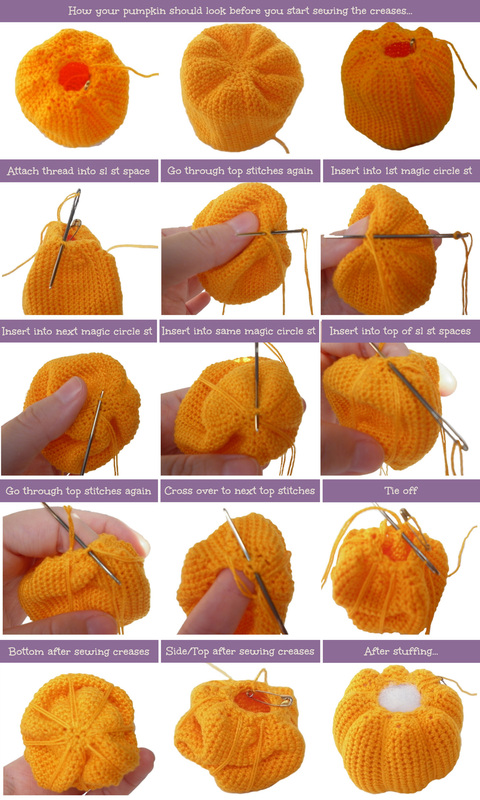
To Zoom in: Command Key + (MAC); CTRL + (PC)
Now it is time to stuff the pumpkin...
Insert little bits of polyester filling at a time, pushing into each section. A little bit into the first one and then into the next and so on. Just keep going around the pumpkin in this fashion. Once you have each section of the pumpkin stuffed nicely, add some more into the center. Use a little more than you think you will need. Continue crocheting... rnd 36: sc 16 (16 sts) rnd 37: sc2tog x 8, sl st into next st, f/o (8 sts) Set aside to work on stem and leaves. Crochet Pumpkin Stem Base & Leaves: Make 1
Starting with the Stem Tip:
with green... rnd 1: sc 4 into a magic circle (4 st) rnd 2-6: sc 4 rnd 7: (sc 2 in next st) x 4 (8 st) rnd 8: sc 8 rnd 9: [sc, sc 2 in next st] x 4 (12 st) rnd 10: [sc 2, sc 2 in next st] x 4 (16 st) rnd 11: sc 16 rnd 12: [sc, sc 2 in next st] x 8 (24 st)
Now it is time to decide if you want to have vines and leaves on your pumpkin...
Option A - Omit the leaves and vines:
rnd 13: scinc x 24, sl st into next st, f/o with long tail for sewing (48 sts) Sew last row of stem base to rnd 31 of pumpkin body using a whip stitch. Tie off, and tuck in ends.
Option B - Make Pumpkin like pictured with leaves and vines:
Special Notes for rnd 13: Rnd 13 has been broken down into parts to make it easier for you to see where you continue working around the pumpkin stem base and where you break away to do the leaves and vines. All the stitches done for the Leaves and the Vines are worked into the bottom loops of the chain stitches. Special Abbreviations for the Leaves: Leaf 2: hdc into the 2nd ch from hook, dc over next 3 ch, sl st over next 2 ch Leaf 3: hdc into the 2nd ch from hook, sl st over next 2 ch rnd 13:
Sew last row of stem base to rnd 31 of pumpkin body using a whip stitch. Tie off, and tuck in ends.
 
Hello Visitor and Welcome to Rebeckah's Treasures... I am a Norwegian/Canadian currently studying Midwifery in the UK. I love to crochet! At Rebeckah's Treasures, I share my crochet patterns and treasures. I hope they inspire you to crochet your own little treasures too... 
Comments
|


Hello, my name is Rebeckah.
I hope my crochet inspires you to create your very own treasures! Learn more about me... Categories
All
Archives
October 2021
© 2012-2021 Rebeckah Ferger
All rights reserved. Disclaimer: This website makes use of sponsored and/or affiliate links. Please see this page for more information.
|
- Home
-
-
- Special Offers
- New Releases
- Accessory Crochet Patterns
- Afghan Square Crochet Patterns
- Amigurumi Crochet Patterns
- Applique Crochet Patterns
- Baby Crochet Patterns
- Dolly Crochet Patterns
- Fashion Doll Crochet Patterns
- Free Downloads
- Holiday Crochet Patterns
- Tapestry Crochet Patterns
- Under the Sea Crochet Patterns
- Wedding Crochet Patterns
- Disclaimer and FAQs
-
-
- Free Crochet Patterns
- New Free Releases
- Free Accessory Crochet Patterns
- Free Afghan Square Crochet Patterns
- Free Amigurumi Crochet Patterns
- Free Applique Crochet Patterns
- Free Baby Crochet Patterns
- Free Dolly Crochet Patterns
- Free Fashion Doll Crochet Patterns
- Free Guest Crochet Patterns
- Free Holiday Crochet Patterns
- Free Tapestry Crochet Patterns
- Free Under the Sea Crochet Patterns
- Free Wedding Crochet Patterns
- Free Crochet Patterns Coming Soon
Welcome Visitor! I hope you enjoy my treasures.


 RSS Feed
