|
Disclaimer: This website makes use of sponsored and/or affiliate links. Please see this page for more information.
Now that you know how to crochet the Criss Cross Diamond Stitch I designed, it's time to learn how you can do increases and decreases to add shaping to your projects!
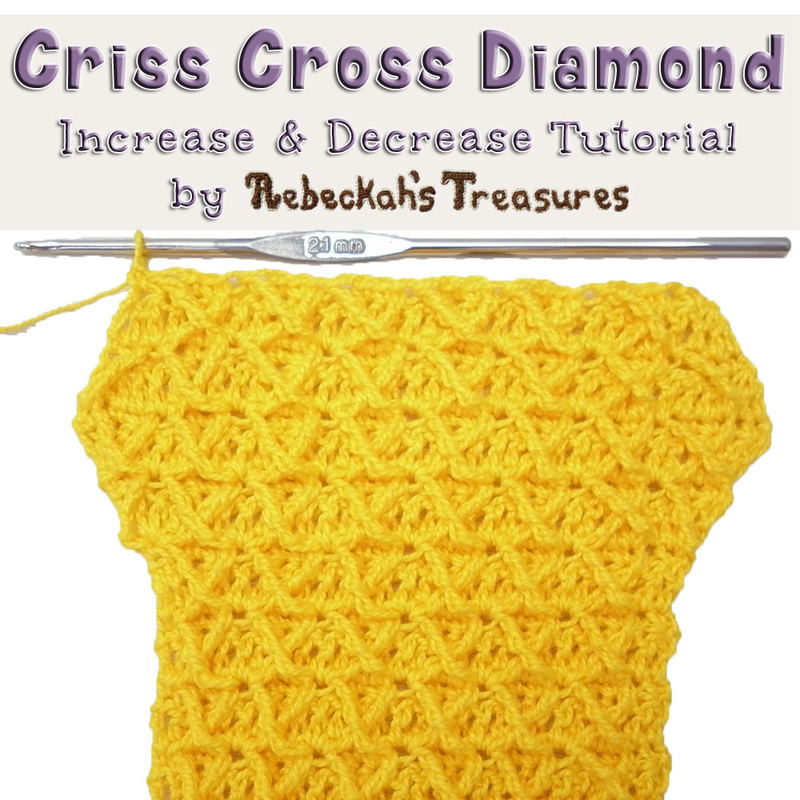
Knowing how to work increases and decreases in this stitch will open the doors to creating lovely works of crochet art in the form of apparel and other amazing things.
Again for this stitch, you should be familiar with basic crochet stitches (such as ch, sc & dc), tall crochet stitches (such as dtr) and surface crochet by means of working dropped post stitches. For this part of the tutorial, you should also be familiar with increases (working more than one stitch into the same space) and decreases (by means of the cluster version of the dc3tog). If you're new to any of these techniques, rest assured that either the photo or video tutorial below or both will help you master them. If you haven't see the tutorial for working this stitch without increases or decreases, you should take a look at it first. See the first part of this stitch tutorial here, or watch the video tutorial below. Let's get started! You'll Need:
Abbreviations: ~US terms are used~
Quick Notes About Increasing and Decreasing:
Increases and decreases are worked in the even double crochet rows. It takes two sets of increase or decrease rows to add or subtract respectively an X on either side. This is to make the increase more gradual and prevent a huge slant or curve to your project.
For increases, you'll add two stitches to either side of the row. The first time and all odd times after you do an increase, it adds half of an X or one slant to each side when you work the next criss cross diamond row. The second time and all even times you do an increase, it adds the other half of the X on each side, thereby giving you two additional X's in the next criss cross diamond row after the original row before this set of increases. Jump to the increases below... For decreases, you'll subtract two stitches to either side of the row. The first time and all odd times after you do a decrease, it takes away half of an X or one slant to each side when you work the next criss cross diamond row. The second time and all even times you do an decrease, it takes away the other half of the X on each side, thereby giving you two fewer X's in the next criss cross diamond row after the original row before this set of decreases. Jump to the decreases below... You will work an alternate row 5 after the first/odd increase or decrease, so that the X's stay lined up on top of one another. Special Stitch Abbreviations:
Here are the special abbreviations for this stitch again...
criss-left = work a dtr into the FP of the 4th st of the group from prev odd row OR (for future rows) into the top of the 2nd dtr slant - a.k.a. top of the cross-right slant – of the group from prev odd row. cross-right = work a dtr into the FP of the first st of the group from prev odd row, hereby crossing over the last dtr made and creating a “X” OR (for future rows) into the top of the 1st dtr slant - a.k.a. top of the criss-left slant – of the group from prev odd row, crossing over the last dtr made. criss cross diamond = criss-left, sk 1 st of current row, sc 2, [cross-right, criss-left, sk 2 sts of current row, sc 2] rep across until only one more st of the section rems, cross-right, sk 1 st of current row.
Reminder:
Criss Cross Diamond Increase Instructions:
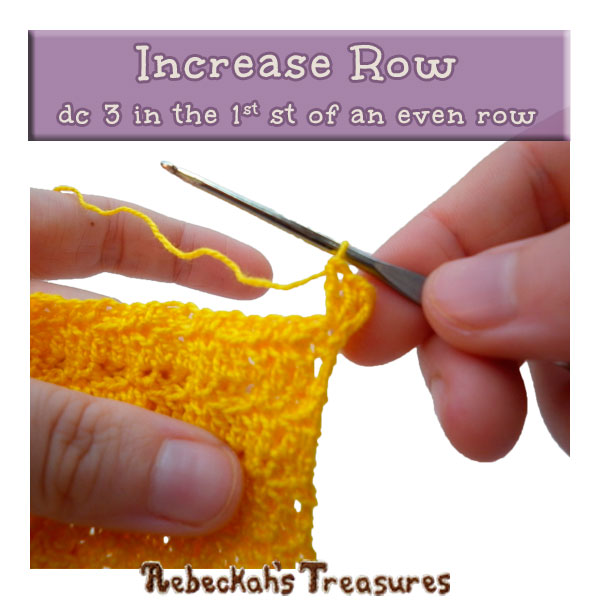
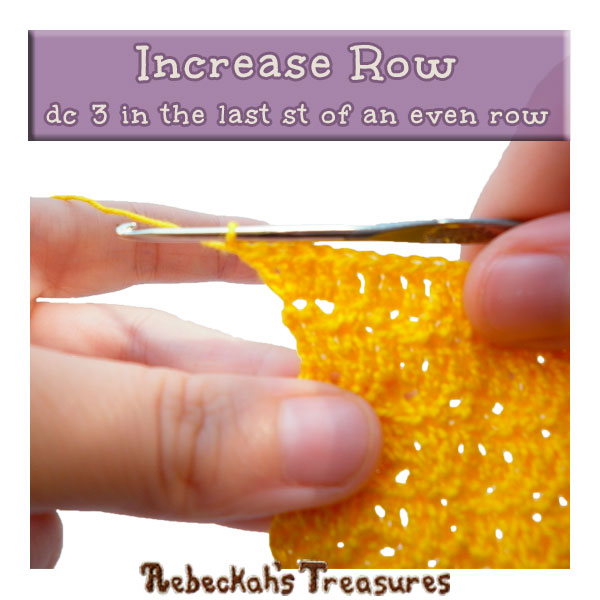
Work the increase on an even double crochet row OR if following the photo/video tutorials, it's row 14 for the first increase and row 16 for the second increase...
increase row: dc 3 in the first st, dc across the row until only 1 st rems, dc 3 in the last st, ch 1, turn (4 sts more than the prev row). *Click on pictures to get a closer look.
Working the next Criss Cross Diamond row after the FIRST Increase:
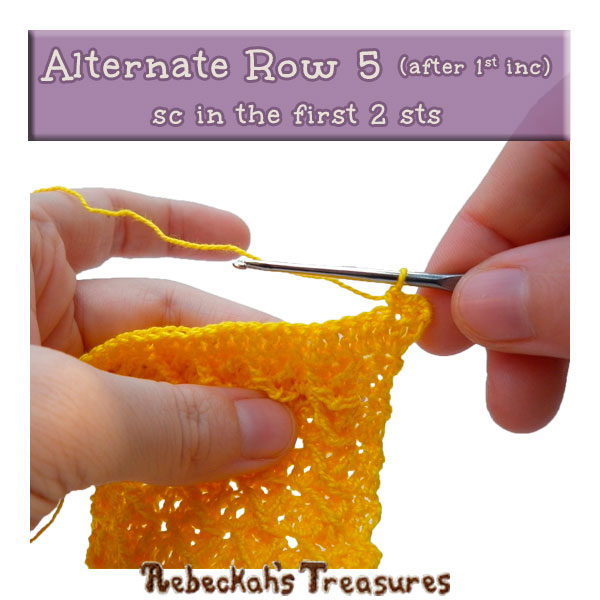
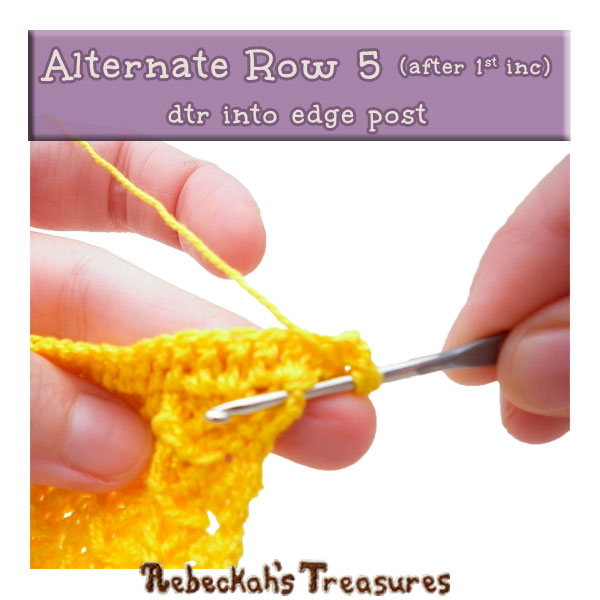
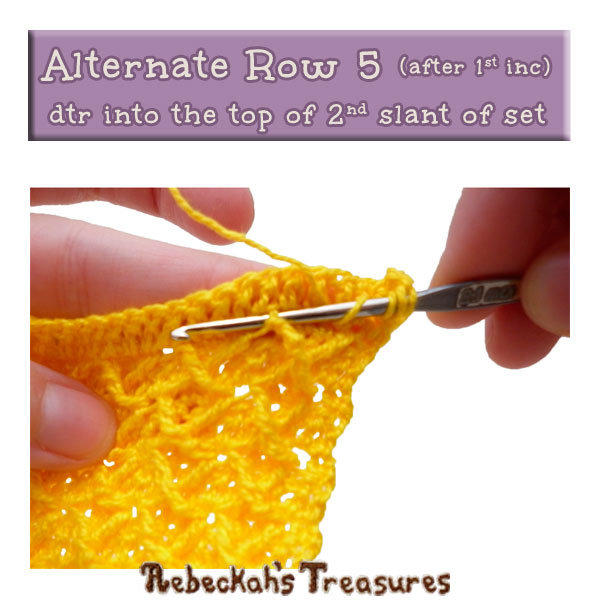
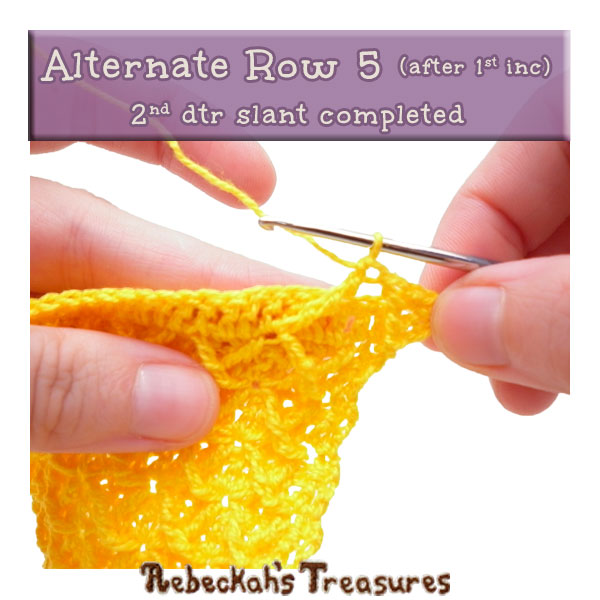
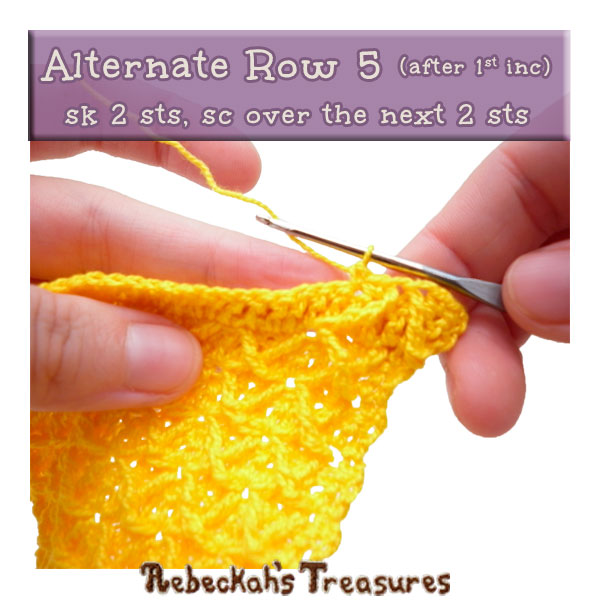
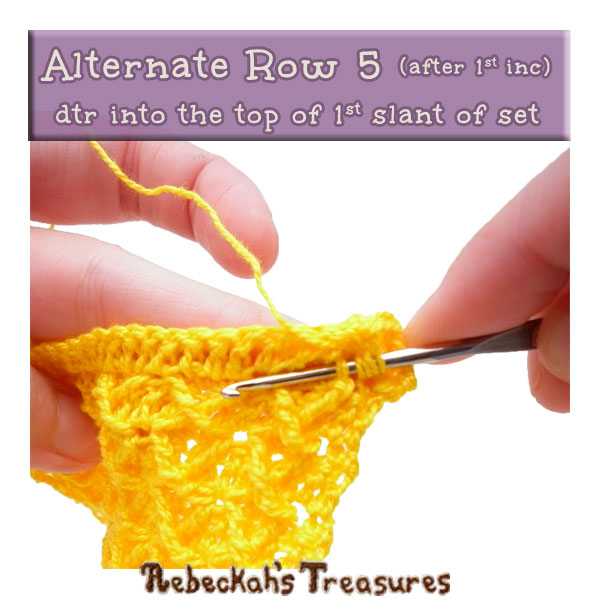
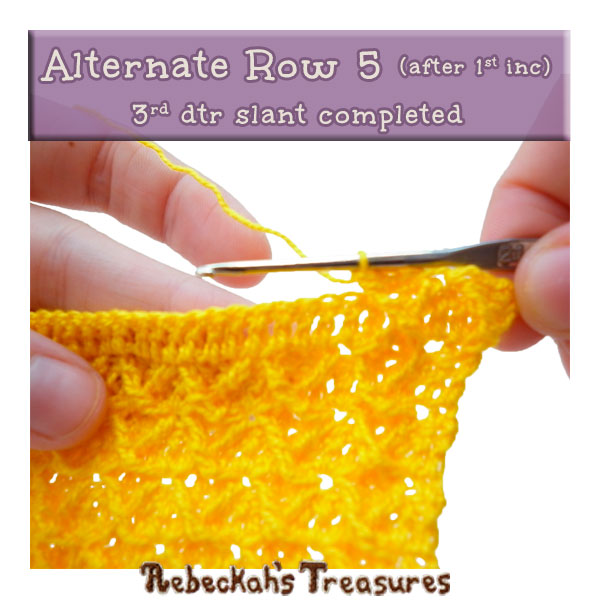
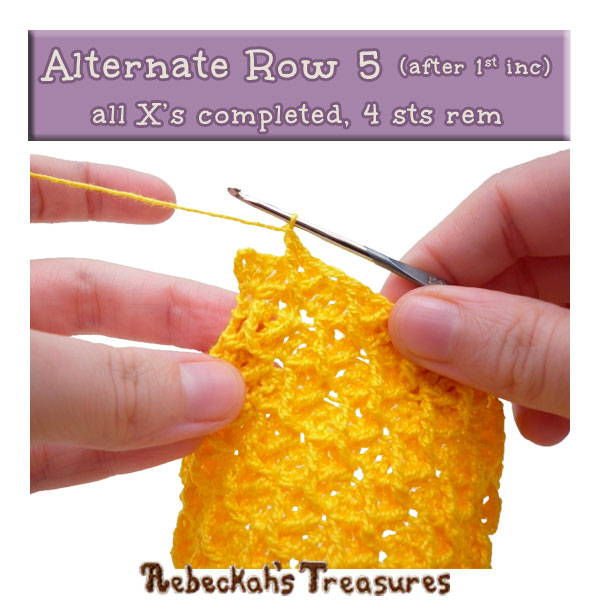
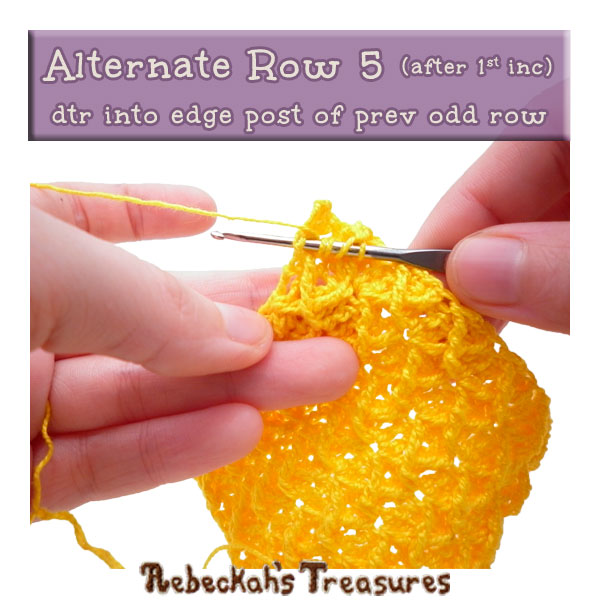
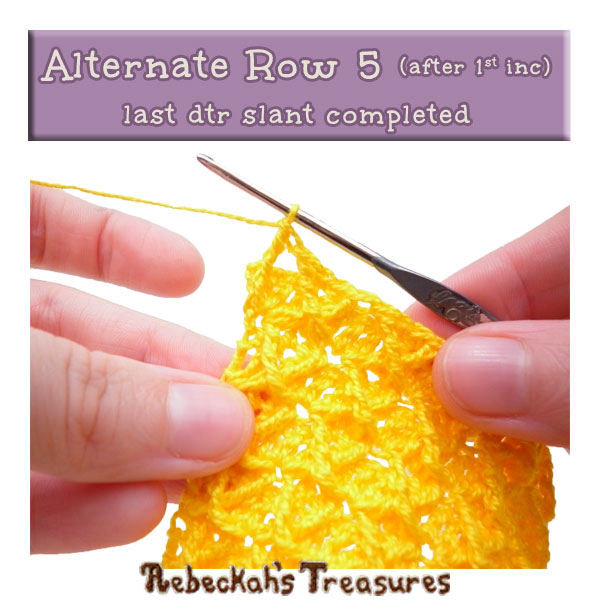
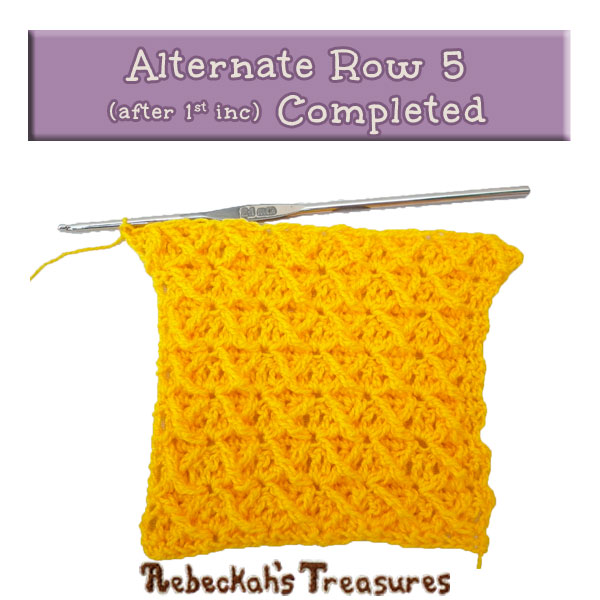
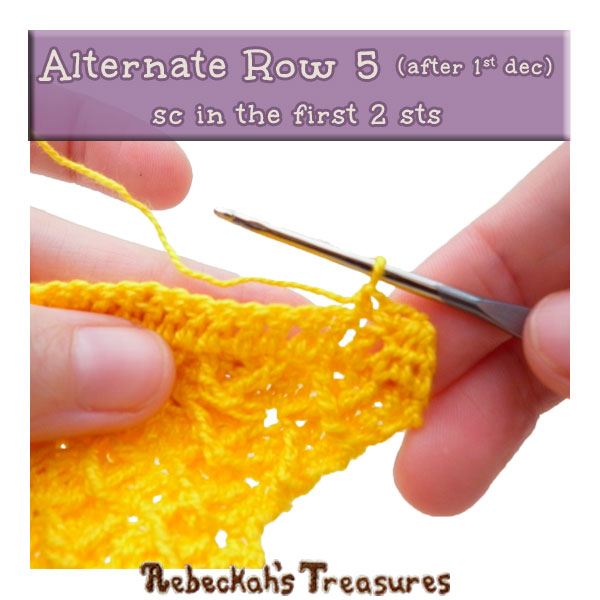
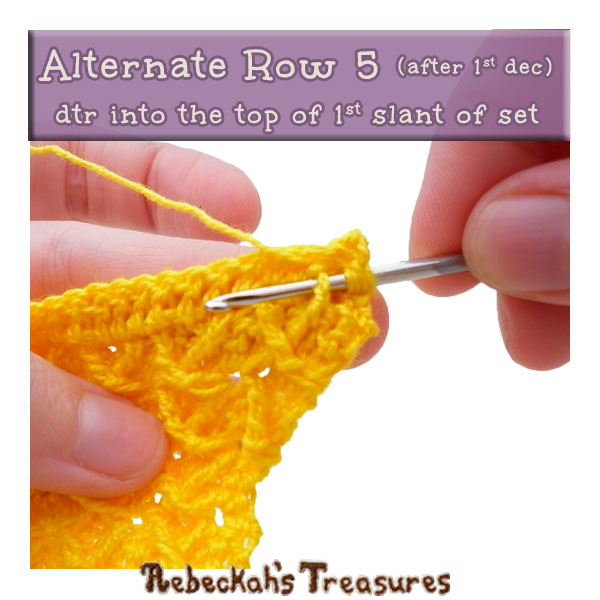
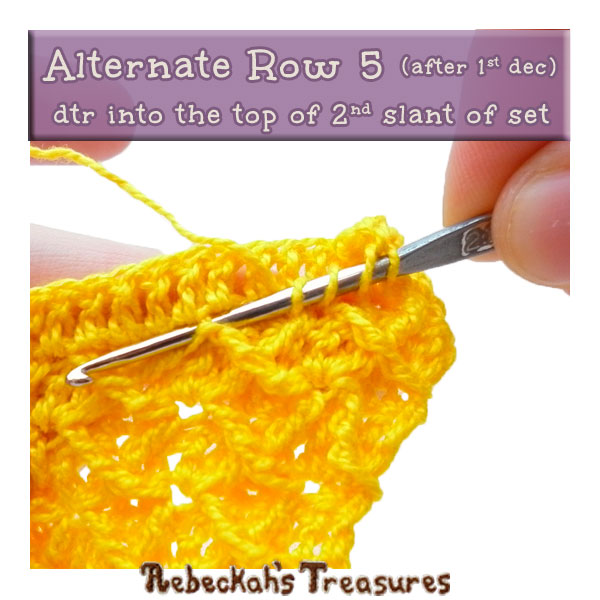
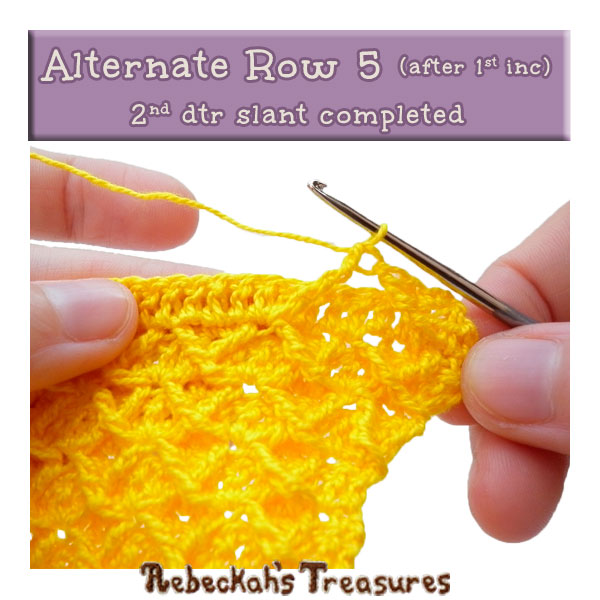
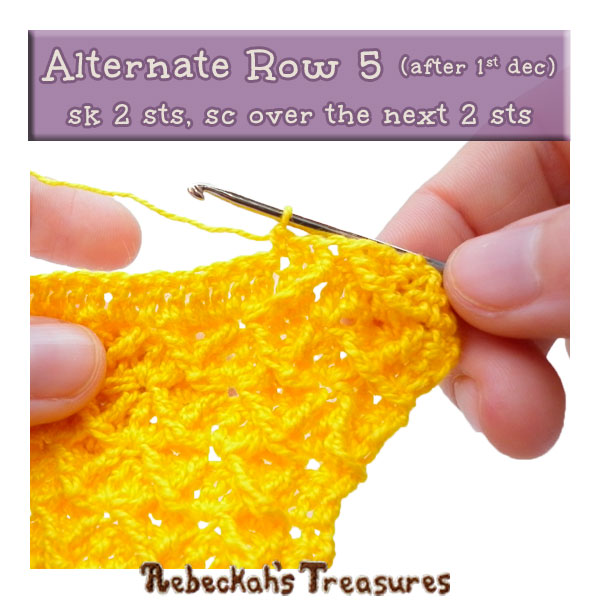
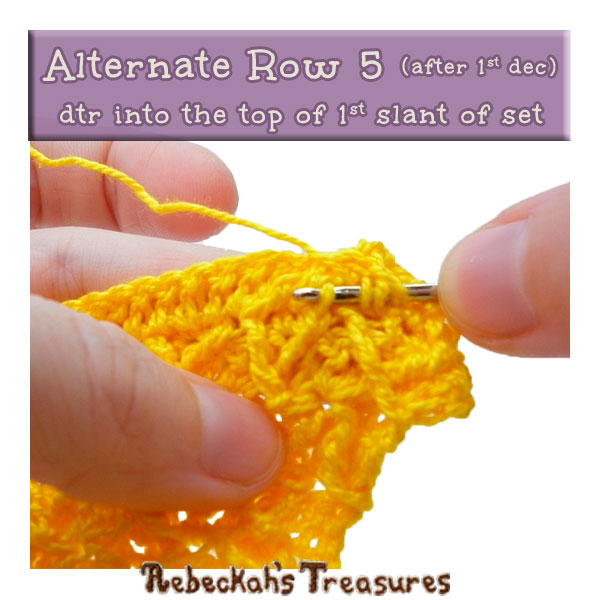
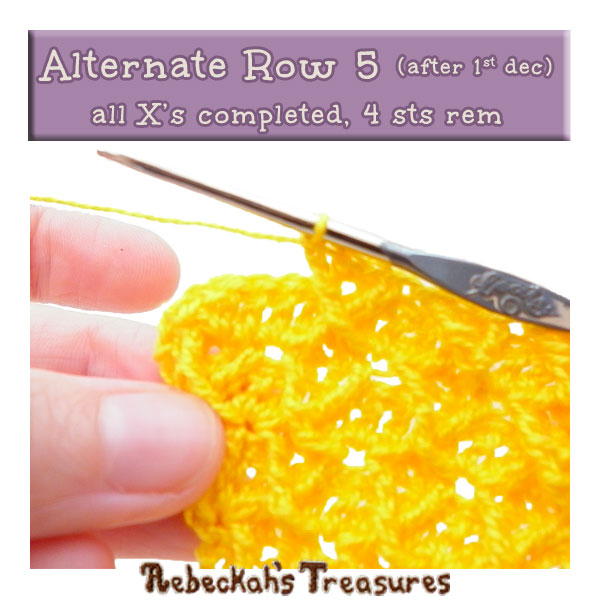
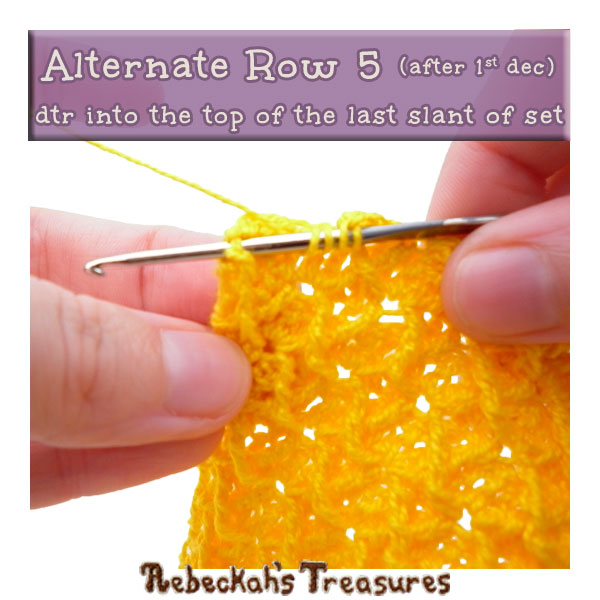
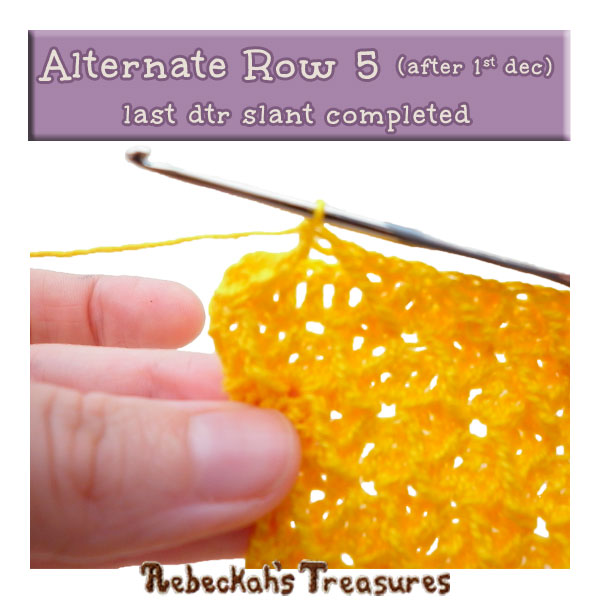
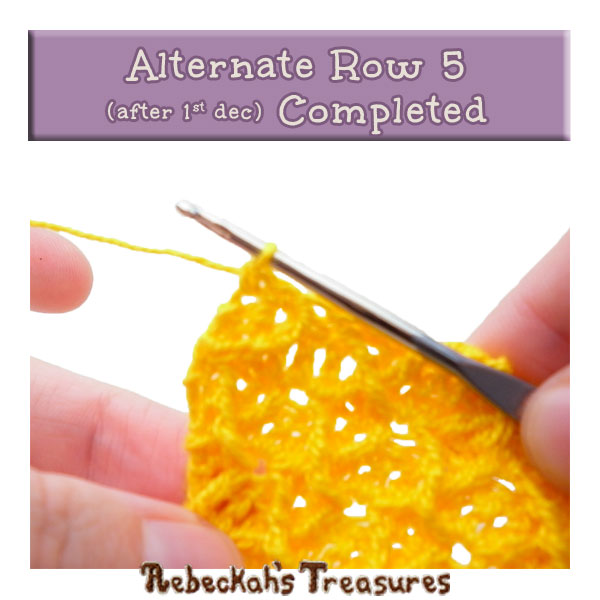
After the first increase, you will only have two extra stitches on each side, which means you won't have a complete X on either side. So you will need to work an alternate row 5 OR if following the photo/video tutorials, it's row 15. ALTERNATE row 5 – simple instructions: sc 2, cross-right (this time working the dtr into the edge post of the prev odd row), criss-left, sk 2 sts of current row, sc 2, rep only the rep section in the brackets [...] of the criss cross diamond stitch abbreviation across the row until only 3 sts & the anchor st(s) rem, cross-right, criss-left (this time working the dtr into the edge post of the prev odd row), sk 2 sts, sc 2, turn (same number of sts as the prev row). ALTERNATE row 5 – expanded instructions: sc 2, work a dtr into the edge post of the prev odd row (half of an X left on this side), work a dtr into the top of the 2nd dtr FP st (of first official group) from the prev odd row, sk 2 sts of current row, sc 2, [work a dtr into the top of the 1st dtr FP st (of group) from the prev odd row (so you are crossing over the last dtr FP st made and creating a “X”), work a dtr into the top of the 2nd dtr FP st (of new group) from the prev odd row, sk 2 sts of current row, sc 2] rep across the row until only 3 sts & the anchor st(s) rem, work a dtr into the top of the 1st dtr FP (of group) from the prev odd row (to complete the last official “X” of the section), work a dtr into the edge post of the prev odd row (half of an X left on this side), sk 2 sts of current row, sc 2, turn (same number of sts as the prev row). Reminder: The first and last single crochet in row 5 is the anchor stitch. If you are following another pattern, the number of single crochets before and after the criss cross section may differ.
If you would like to stay with the same number of stitches for a while before continuing to the second increase, all you need to do is alternate between repeating row 4 & the alternate row 5 until you reach your desired height, or for as many rows called for in the pattern you are following.
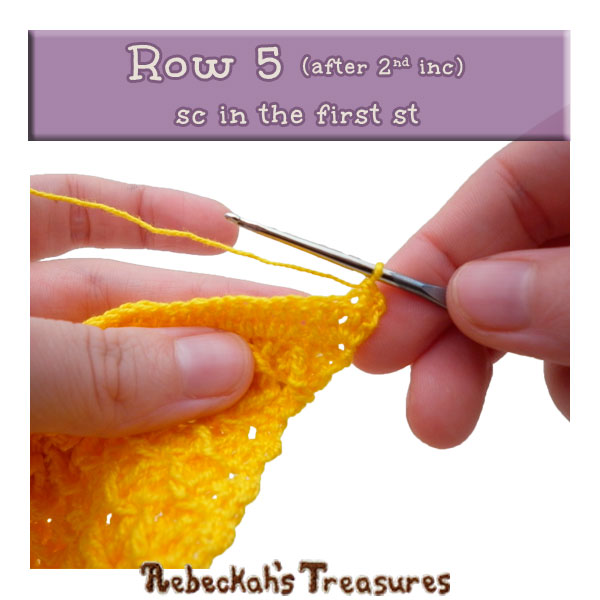
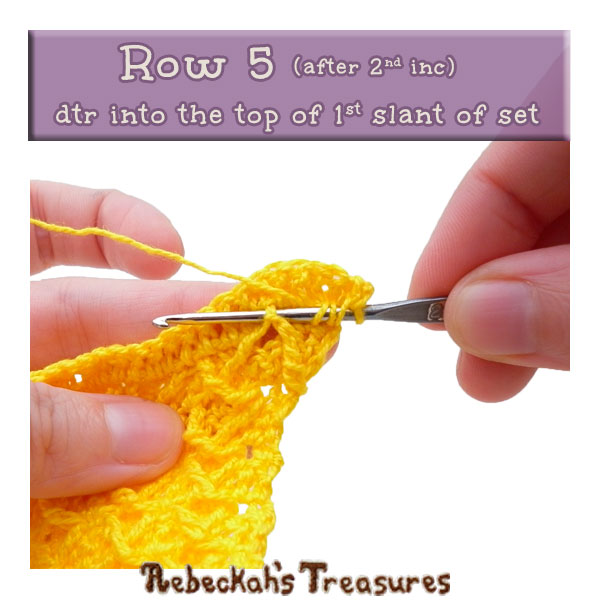
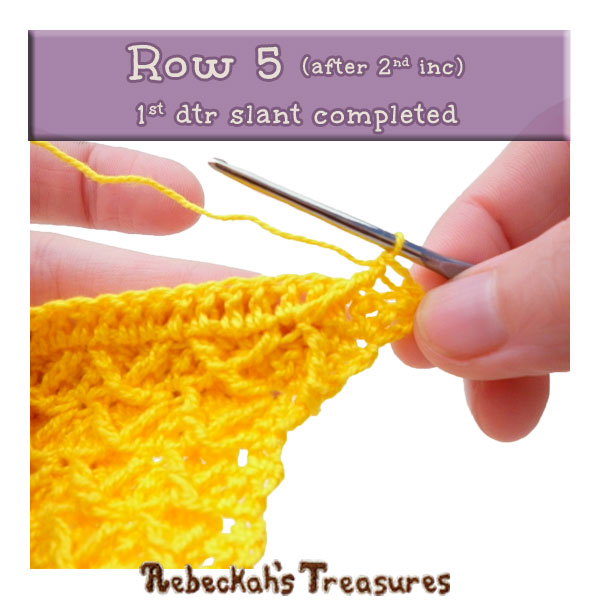
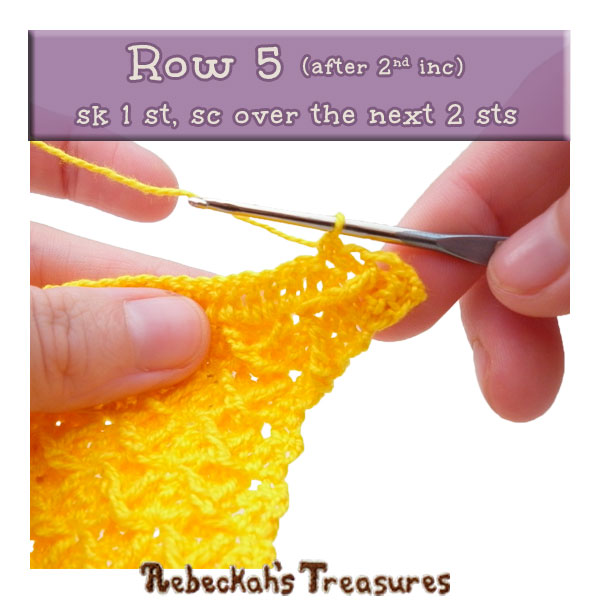
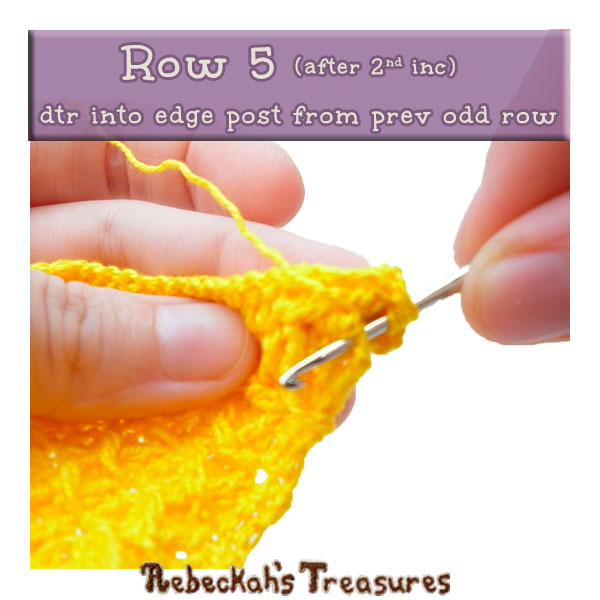
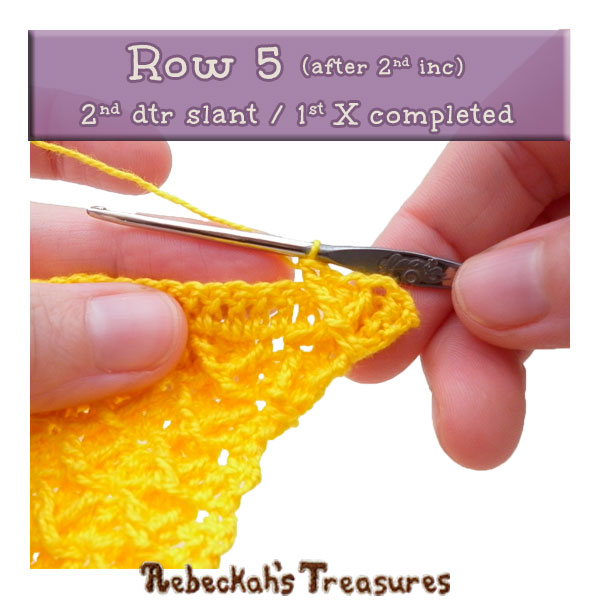
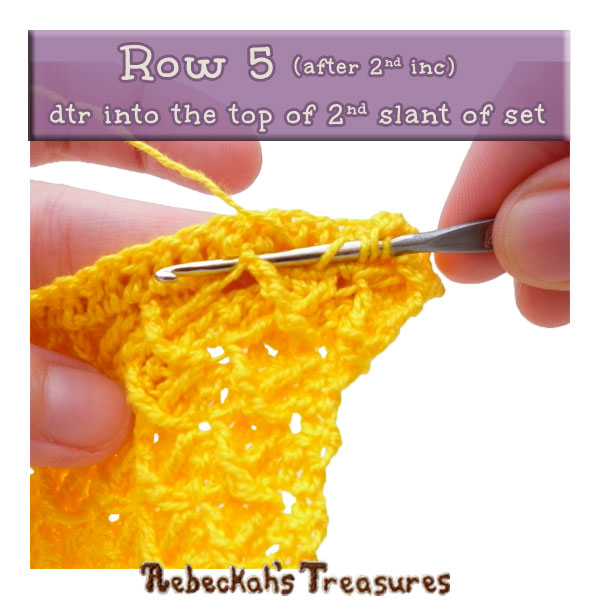
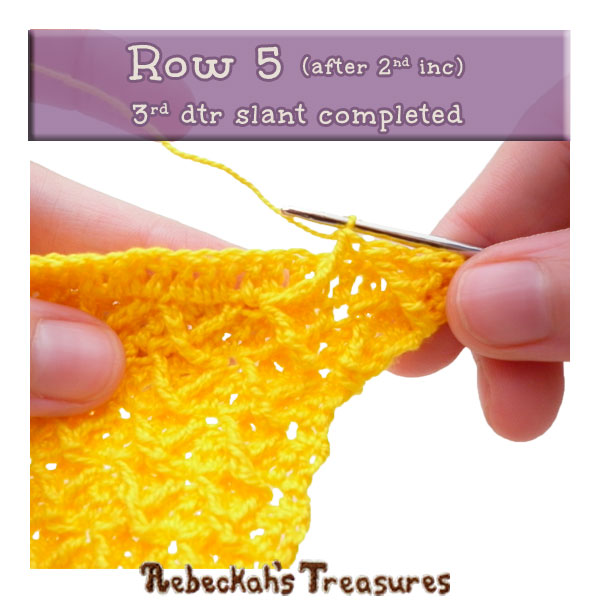
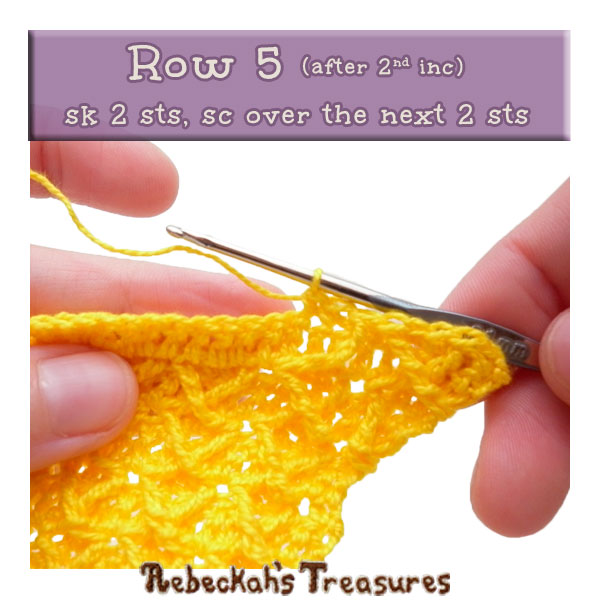
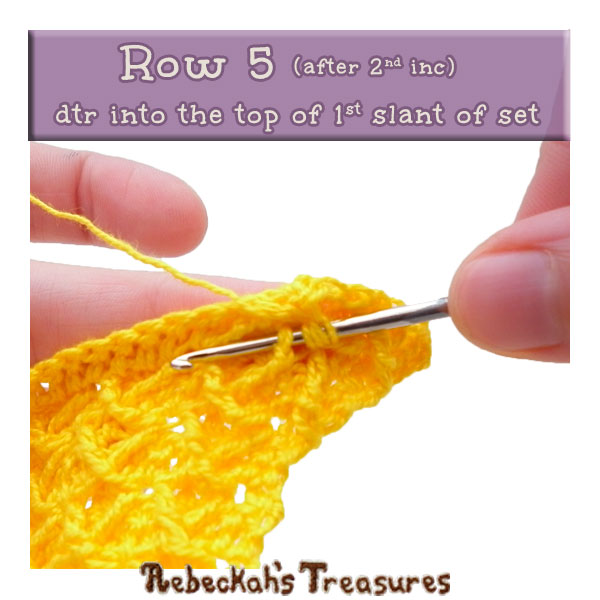
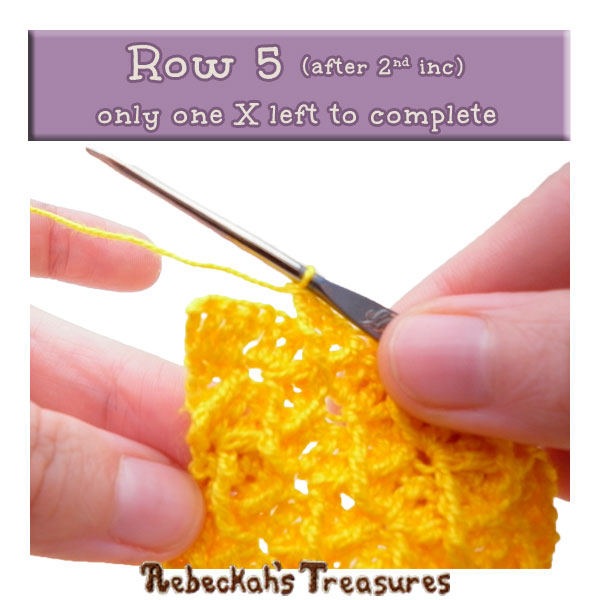
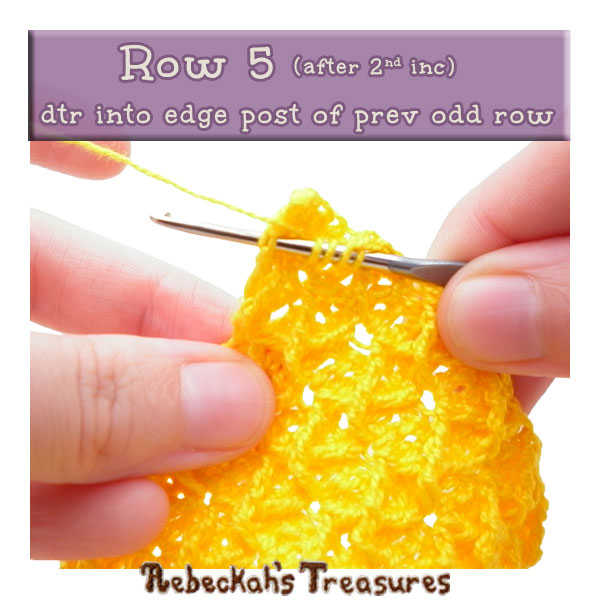
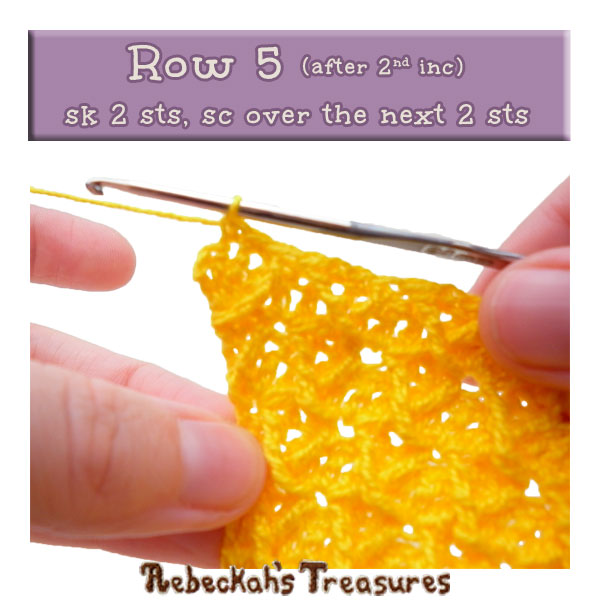
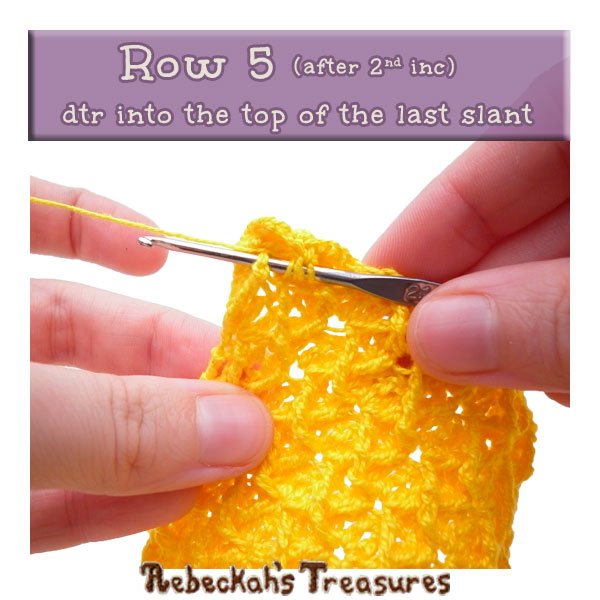
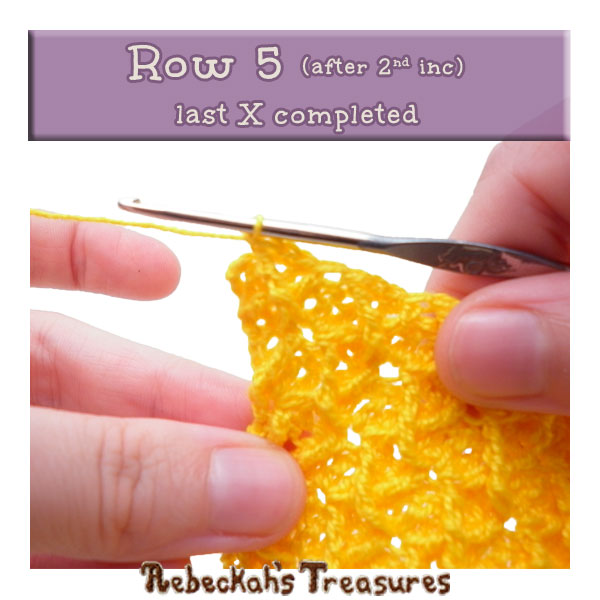
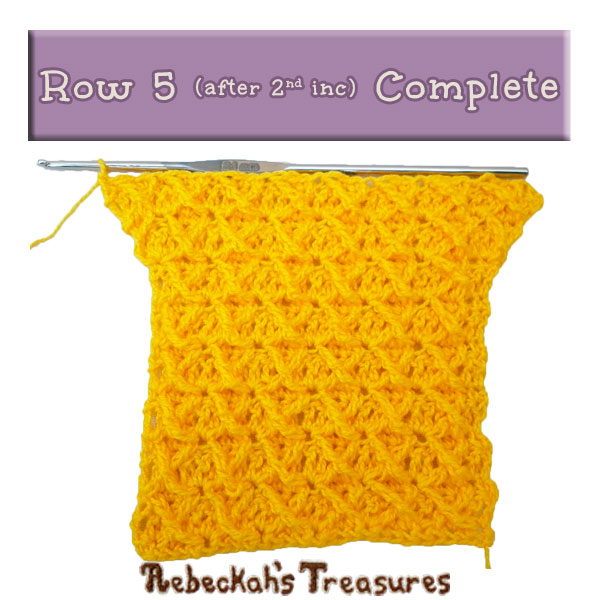
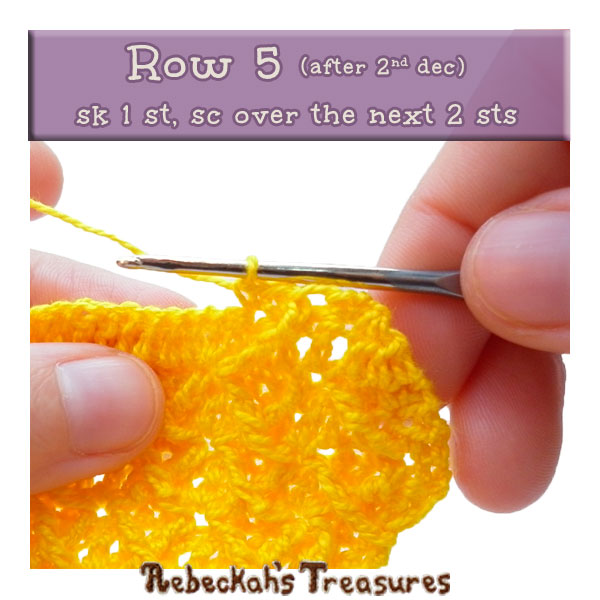
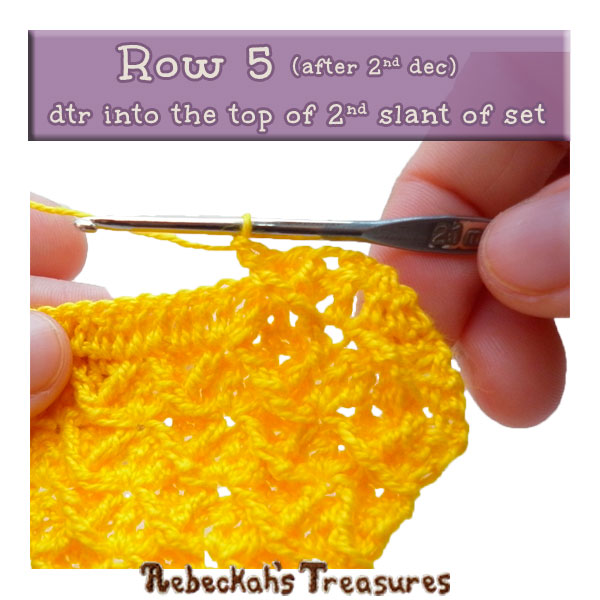
Here's row 4 again... row 4: dc across the row, ch 1, turn (same number of sts as the prev row). Otherwise, you will work another increase and proceed to the directions for the following... Working the next Criss Cross Diamond row after the SECOND Increase: After the second increase, you will have two more stitches to either side, which means you have the four stitches required to return to having complete X's across the row. So, you will be going back to working a normal row 5 (if following the photo/video tutorials, you'll be on row 17). However, the first criss cross diamond row after the second increase will be slightly different than the normal row 5 since there isn't a complete X on either side of the prev odd row. Here's how you will work it... row 5 – simple instructions: sc, criss-left, sk 1 st of current row, sc 2, cross-right (this time working the dtr into the edge post of the prev odd row), criss-left, sk 2 sts of current row, sc 2, rep only the rep section in the brackets [...] of the criss cross diamond stitch abbreviation across the row until only 5 sts & the anchor st(s) rem, cross-right, criss-left (this time working the dtr into the edge post of the prev odd row), sk 2 sts, sc 2, cross-right, sk 1 st of current row, sc, turn (same number of sts as the prev row). row 5 – expanded instructions: sc, work a dtr into the top of the solo edge dtr FP slant from prev odd row, sk 1 st of current row, sc 2, work a dtr into the edge post of the prev odd row, [work a dtr into the top of the 2nd dtr FP st (of new group) from the prev odd row, sk 2 sts of current row, sc 2, work a dtr into the top of the 1st dtr FP st (of group) from the prev odd row (so you are crossing over the last dtr FP st made and creating a “X”)] rep across the row until only 5 sts & the anchor st(s) rem, work a dtr into the edge post of the prev odd row, sk 2 sts of current row, sc 2, work a dtr into the top of the solo edge dtr FP slant from prev odd row (to complete the last “X” of the section), sk 1 st of current row, sc, turn (same number of sts as the prev row). Reminder: Again, the first and last single crochet in row 5 is the anchor stitch. If you are following another pattern, the number of single crochets before and after the criss cross section may differ.
If you would like to stay with the same number of stitches for a while before continuing to the decreases or increasing again, all you need to do is alternate between repeating row 4 & the normal row 5 (see below) until you reach your desired height, or for as many rows called for in the pattern you are following.
Working the normal Criss Cross Diamond row:
Now that you're finished with increasing, here's how to work the normal row 5 again... row 5 – simple instructions: sc, criss cross diamond however many multiples of 4 you started your project with or however many times called for in the pattern you are following, sc, turn (same number of sts as the prev row). row 5 – expanded instructions: sc, work a dtr into the top of the 2nd dtr FP st (of first group) from the prev odd row, sk 1 st of current row, sc 2, [work a dtr into the top of the 1st dtr FP st (of group) from the prev odd row (so you are crossing over the last dtr FP st made and creating a “X”), work a dtr into the top of the 2nd dtr FP st (of new group) from the prev odd row, sk 2 sts of current row, sc 2] rep across the row however many multiples of 4 you started your project with or however many times called for in the pattern you are following minus one, work a dtr into the top of the 1st dtr FP (of group) from the prev odd row (to complete the last “X” of the section), sk 1 st of current row, sc, turn (same number of sts as the prev row). Reminder: Again, the first and last single crochet in row 5 is the anchor stitch. If you are following another pattern, the number of single crochets before and after the criss cross section may differ. Criss Cross Diamond Decrease Instructions:
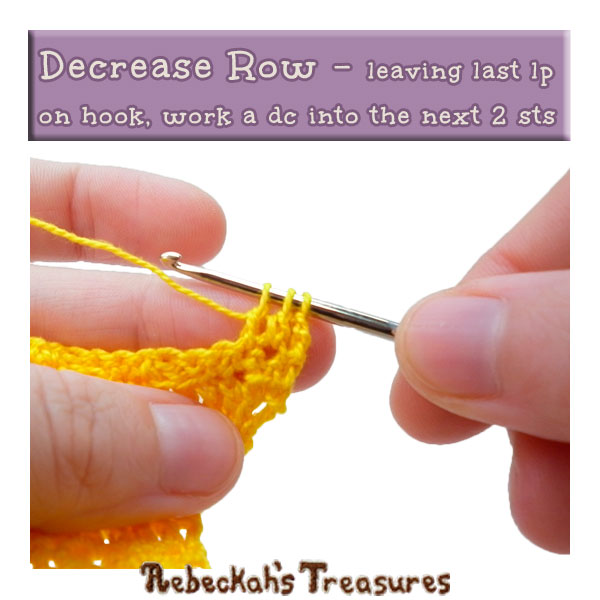
Work the decrease on an even double crochet row OR if following the photo/video tutorials, it's row 18 for the first decrease and row 20 for the second decrease.
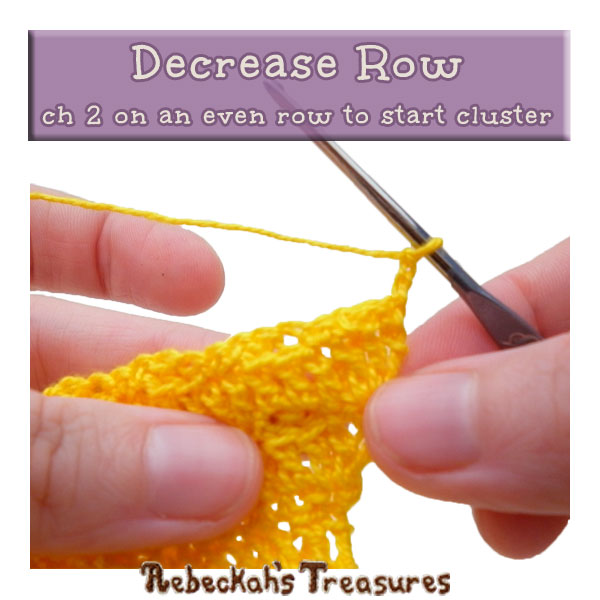
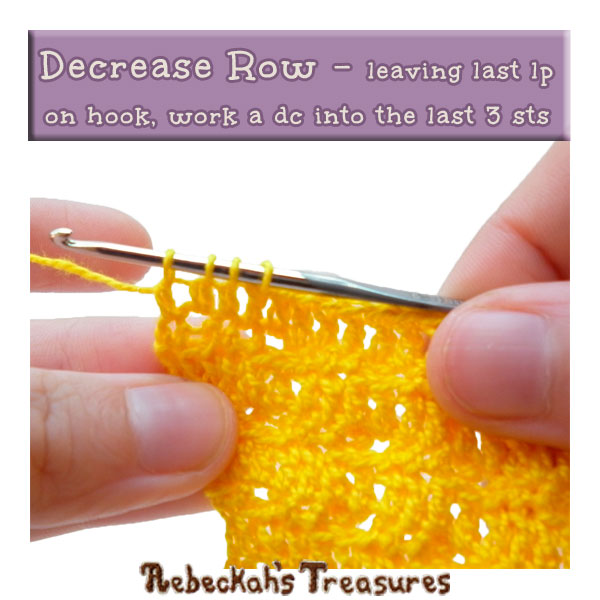
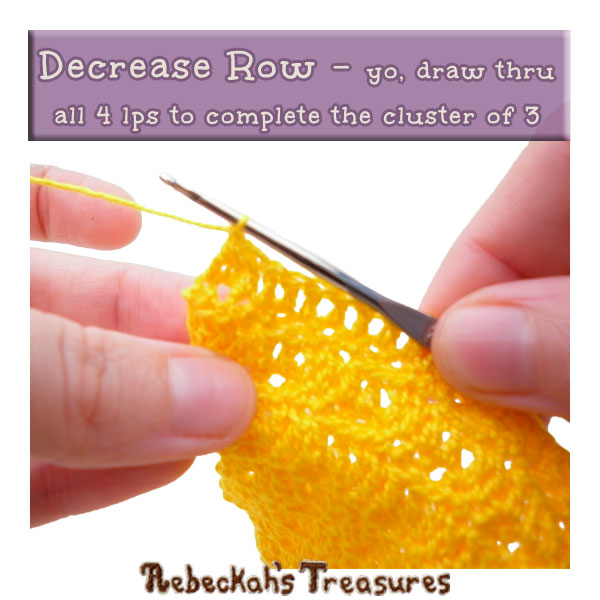
Here's a special stitch instruction for the decrease row... CL of 3 (for first one at the beg of a row) = ch 2, leaving the last lp of each of the following dc on hook – work a dc into the next 2 sts (you should have 3 lps on hook), yo, draw thru all 3 lps. CL of 3 (for all others) = leaving the last lp of the following dc on hook – work a dc into the next 3 sts (you should have 4 lps on hook), yo, draw thru all 4 lps.
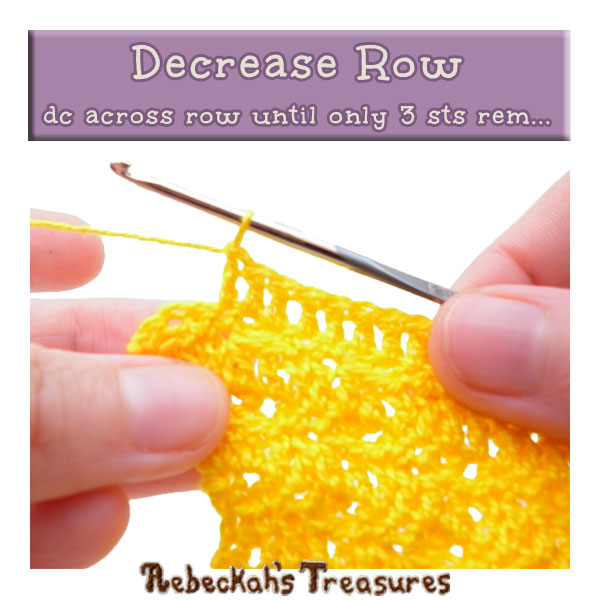
decrease row – simple instructions: CL of 3, dc across the row until only 3 sts rem, CL of 3, ch 1, turn (4 sts less than the prev row).
decrease row – expanded instructions: ch 2, leaving the last lp of each of the follow dc on hook – work a dc into the next 2 sts, yo draw thru all 3 lps on hook, dc across the row until only 3 sts rem, leaving the last lp of each of the follow dc on hook – work a dc into the last 3 sts, yo draw thru all 4 lps on hook, ch 1, turn (4 sts less than the prev row).
Working the next Criss Cross Diamond row after the FIRST Decrease:
After the first decrease, you will only have two stitches less on each side, which means you won't have a complete X on either side. So you will need to work an alternate row 5 OR if following the photo/video tutorials, it's row 19. *This alternate row 5 is different from the alternate row 5 used after the first increase, and is only used one time after the first decrease. All other times will use the original alternate row 5 as seen after the first increase. ALTERNATE row 5 – simple instructions: sc 2, rep only the rep section in the brackets [...] of the criss cross diamond stitch abbreviation across the row, turn (same number of sts as the prev row). ALTERNATE row 5 – expanded instructions: sc 2, work a dtr into the top of the 1st dtr FP st (of first group) from the prev odd row (so you create the solo dtr FP edge slant), [work a dtr into the top of the 2nd dtr FP st (of new group) from the prev odd row, sk 2 sts of current row, sc 2, work a dtr into the top of the 1st dtr FP st (of group) from the prev odd row (so you are crossing over the last dtr FP st made and creating a “X”)] rep across the row until only 3 sts & the anchor st(s) rem, work a dtr into the top of the 2nd dtr FP st (of new group) from the prev odd row (half of an X left on this side), sk 2 sts of current row, sc 2, turn (same number of sts as the prev row). Reminder: The first and last single crochet in row 5 is the anchor stitch. If you are following another pattern, the number of single crochets before and after the criss cross section may differ.
If you would like to stay with the same number of stitches for a while before continuing to the second decrease, all you need to do is alternate between repeating row 4 & the alternate row 5 until you reach your desired height, or for as many rows called for in the pattern you are following. Otherwise, you will work another increase and proceed to the directions for the following...
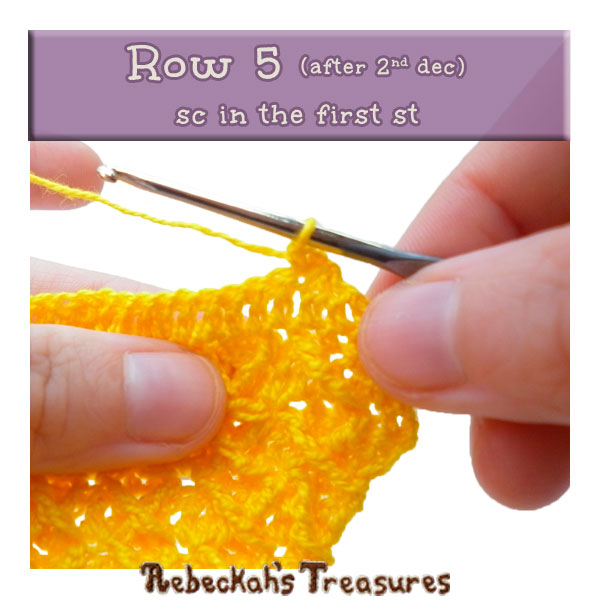
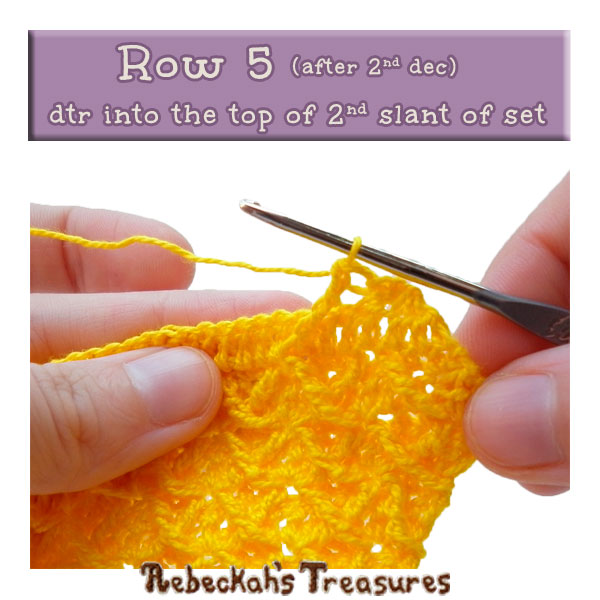
Working the next Criss Cross Diamond row after the SECOND Decrease: After the second decrease, you will have two less stitches to either side again, which means you will be back to the groups of four stitches required to return to having complete X's across the row. So, you will be going back to working a normal row 5 (if following the photo/video tutorials, you'll be on row 21). The first criss cross diamond row after the second decrease will be exactly the same as the normal row 5 with the only difference being you ignore completely the solo slants or half groups on either side of the prev odd row and you pretend like they do not exist. row 5 – simple instructions: sc, criss cross diamond however many multiples of 4 you started your project with or however many times called for in the pattern you are following, sc, turn (same number of sts as the prev row). row 5 – expanded instructions: sc, work a dtr into the top of the 2nd dtr FP st (of first official group) from the prev odd row, sk 1 st of current row, sc 2, [work a dtr into the top of the 1st dtr FP st (of group) from the prev odd row (so you are crossing over the last dtr FP st made and creating a “X”), work a dtr into the top of the 2nd dtr FP st (of new group) from the prev odd row, sk 2 sts of current row, sc 2] rep across the row however many multiples of 4 you started your project with or however many times called for in the pattern you are following minus one, work a dtr into the top of the 1st dtr FP (of group) from the prev odd row (to complete the last “X” of the section), sk 1 st of current row, sc, turn (same number of sts as the prev row). Reminder: Again, the first and last single crochet in row 5 is the anchor stitch. If you are following another pattern, the number of single crochets before and after the criss cross section may differ.
If you would like to stay with the same number of stitches for a while before doing any more decreases or increases, all you need to do is alternate between repeating row 4 & the normal row 5 until you reach your desired height, or for as many rows called for in the pattern you are following.
Here's a recap of the Criss Cross Diamond Stitch... 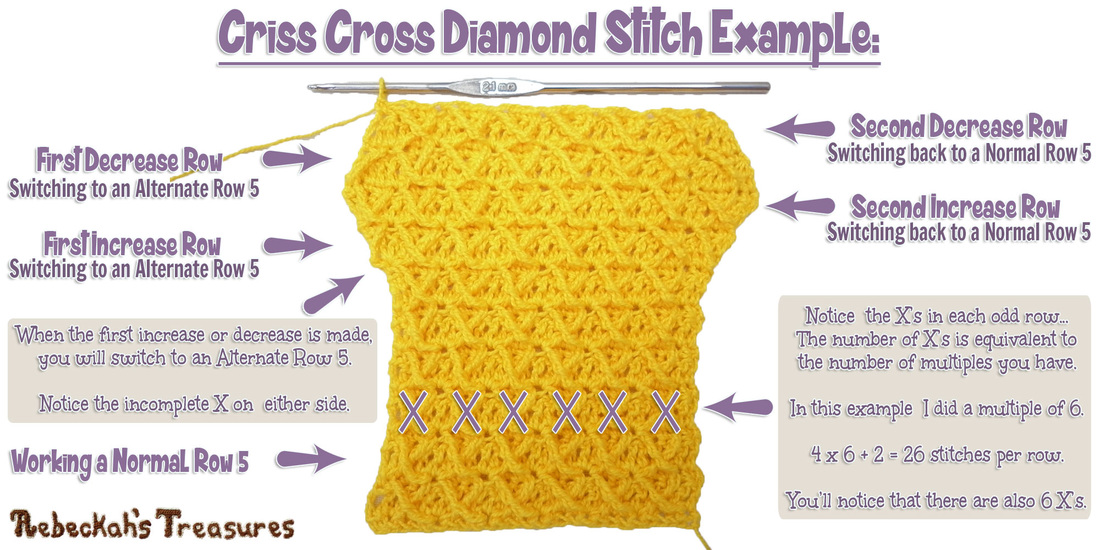
Jump to a specific section in this video tutorial!
*Note: Clicking on the links below will open this video in YouTube at the respective time. If you would rather stay on this page, just use the time bar to scroll to the linked time for the section you wish to view... Table of Contents 0:00 – Intro 0:20 – Supplies & Techniques 0:45 – Foundation Row Intro 1:04 – Foundation Row | Option 1: Starting with the traditional foundation chains and a row of single crochet. 1:33 – Foundation Row | Option 2: Starting with the recommended foundation single crochet. 1:53 – Row 2 | Working a row of double crochet. 3:14 – Row 3 Intro 5:00 – Row 3 | Working the first row of X's. 12:56 – Row 4 | Working a row of double crochet. 13:17 – Row 5 | Working the next row of X's (a.k.a. normal row 5). 19:30 – Row 6+ | Repeating rows 4 & 5. *Optional for the tutorial. Increases (19:56): 20:06 – Row 14 | Working the FIRST set of increases. 21:53 – Row 15 | Working the next row of X's (a.k.a. alternate row 5). 28:43 – Row 16+ | Repeating rows 4 & 15. *Optional - not repeated in the tutorial. 28:53 – Row 16 | Working the SECOND set of increases. 30:14 – Row 17 | Working the next row of X's (a.k.a. returning to a normal row 5). 36:59 – Row 18+ | Repeating rows 4 & 5. *Optional - not repeated in the tutorial. Decreases (37:09): 37:19 – Row 18 | Working the FIRST set of increases. 39:17 – Row 19 | Working the next row of X's (a.k.a. alternate row 5). 44:40 – Row 20+ | Repeating rows 4 & 15. *Optional - not repeated in the tutorial. 44:50 – Row 20 | Working the SECOND set of increases. 46:26 – Row 21 | Working the next row of X's (a.k.a. returning to a normal row 5). 50:57 – Row 22+ | Repeating rows 4 & 5. *Optional - not repeated in the tutorial.
I hope you've enjoyed learning this new stitch. If you have, please share your rating of this stitch with us here, or favourite this stitch pattern on Ravelry here...
If you have any questions or concerns, leave me a comment below and I'll get back to you as quickly as I can... Thanks so much for visiting. I hope you have a wonderful day!
Please share this tutorial with your friends or anyone you know who loves textured crochet...  

Hello Visitor and Welcome to Rebeckah's Treasures... I am a Norwegian/Canadian currently studying Midwifery in the UK. I love to crochet! At Rebeckah's Treasures, I share my crochet patterns and treasures. I hope they inspire you to crochet your own little treasures too... 
Comments
|


Hello, my name is Rebeckah.
I hope my crochet inspires you to create your very own treasures! Learn more about me... Categories
All
Archives
October 2021
© 2012-2021 Rebeckah Ferger
All rights reserved. Disclaimer: This website makes use of sponsored and/or affiliate links. Please see this page for more information.
|
- Home
-
-
- Special Offers
- New Releases
- Accessory Crochet Patterns
- Afghan Square Crochet Patterns
- Amigurumi Crochet Patterns
- Applique Crochet Patterns
- Baby Crochet Patterns
- Dolly Crochet Patterns
- Fashion Doll Crochet Patterns
- Free Downloads
- Holiday Crochet Patterns
- Tapestry Crochet Patterns
- Under the Sea Crochet Patterns
- Wedding Crochet Patterns
- Disclaimer and FAQs
-
-
- Free Crochet Patterns
- New Free Releases
- Free Accessory Crochet Patterns
- Free Afghan Square Crochet Patterns
- Free Amigurumi Crochet Patterns
- Free Applique Crochet Patterns
- Free Baby Crochet Patterns
- Free Dolly Crochet Patterns
- Free Fashion Doll Crochet Patterns
- Free Guest Crochet Patterns
- Free Holiday Crochet Patterns
- Free Tapestry Crochet Patterns
- Free Under the Sea Crochet Patterns
- Free Wedding Crochet Patterns
- Free Crochet Patterns Coming Soon
Welcome Visitor! I hope you enjoy my treasures.


 RSS Feed
