|
Disclaimer: This website makes use of sponsored and/or affiliate links. Please see this page for more information.
UPDATE - February 3, 2016: This tutorial has been revised to include a photo tutorial, a video tutorial and improved written directions! See the brand new tutorial here...
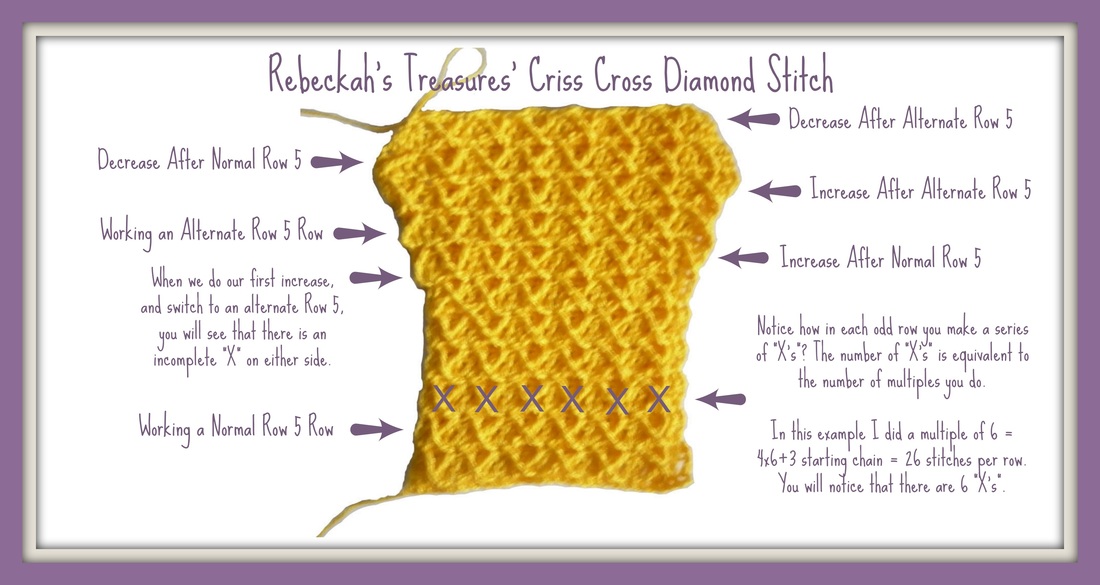
Criss Cross Diamond Stitch Instructions:Starting Chain is a multiple of 4 + 3 (example: 7 = 4 x 1 + 3; 27 = 4 x 6 + 3; 63 = 4 x 15 + 3)
NOTE: For the next row, you will create several "X's" across the row. The amount of "X's" is equivalent to the number of multiples of 4 you do. All FPdtr stitches of this next row will be worked into the posts of the previous single crochet row, or 2nd row back. Ignoring the first and last posts of the row, and breaking up the row into groups of 4, each FPdtr will be worked into the 4th post of the group, then the next one will be worked into the 1st post of each group. So the pattern is as follows: Counting first and last posts of row: 5th post, 2nd post, 9th post, 6th post, 13th post, 10th post... etc. Not counting first & last posts of row: 4th post, 1st post, 8th post, 5th post, 12th post, 9th post... etc.
NOTE: For this next row, you will also create several "X's" across the row. For the next row, all FPdtr stitches will be worked into the top of the FPdtr posts of the previous single crochet row, or 2nd row back, as if it were a complete single crochet row. So the pattern is as follows: Only counting the dtr posts ~ 2nd post, 1st post, 4th post, 3rd post, 6th post, 5th post... etc.
Alternate row 5 for odd increase or decrease rows:NOTE: Whenever you do this alternate row, you will not create perfect "X'"s across the row like for the other. Instead you will have one incomplete "X" on each side of the row. This time the FPdtr go into each dtr post as before, except the first and last FPdtr stitches go into the edge posts of the row, and the 2nd and 2nd to last posts are skipped. So the pattern will be: Only counting the edge and dtr posts ~ edge post, 3rd post, 2nd post, 5th post, 4th post, 7th post, 6th post... repeat then end with edge post.
Increasing Stitches in the Row:Stitches will be increased in the even double crochet row. All you have to do is add 2 dc to the first and last stitches of the row so that 3 stitches are made in each, and do one dc in all stitches in between those ones.
Decreasing Stitches in the Row:As for increasing, stitches will be decreased in the even double crochet row. All you have to do is dc3tog the first 3 stitches and last 3 stitches of the row so that where the were 3 stitches there is now only one, and do one dc in all stitches in between those ones.
Note: Each row will be a multiple of 4 + 2 (example: 6 = 4 x 1 + 2; 26 = 4 x 6 + 2; 62 = 4 x 15 + 2) Odd rows facing you is the right side of the work. I plan to make a video tutorial of the stitch sometime in 2014. Until then, if you have any questions, or need any help with this stitch, please leave me a comment below, or contact me here.

Hello Visitor and Welcome to Rebeckah's Treasures... I am a Norwegian/Canadian currently studying Midwifery in the UK. I love to crochet! At Rebeckah's Treasures, I share my crochet patterns and treasures. I hope they inspire you to crochet your own little treasures too... 
Comments
|
Hello, my name is Rebeckah.
I hope my crochet inspires you to create your very own treasures! Learn more about me... Categories
All
Archives
October 2021
© 2012-2021 Rebeckah Ferger
All rights reserved. Disclaimer: This website makes use of sponsored and/or affiliate links. Please see this page for more information.
|
- Home
-
-
- Special Offers
- New Releases
- Accessory Crochet Patterns
- Afghan Square Crochet Patterns
- Amigurumi Crochet Patterns
- Applique Crochet Patterns
- Baby Crochet Patterns
- Dolly Crochet Patterns
- Fashion Doll Crochet Patterns
- Free Downloads
- Holiday Crochet Patterns
- Tapestry Crochet Patterns
- Under the Sea Crochet Patterns
- Wedding Crochet Patterns
- Disclaimer and FAQs
-
-
- Free Crochet Patterns
- New Free Releases
- Free Accessory Crochet Patterns
- Free Afghan Square Crochet Patterns
- Free Amigurumi Crochet Patterns
- Free Applique Crochet Patterns
- Free Baby Crochet Patterns
- Free Dolly Crochet Patterns
- Free Fashion Doll Crochet Patterns
- Free Guest Crochet Patterns
- Free Holiday Crochet Patterns
- Free Tapestry Crochet Patterns
- Free Under the Sea Crochet Patterns
- Free Wedding Crochet Patterns
- Free Crochet Patterns Coming Soon
Welcome Visitor! I hope you enjoy my treasures.


 RSS Feed
