|
Disclaimer: This website makes use of sponsored and/or affiliate links. Please see this page for more information.
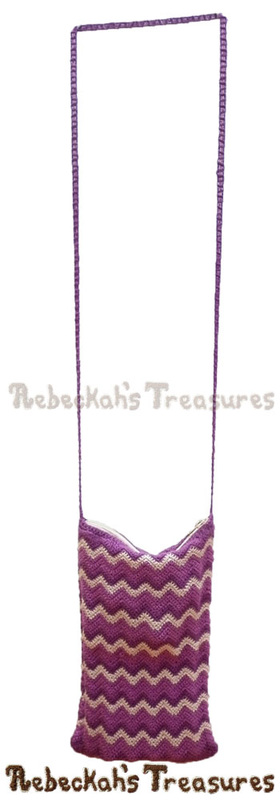
Looking for a stylish bag for when you’re on the go? Crochet this awesome Chevron Shoulder Bag!
It’s just the right size for carrying a passport, cell phone and other small necessities... 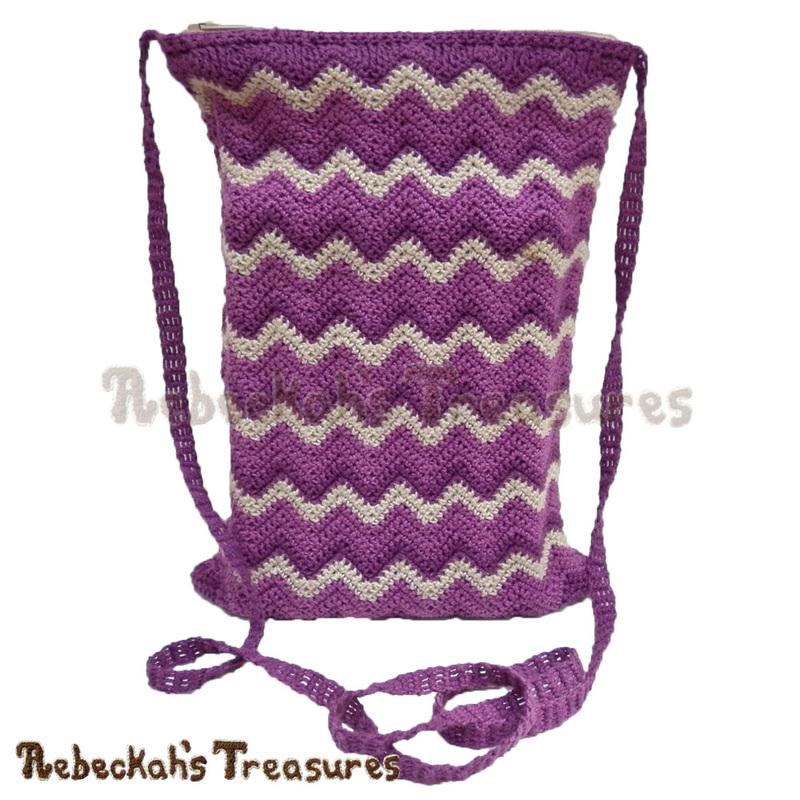
This crochet pattern includes written instructions for crocheting the chevron shoulder bag you see pictured in two or more colours according to your preference.
This project was inspired back in 2014 when I fell in love with Chevrons and decided I needed a new on the go bag. You can read the full story behind this bag here... I chose three of my favourite colours (plum, purple & beige) to make this bag, but you can chose any and as many colours as you like for yours!
This pattern is copyrighted to Rebeckah Ferger of www.rebeckahstreasures.com. It is for personal use only. No part of this pattern may be copied or distributed in any way. If you sell what you make from this pattern, please credit me as the designer. All rights reserved, 2016.

You'll Need:
Sizing:
8.5” Height x 6” Width (22 cm x 15 cm).
*For more sizing options and other customizations, purchase the ad-free downloadable PDF version of this crochet pattern for only $3.75. Gauge:
One Chevron = 11 sts (from peak to peak) = 1” (2.5 cm).
Note: This is just an approximate size. Your gauge will be the determining factor for your project size, and it’s perfectly all right if your bag is a bit bigger or smaller than this one! Pattern Notes:
You should be familiar with basic crochet stitches (chs, sl sts, sc, hdc, dc, tr), working in rows, front/back loops, and how to do increases and decreases. A special stitch you should be familiar with is a variation of the cluster.
Decreases or tog sts are best worked by using the invisible decrease technique, where you only work in the front or back loops of a stitch. If you are unfamiliar with this technique, see my video tutorial here... On occasion, a recommended length for a starting or ending tail is suggested. This is the minimum length you will need because you will use these tails to stitch up seams. If you would like to make the tails longer just to be safe, you can do that too! If you run out of tail length for sewing, just cut some more thread and complete the seam. When a long tail is suggested instead of a specific length, simply fasten off where the wrapped thread reaches the side of your palm. You should also be familiar with hand sewing on crochet pieces by means of the whip and running stitches. Additional notes for each part are included as you come to them below... Chevron Full Panel Instructions:
Make 2
The full panel is worked in rows from the bottom-up. You need at least two for one bag. If you’d like two full compartments inside the bag, make three of these panels. Change colours as frequently as you like, or follow the same colour change as the model bag. *EVEN rows = RS. Colour Change Pattern: 3 rows in A, [*4 rows in B, 2 rows in C,** 2 rows in A] rep 6 times, rep from * to **, 5 rows in A. Full Panel Instructions: ch 50 with a loose tension... row 1: work this row in the bottom lp (a.k.a. back hump) of the chs – sc in 2nd ch from hook, *hdc, dc 2 in the next st, (dc, tr, dc) in the next st, dc 2 in the next st, hdc,** [sc 2, rep from * to **] x 6, sc, ch 1, turn (77 sts). row 2: sc2tog in BL, sc 3, [sc 3 in the next st, sc 4, sk 2 sts, sc 4] x 6, sc 3 in the next st, sc 3, sc2tog in BL, now either ch 1, turn to cont with the same colour, OR switch colours (77 sts). When starting a new colour, you have two choices for making the switch...
row 3: sc2tog in FL, sc 3, [sc 3 in the next st, sc 4, sk 2 sts, sc 4] x 6, sc 3 in the next st, sc 3, sc2tog in FL, now either ch 1, turn to cont with the same colour, OR switch colours (77 sts). row 4-59: rep row 2-3 alternately, switching colours according to your preference. row 60: ch 4, [*CL of 3, hdc, sc, hdc, CL of 3,** tr 2] x 6, rep from * to **, tr, ch 1, turn (49 sts). row 61-62: sc 49, ch 1, turn (49 sts). Set aside for now. *NOTE: The chevron pattern may cause waves in the finished piece. You can either leave them as they are, iron the panels or block them to remove the waves. It’s totally up to you! Chevron Short Inner Panel Instructions (optional):
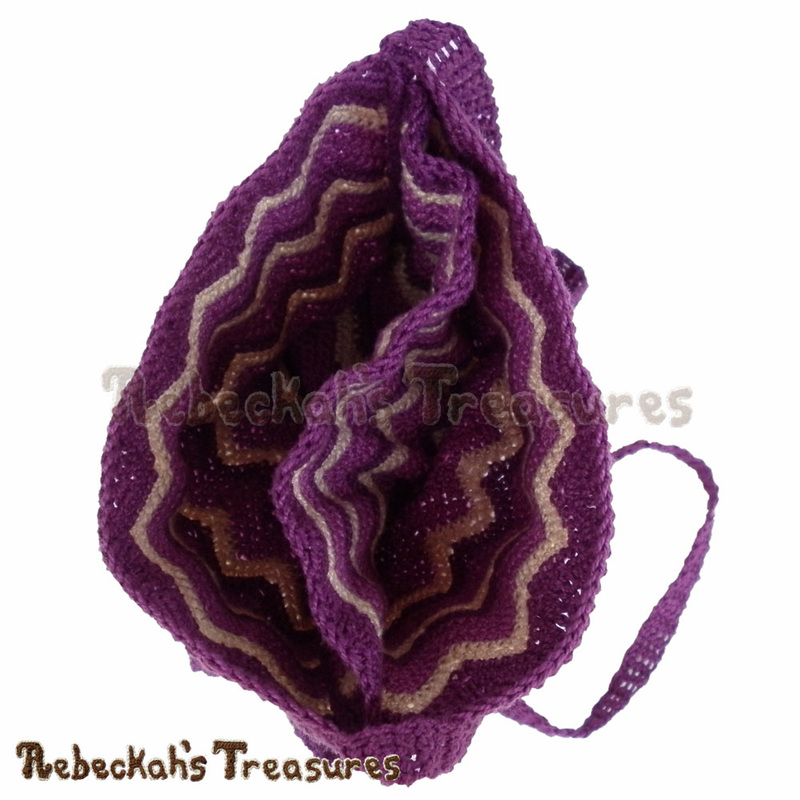
Make 1
The short inner panel is worked in rows from the bottom-up. For a short compartment and a long compartment inside the bag, make one of these. Omit if you’d prefer one compartment. Change colours as frequently as you like, or follow the same colour change as the inner panel of the model bag by starting with 2 rows in B and continuing with the same colour change repeat as above. *ODD rows = RS. *NOTE: The shorter compartment has the added benefit of only short stitches at the bottom. This means smaller items like coins and pencils are less likely to poke out. Short Inner Panel Instructions: make a slip knot with a long (16” or 40 cm) starting tail, ch 78... row 1: work this row in the bottom lp (a.k.a. back hump) of the chs – work a sc2tog into the 2nd & 3rd chs from hook, sc 3, [sc 3 in the next ch, sc 4, sk 2 chs, sc 4] x 6, sc 3 in the next ch, sc 3, sc2tog over the last 2 chs, ch 1, turn (77 sts). *NOTE: This row lines up with and the demo pattern reps the colours from row 30 of the full panel. row 2-30: rep rows 2-3 of the full panel alternately, switching colours according to your preference. row 31: rep row 60 of the full panel, ch 1, f/o. Set aside for now. Strap Instructions:
Make 1
The strap is worked in short rows from one side to the other. Follow this strap pattern, or use one of your own design instead. *EVEN rows = RS. make a slip knot with a long starting tail in A, ch 5... row 1: work this row in the bottom lp of the chs – sc in 2nd ch from hook & in each across (4 sts). row 2+: sc 4, ch 1, turn for as many rows as it takes to reach desired strap length, but remember to take stretch into consideration as it will stretch considerably (see additional notes below), f/o with a long tail at the end of the last row (4 sts). The size of the intended recipient will play an important factor into the length of the strap. An ideal strap length for a woman’s shoulder bag is 44” (111 cm), fully stretched (stretched as much as you can). It took 200 rows in cotton thread #10 to reach this ideal length for the model bag. However, you most likely won’t need more than 200 rows unless you are making this bag for an extremely tall or plus-sized woman. Fewer rows are needed if you are crocheting this for a child. Here's what you should have now... 
Sewing the Short Inner Panel onto a Full Panel:
Omit this step if you didn’t make a short inner panel.
Place the short inner panel on top of the full panel, so that the rows line up nicely together. The WS of both pieces should face you. Take the long starting tail of the short panel and using a whip stitch, sew the bottom row of the inner panel to its corresponding row on the full panel. Tie off. Putting the Rest of the Bag Together:
Follow the instructions below according to the number of panels and compartments your bag has...
Instructions for ONE Compartment using TWO Full Panels: Place the RS of both full panels together. Make a slip knot in A, sc attach to the top corner of one side of the panels to join the first st of both tog, sc evenly down the side, across the bottom and up the other side – inserting the hook into both panels to join them all tog as you work each st, ch 1, f/o. *Alternatively, you may sew the panels tog instead. Turn RS out. Next, take the starting and ending tails of the strap, and using the whip stitch, sew each end of the strap to one side of the bag. Tie off. Weave in all remaining ends. Instructions for TWO Compartments using TWO Full Panels & ONE Short Inner Panel: Place the RS of both full panels together – one should have the short panel partially attached to it and facing out. Make a slip knot in A, sc attach to the top corner of one side of the full panels to join the first st of both tog, sc evenly down the side, across the bottom and up the other side – inserting the hook into ALL THREE OR TWO FULL panels (depending on the short panel placement) to join them all tog as you work each st, ch 1, f/o. *Make sure you are working into all the panels as needed. Alternatively, you may sew the panels tog instead. Turn RS out. Next, take the starting and ending tails of the strap, and using the running or whip stitch, sew each end of the strap to one side of the bag. Tie off. Weave in all remaining ends. *OPTIONAL: You may like to line your bag with fabric. I recommend doing this before going on to the next step. Lining your bag is totally up to you! Sewing the Zipper(s) onto the Bag:
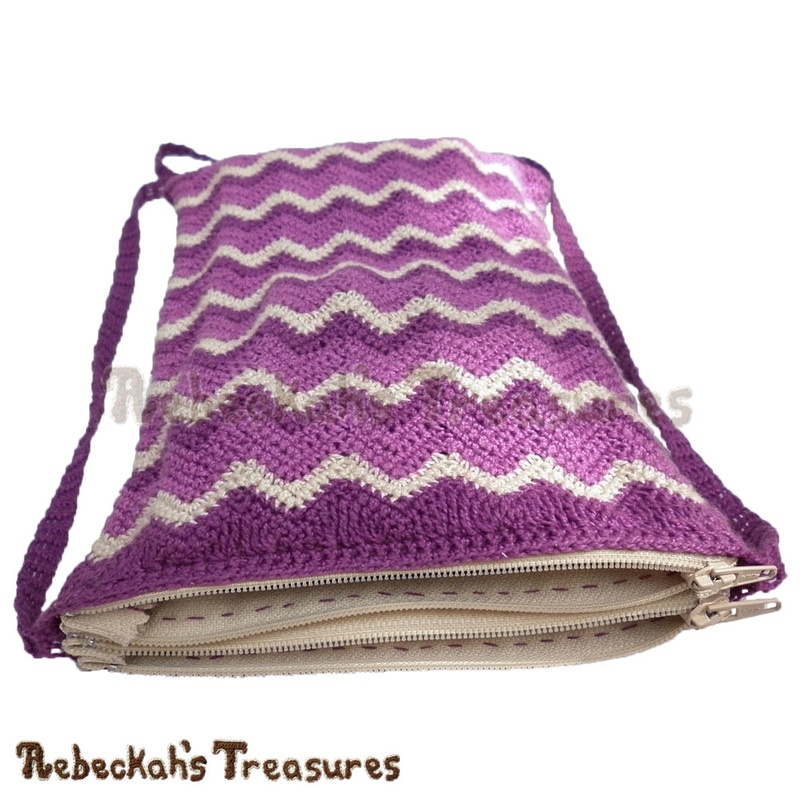
Whether you have one or two compartments, the instructions for the zipper placement is the same.
Some safety or sewing pins will come in handy for this step... Line up either side of the zipper with the top of row 60 of two adjacent panels. Pin into place to keep everything even, and using the whip stitch, sew evenly across both sides – you may need to pinch the zipper a bit. Tie off. Repeat for second zipper if the bag has two compartments. Weave in any remaining ends. *If you need help with adding a zipper to your bag, check out this tutorial by Love City here...
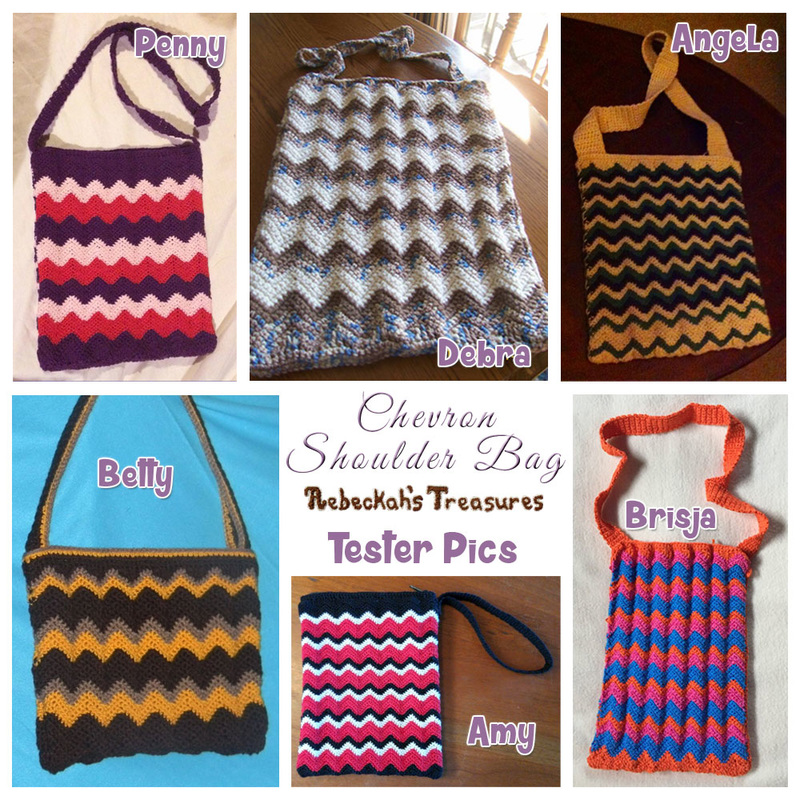
Thanks Alexandra R., Angela W., Amy B., Betty L., Brisja R., Debra C., Jewel F., Margie E. and Penny J. for testing the Chevron Shoulder Bag crochet pattern for me, and a huge thank you to Theresa P. for your help tech editing this pattern too!
 

Hello Visitor and Welcome to Rebeckah's Treasures... I am a Norwegian/Canadian currently studying Midwifery in the UK. I love to crochet! At Rebeckah's Treasures, I share my crochet patterns and treasures. I hope they inspire you to crochet your own little treasures too... 
Comments
|


Hello, my name is Rebeckah.
I hope my crochet inspires you to create your very own treasures! Learn more about me... Categories
All
Archives
October 2021
© 2012-2021 Rebeckah Ferger
All rights reserved. Disclaimer: This website makes use of sponsored and/or affiliate links. Please see this page for more information.
|
- Home
-
-
- Special Offers
- New Releases
- Accessory Crochet Patterns
- Afghan Square Crochet Patterns
- Amigurumi Crochet Patterns
- Applique Crochet Patterns
- Baby Crochet Patterns
- Dolly Crochet Patterns
- Fashion Doll Crochet Patterns
- Free Downloads
- Holiday Crochet Patterns
- Tapestry Crochet Patterns
- Under the Sea Crochet Patterns
- Wedding Crochet Patterns
- Disclaimer and FAQs
-
-
- Free Crochet Patterns
- New Free Releases
- Free Accessory Crochet Patterns
- Free Afghan Square Crochet Patterns
- Free Amigurumi Crochet Patterns
- Free Applique Crochet Patterns
- Free Baby Crochet Patterns
- Free Dolly Crochet Patterns
- Free Fashion Doll Crochet Patterns
- Free Guest Crochet Patterns
- Free Holiday Crochet Patterns
- Free Tapestry Crochet Patterns
- Free Under the Sea Crochet Patterns
- Free Wedding Crochet Patterns
- Free Crochet Patterns Coming Soon
Welcome Visitor! I hope you enjoy my treasures.


 RSS Feed
