|
Disclaimer: This website makes use of sponsored and/or affiliate links. Please see this page for more information.
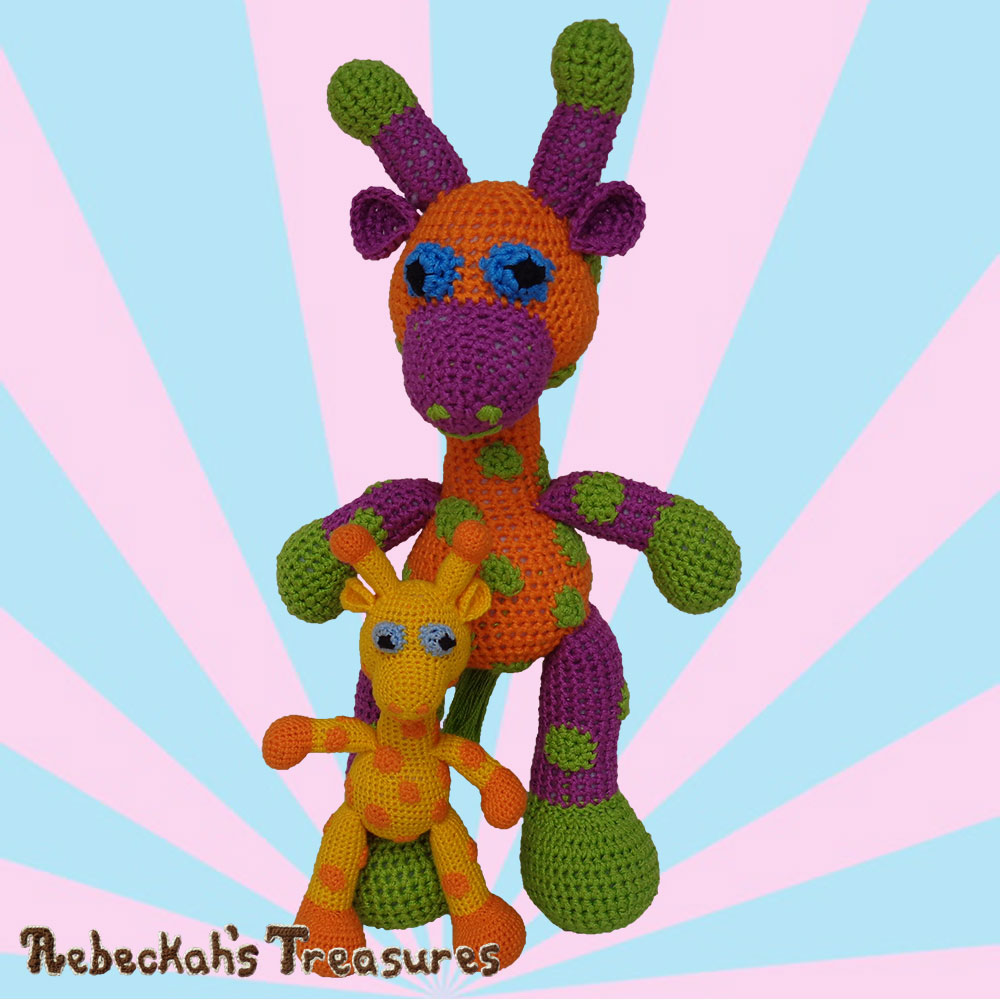
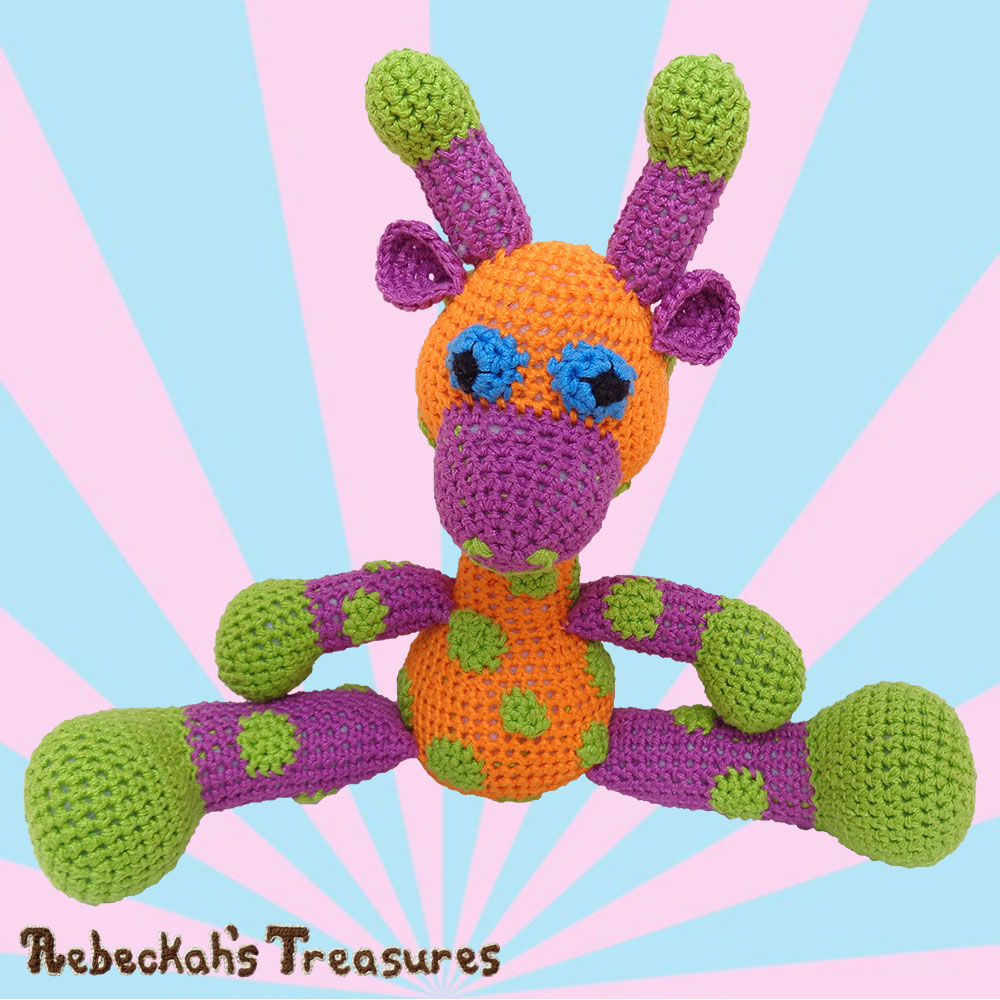
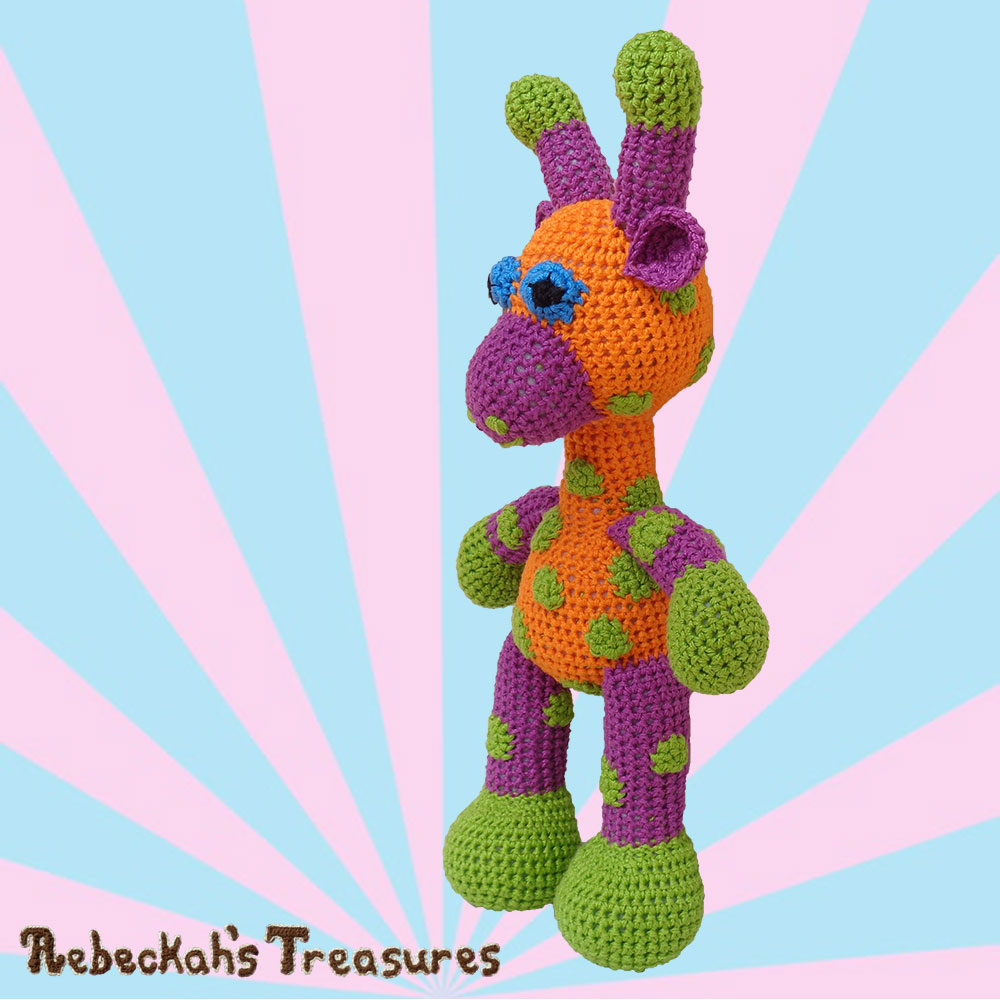
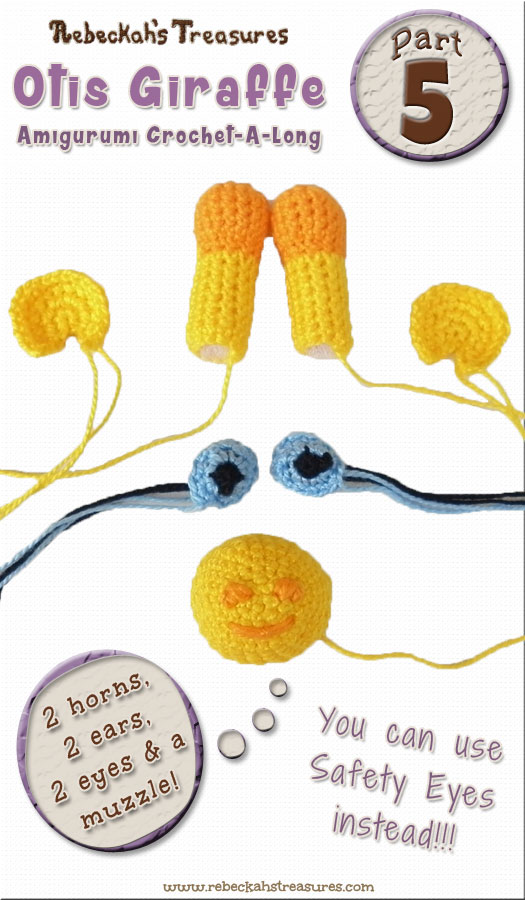
Welcome to Part 5 of the Otis Giraffe CAL! This part will cover all of the giraffe’s facial features, including, the muzzle and its embroidery details, the ears, the eyes (optional) and the horns.
Photo tutorials available for this part (on the blog only) show how to work the muzzle embroidery. 4 FULL video tutorials for all the facial features are available! Perfect for beginners to Amigurumi, and those who'd like to see how to embroider the muzzle features especially. It's time to give your giraffes some character! Are you ready? Let's crochet some more... 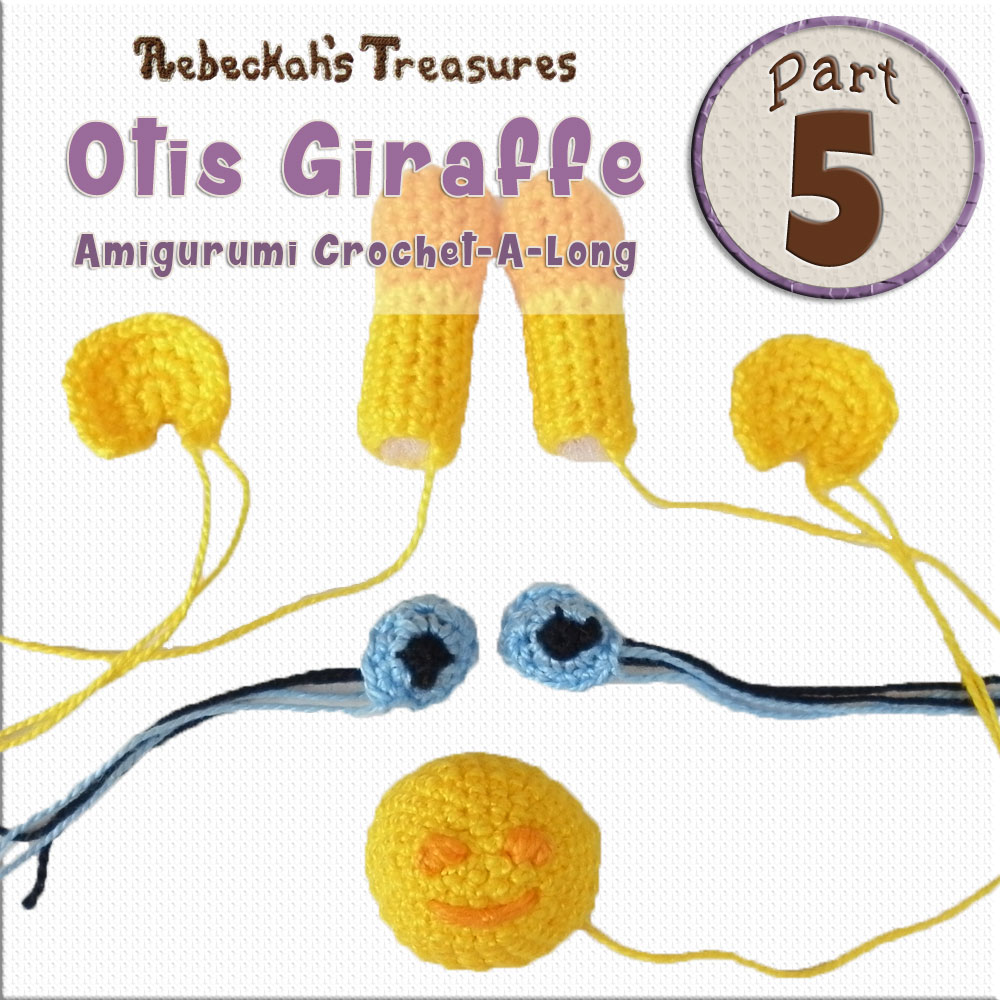
Otis is part of a HUGE ongoing series of Amigurumi CALS Hosted by CAL – Crochet A Long!!! All in multiple languages. So, if you haven't already, make sure you join their Facebook Group here, then SIGN UP for the FULL EVENT HERE or the Individual Event for Otis Giraffe Here.
If you'd rather connect personally with just me, sign up to my page event for Otis Giraffe CAL Here, or join one of my Crocheting Treasures groups/communities on Facebook, Ravelry or Google+. PLUS: Join me tomorrow (Tuesday, April 18th, 2017) at 3:00 P.M. (EST) for FACEBOOK LIVE on my business page, Rebeckah's Treasures.
Just in case you've missed them:
~SEE PART 1 HERE~ for Abbreviations & Important Notes. ~SEE PART 2 HERE~ to Crochet the Spots. ~SEE PART 3 HERE~ to Crochet the Limbs (arms, legs & tail). ~SEE PART 4 HERE~ to Crochet the Body.
This crochet pattern and it's complimentary photos and videos are copyrighted to Rebeckah Ferger of www.rebeckahstreasures.com. They are for personal use only. No part of this pattern may be copied or distributed in any way. If you sell what you make from this pattern, please credit me as the designer.
All rights reserved, 2017.
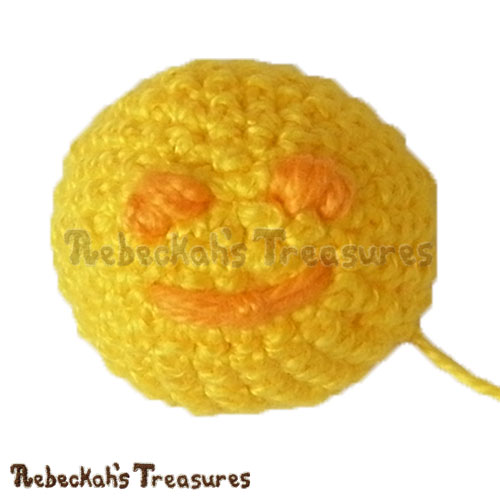
Giraffe Muzzle Instructions:
Make 1. Use the tip boxes to mark stitches for easy embroidery later! The giraffe muzzle is worked in continuous rnds from the center-outwards. Later, embroidery is used to create the nostrils and mouth – a photo tutorial is included here. Do not turn at the end of rnds. *Side facing you = WS.
*Use MC. Rnd 1: Sc 6 into a magic circle (6 sts). Rnd 2: 2 sc into each st around (12 sts). Pause here to mark nostril stitches #5-6 (right) AND #11-12 (left) on rnd 2 for easy embroidery later... Rnd 3: [Sc 1, 2 sc into the next st] 6 times (18 sts). Rnd 4: Sc 1, [2 sc into the next st, sc 2] 5 times, 2 sc into the next st, sc 1 (24 sts). Pause here to mark mouth stitches #1-7 on rnd 4 for easy embroidery later... Rnd 5-8: Sc 24 – 4 rnds (24 sts). Rnd 9: [Sc 1, 2 sc into the next st] 12 times, sl st join to the first st of rnd, f/o (with a long tail – traditional) (36 sts).
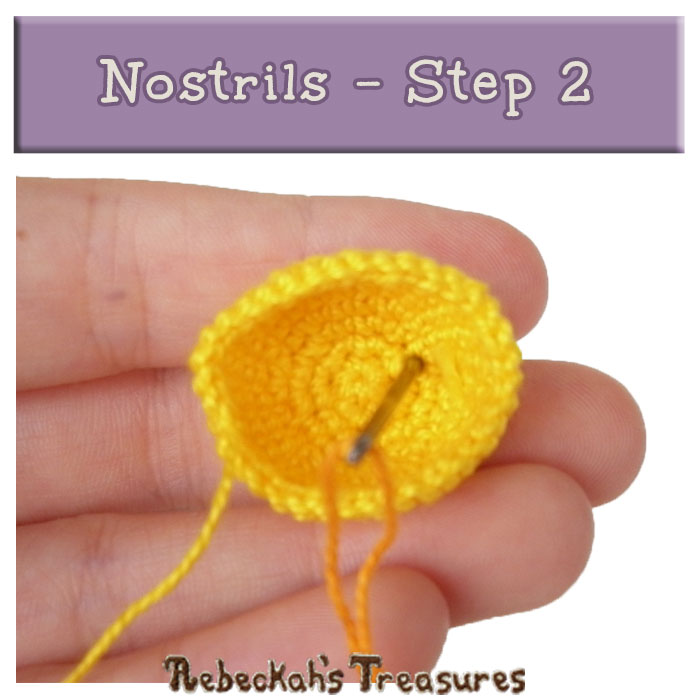
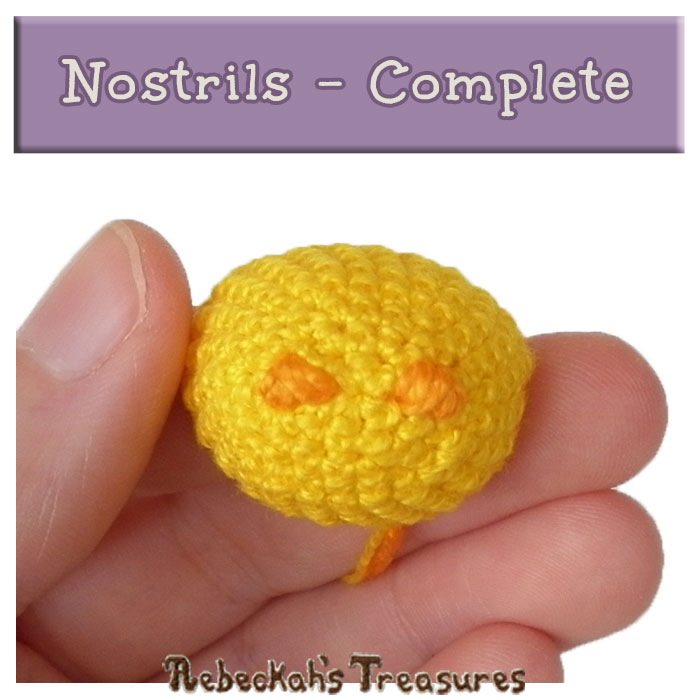
Nostril Embroidery Instructions:
You may customize your nostrils to your liking, just keep in mind stitches #22-29 and stitches #4-10 are the top and bottom of the muzzle, respectively. Use the following steps and photo tutorial as a guide… Step 1: Thread a long strand of the AC onto a tapestry yarn needle – knot the ends tog. Step 2: Insert needle into stitch #6 of the muzzle on rnd 2 from the inside (WS) going out (RS). Step 3: Come back in thru the st sp below the one you just came out of (#5 from rnd 2), and lock yarn into place by sticking the needle thru the strands of yarn/thread before the knotted ends and pulling tight. *Click on images to zoom in and have a closer look...
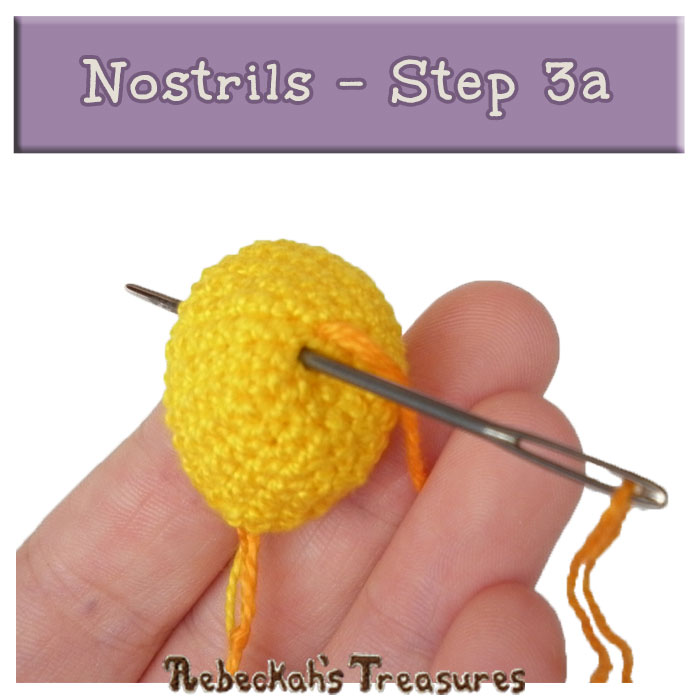
Step 4: Go back out thru the 1st st sp and come back in thru the 2nd st sp a couple times. On the second or third time, come back thru the st sp on rnd 1, below the 1st st that forms a triangle with the other nostril stitches. Wrap around the first and third st sps the same number of times.
First nostril is complete. Step 5: To start the second nostril, cross over to stitch #11 on rnd 2 (this is the 4th st sp) from the inside (WS). Step 6: Come back in thru the st sp below the one you just came out of (#12 from rnd 2), and wrap around these st sps a couple of times like you did for the first nostril. Step 7: Go back out thru the 4th st sp and come back in thru the st sp on rnd 1, below the 4th st that forms a stitch triangle. Wrap around the 4th and 6th st sps the same number of times. Second nostril is complete. *Click on images to zoom in and have a closer look...
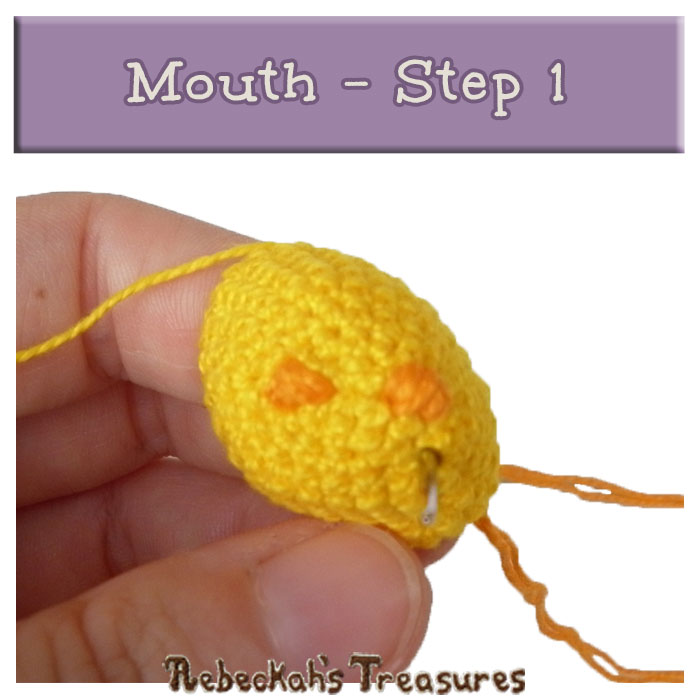
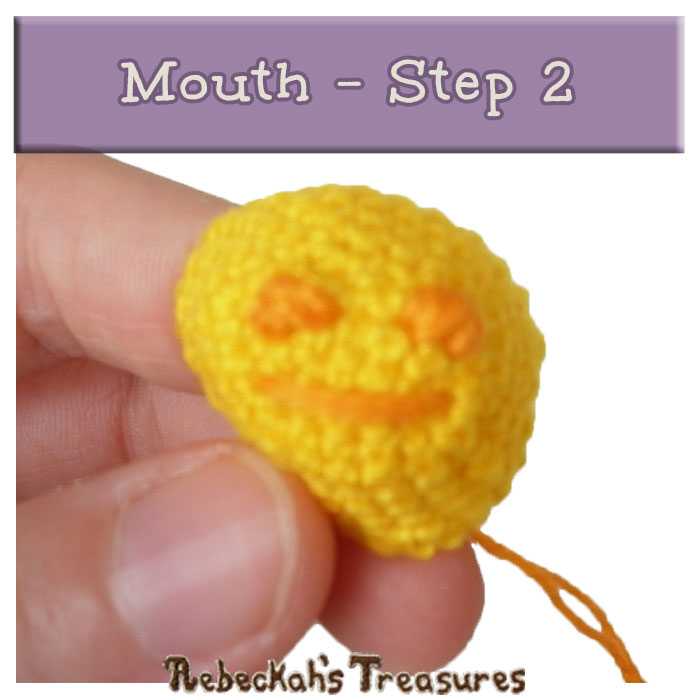
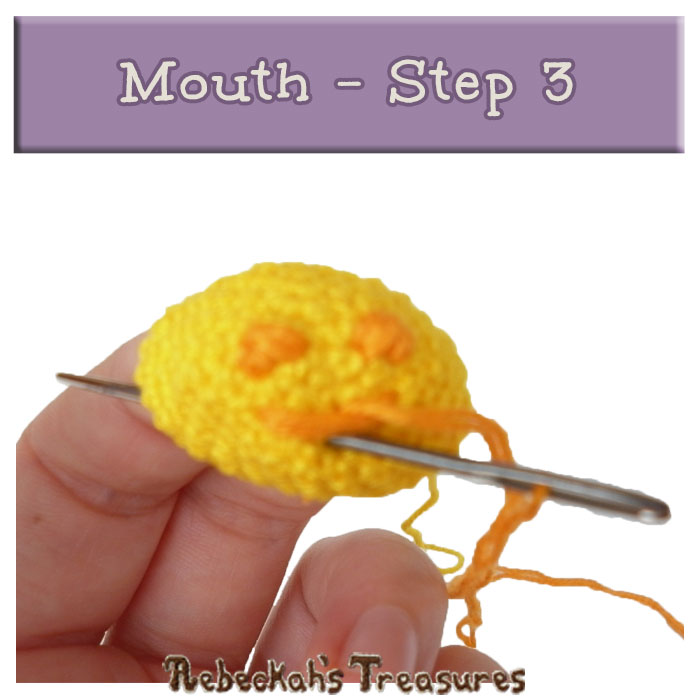
Mouth Embroidery Instructions:
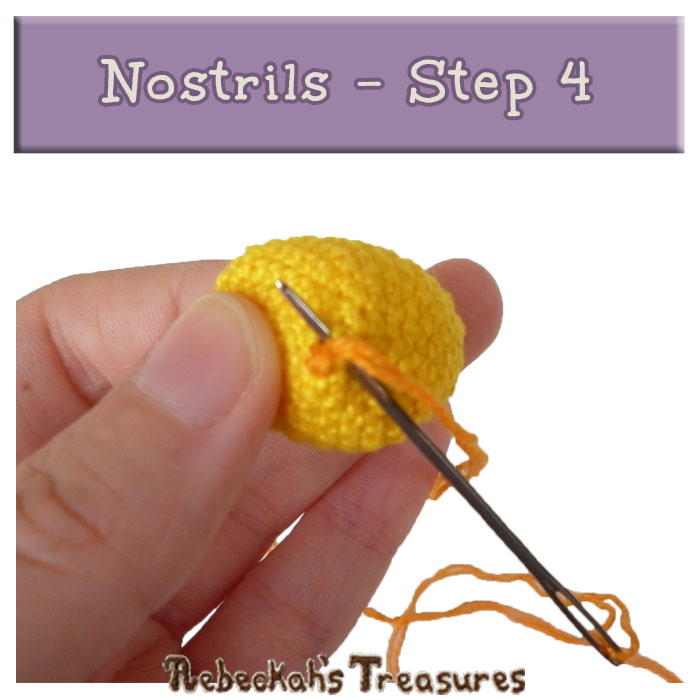
The mouth is a continuum from the working the nostrils… Step 1: Poke needle out thru the st sp below the 5th nostril st sp (or st #12 from rnd 2). Step 2: From the outside (RS), cross over to the other side of the muzzle and come back in thru the st sp below the 2nd nostril st sp. Step 3: Insert needle back out thru the center st sp of the mouth, so that it comes out above the smile. Wrap it around the smile and go back in thru the same st to lock into place. *This step is optional. Step 4: Finally, securely f/o the yarn for the nostrils and mouth by wrapping it around the loose threads closest to it on the WS. Make a double knot and tie off. *Click on images to zoom in and have a closer look...
Muzzle will get stuffed later. Set aside and cont to the Giraffe’s Ears below…
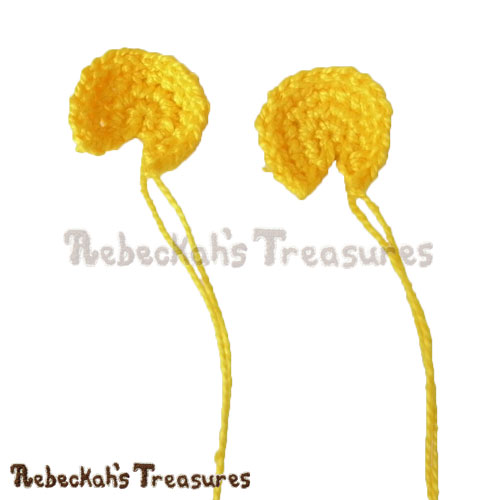
Giraffe Ear Instructions:
Make 2. The giraffe ear is worked in turning, curved rows from the center-outwards. *ODD rows = RS.
*Use MC. Row 1: Sc 6 into a magic circle, ch 1, turn (6 sts). Row 2: 2 mirror sc into each st around, ch 1, turn (12 sts). *Mirror sc in even rows create a distinctive RS. Watch the video tutorial to see how to mirror crochet. Row 3: 2 sc into the first st, sc 2, 2 sc into the next st, sc 4, 2 sc into the next st, sc 2, 2 sc into the next st, ch 1, turn (16 sts). Row 4: mirror all the sts in this row → sc 4, *2 sc into the next st, sc 1, 2 sc into the next st,** sc 2, rep from * to **, sc 4, ch 1, f/o (with a long tail – traditional) (20 sts). Set aside and cont to the Giraffe’s Eyes or the Giraffe’s Horns below...
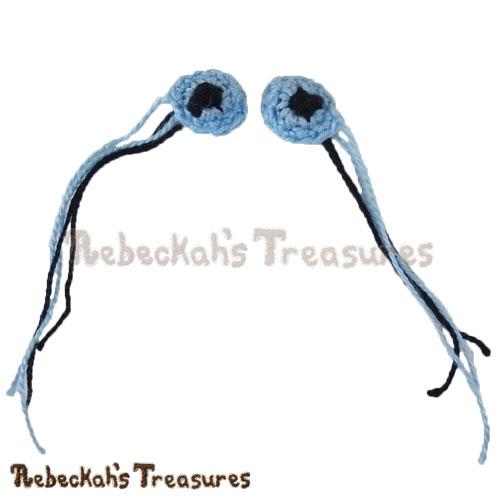
Giraffe Eye Instructions:
Make 2, OR OMIT these instructions if your giraffe will use Safety Eyes. The giraffe eye is worked in continuous rnds from the center-outwards. Do not turn at the end of rnds. *Side facing you = RS.
*Start with Black. Rnd 1: (Sc 1, hdc 2, sc 1) into a magic circle, sl st join to the first st of rnd, f/o (4 sts). Rnd 2: Make a slip knot in EYE COLOUR & with the RS facing you → sc attach to the same st where the sl st join of the last rnd was made, sc 1 into the same st, 2 hdc into each of the next 2 sts, 2 sc into the last st (8 sts). Rnd 3: 2 sc into the next st, sc 2, 2 hdc into each of the next 2 sts, sc 2, 2 sc into the next st, sl st join to the first st of rnd, f/o (with a long tail – traditional) (12 sts). Note: Starting tails will be used later to stuff the eyes. Set aside and cont to the Giraffe’s Horns below...
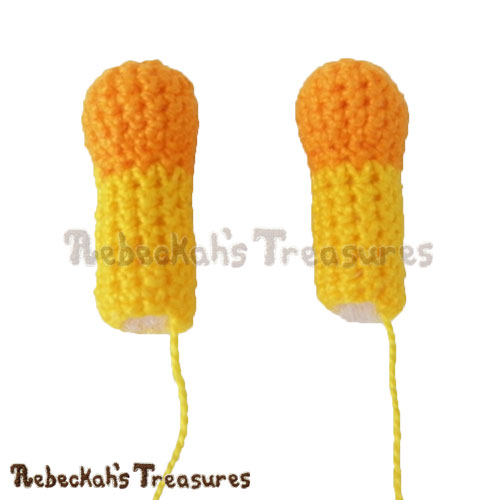
Giraffe Horn Instructions:
Make 2. The giraffe horn is worked in continuous rnds from the top-down. Do not turn at the end of rnds. *Side facing you = WS.
*Start with AC. Rnd 1: Sc 4 into a magic circle (4 sts). Rnd 2: 2 sc into each st around (8 sts). Rnd 3: 2 sc into each st around (16 sts). Rnd 4-7: Sc 16 – 4 rnds (16 sts). Rnd 8: Sc2tog in BL x 4 – switch to MC on the last sc2tog, sc 8 (12 sts). Rnd 9-15: Sc 12 – 7 rnds, sl st join to the first st of the last rnd, f/o (with a long tail – traditional) (12 sts). Stuff the horns. Set aside and cont to the Giraffe’s Head – AVAILABLE in Part 6! 
Multiple Languages Available - DOWNLOAD Part 5 NOW!!!
Written pattern for this part is available in these languages:
DOWNLOADS BEGIN AUTOMATICALLY: Just Click on Your Favourite Button. 


Join me tomorrow (Tuesday, April 18th, 2017) at 3:00 P.M. (EST) for FACEBOOK LIVE on my business page, Rebeckah's Treasures.
There, you can ask questions about the Otis Giraffe CAL and share your ideas... And feel free to ask me questions about me too as you like! 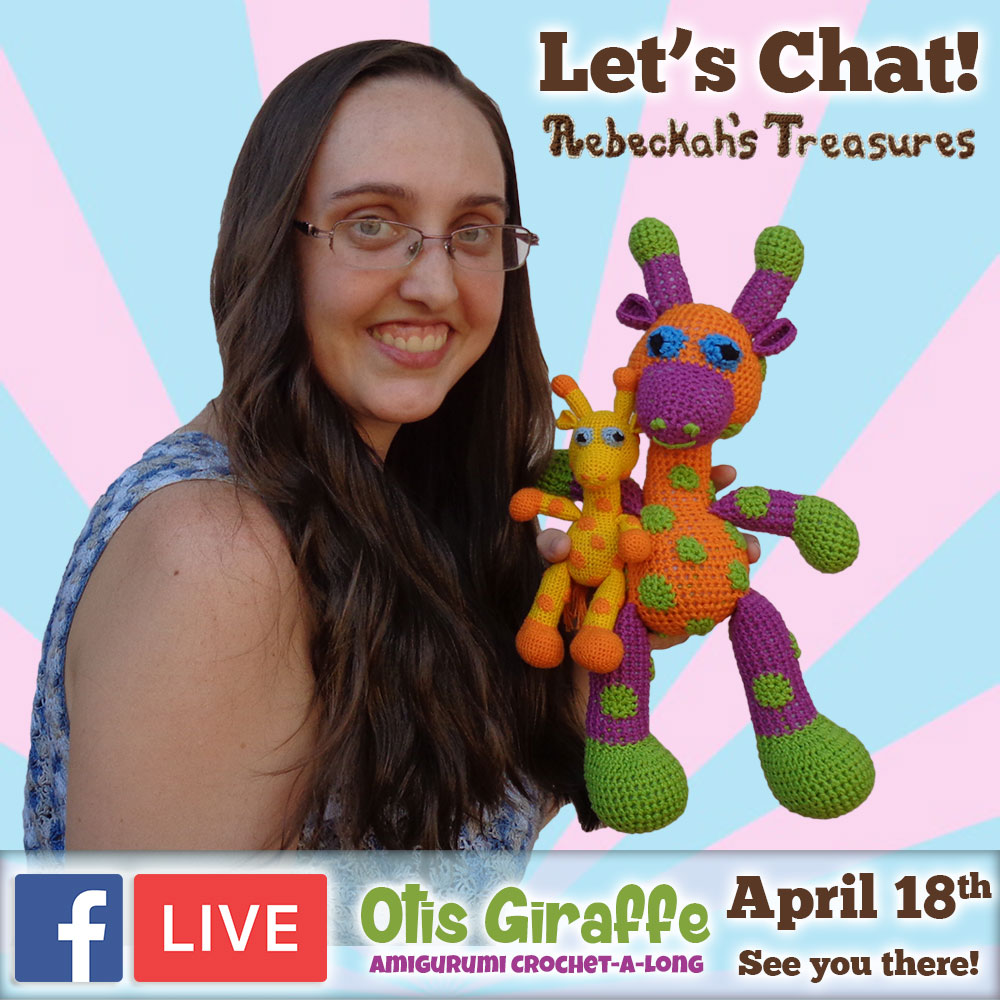
Support & Share!
Are you enjoying this CAL, so far? Here's how you can support me...
However you decide to support me, THANK YOU!!! All comments, shares and donations mean so much to me, and are greatly appreciated. Many hearts...
Thanks so much for visiting today!
If you have any questions, or need pattern help, comment below, send me an inquiry through my website form, OR visit my one of my groups / communities on Facebook, Google+ or Ravelry. Wishing you a superb day! We'll meet again on Thursday, April 20th for Part 6: How to Crochet the Head.  

Hello Visitor and Welcome to Rebeckah's Treasures... I am a Norwegian/Canadian currently studying Midwifery in the UK. I love to crochet! At Rebeckah's Treasures, I share my crochet patterns and treasures. I hope they inspire you to crochet your own little treasures too... 
Comments
|


Hello, my name is Rebeckah.
I hope my crochet inspires you to create your very own treasures! Learn more about me... Categories
All
Archives
October 2021
© 2012-2021 Rebeckah Ferger
All rights reserved. Disclaimer: This website makes use of sponsored and/or affiliate links. Please see this page for more information.
|
- Home
-
-
- Special Offers
- New Releases
- Accessory Crochet Patterns
- Afghan Square Crochet Patterns
- Amigurumi Crochet Patterns
- Applique Crochet Patterns
- Baby Crochet Patterns
- Dolly Crochet Patterns
- Fashion Doll Crochet Patterns
- Free Downloads
- Holiday Crochet Patterns
- Tapestry Crochet Patterns
- Under the Sea Crochet Patterns
- Wedding Crochet Patterns
- Disclaimer and FAQs
-
-
- Free Crochet Patterns
- New Free Releases
- Free Accessory Crochet Patterns
- Free Afghan Square Crochet Patterns
- Free Amigurumi Crochet Patterns
- Free Applique Crochet Patterns
- Free Baby Crochet Patterns
- Free Dolly Crochet Patterns
- Free Fashion Doll Crochet Patterns
- Free Guest Crochet Patterns
- Free Holiday Crochet Patterns
- Free Tapestry Crochet Patterns
- Free Under the Sea Crochet Patterns
- Free Wedding Crochet Patterns
- Free Crochet Patterns Coming Soon
Welcome Visitor! I hope you enjoy my treasures.


 RSS Feed
