|
Disclaimer: This website makes use of sponsored and/or affiliate links. Please see this page for more information.
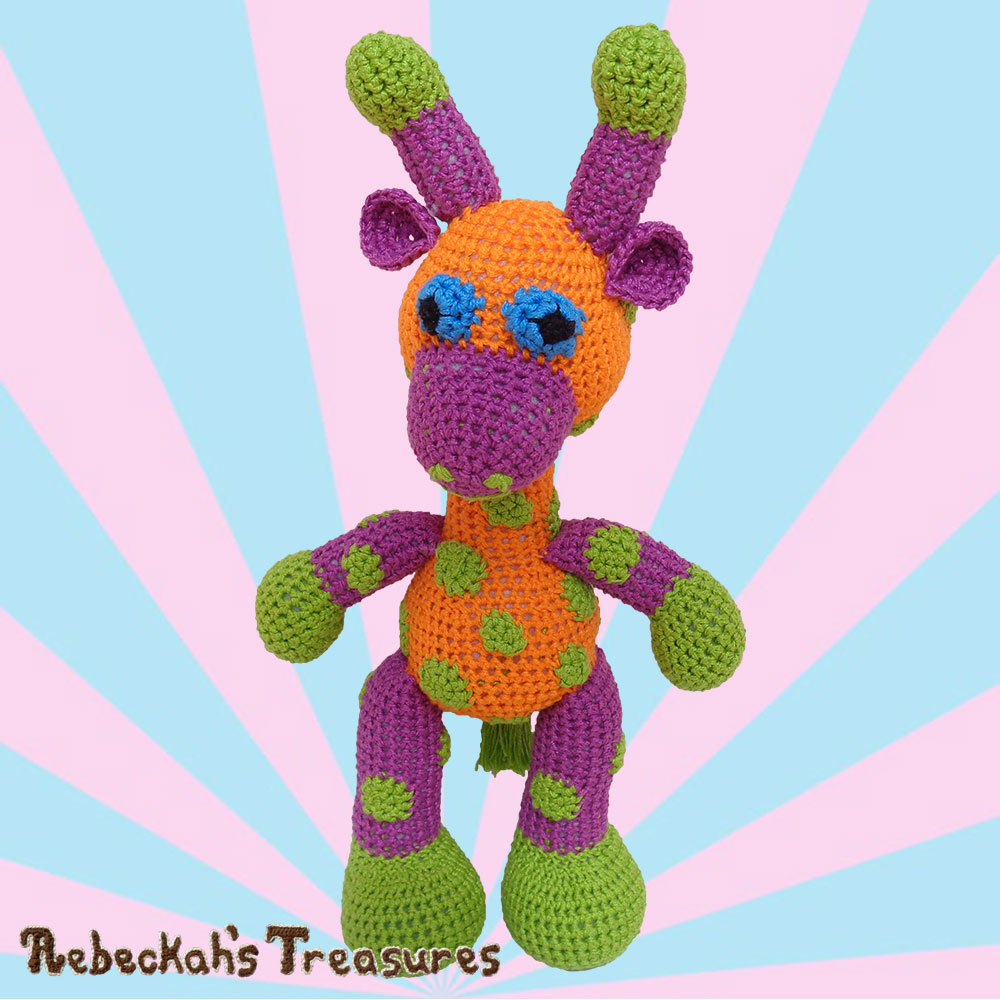
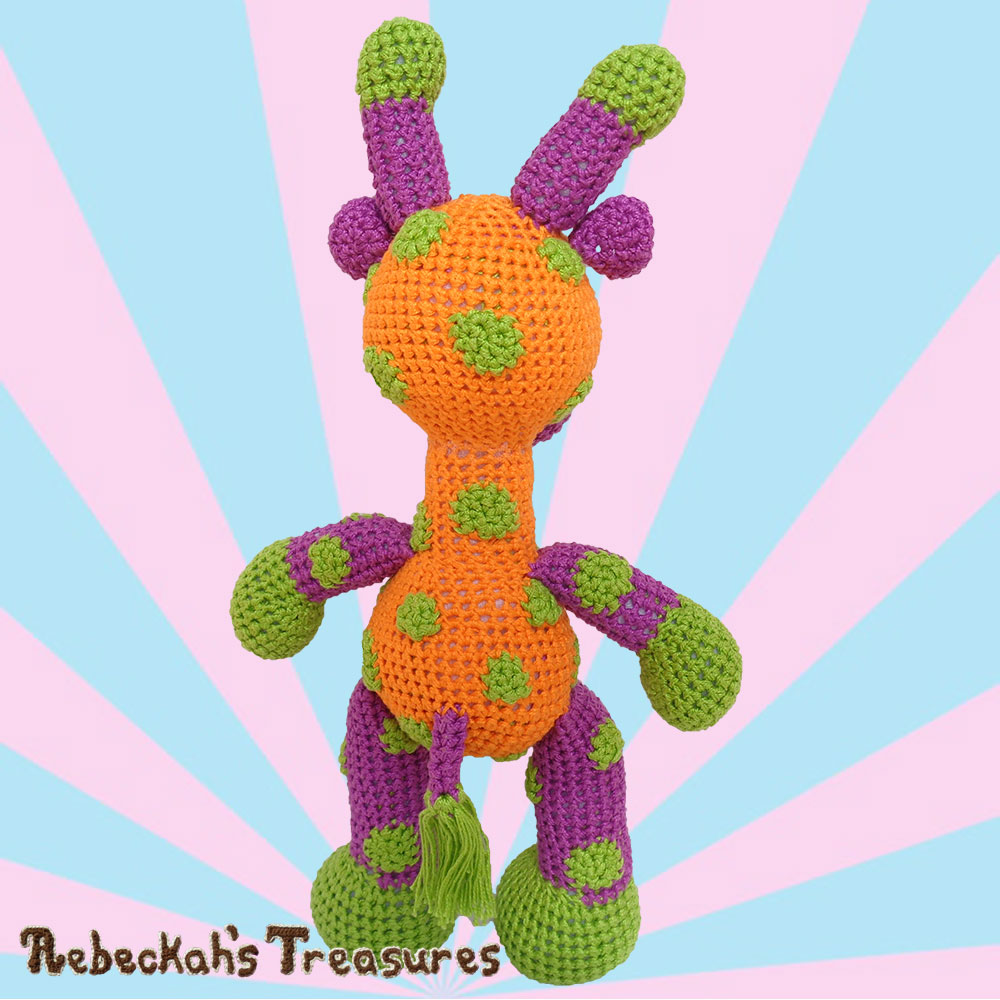
Welcome to Part 2 of the Otis Giraffe CAL! This part will cover the giraffe’s spots.
Photo tutorials available for this part (on the blog only) show how they are joined to the body parts, so you can get a general feel or idea how it all works. If following video tutorials for this series, you’ll get to see the very same spot join in action during parts 3, 4 and 6. A video tutorial for crocheting the spots is also available right now for beginners new to Amigurumi! What are you waiting for? Let's start hooking... 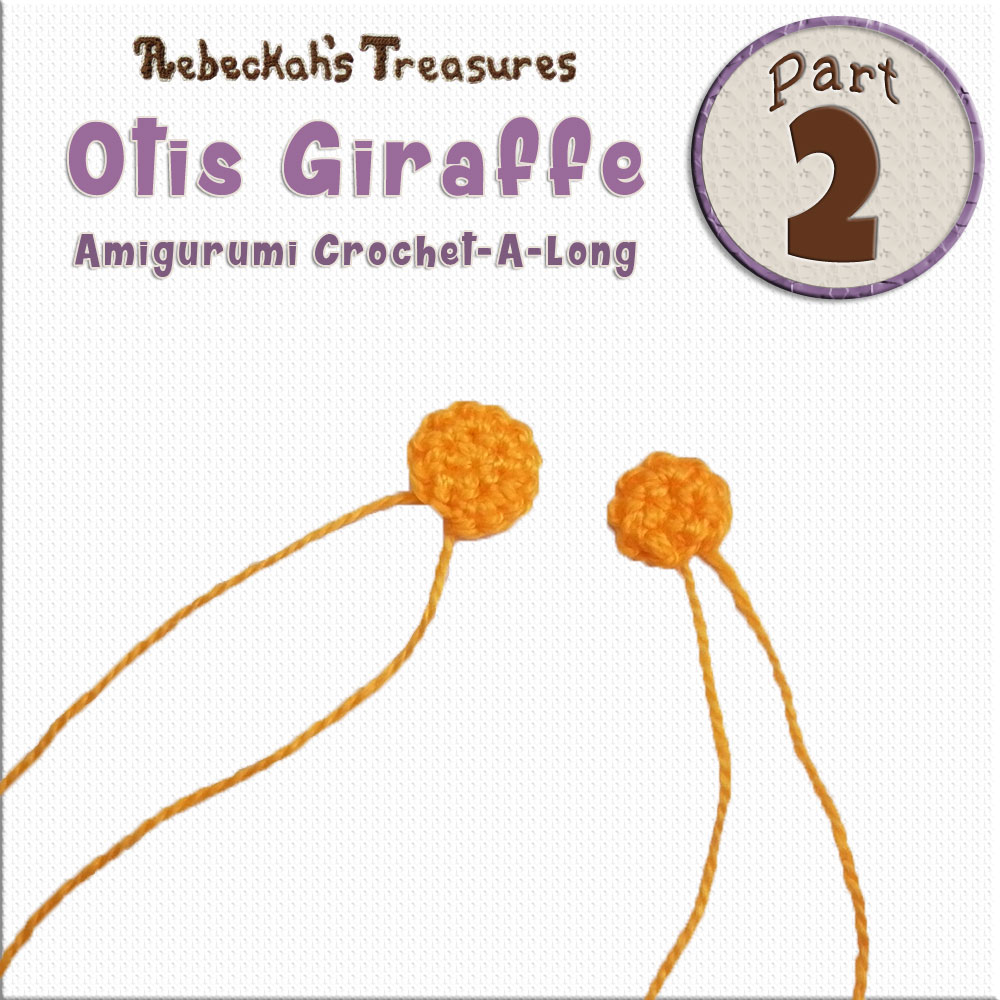
Otis is part of a HUGE ongoing series of Amigurumi CALS Hosted by CAL – Crochet A Long!!! All in multiple languages. So, if you haven't already, make sure you join their Facebook Group here, then SIGN UP for the FULL EVENT HERE or the Individual Event for Otis Giraffe Here.
If you'd rather connect personally with just me, sign up to my page event for Otis Giraffe CAL Here, or join one of my Crocheting Treasures groups/communities on Facebook, Ravelry or Google+.
Let's jump right into crocheting the spots!
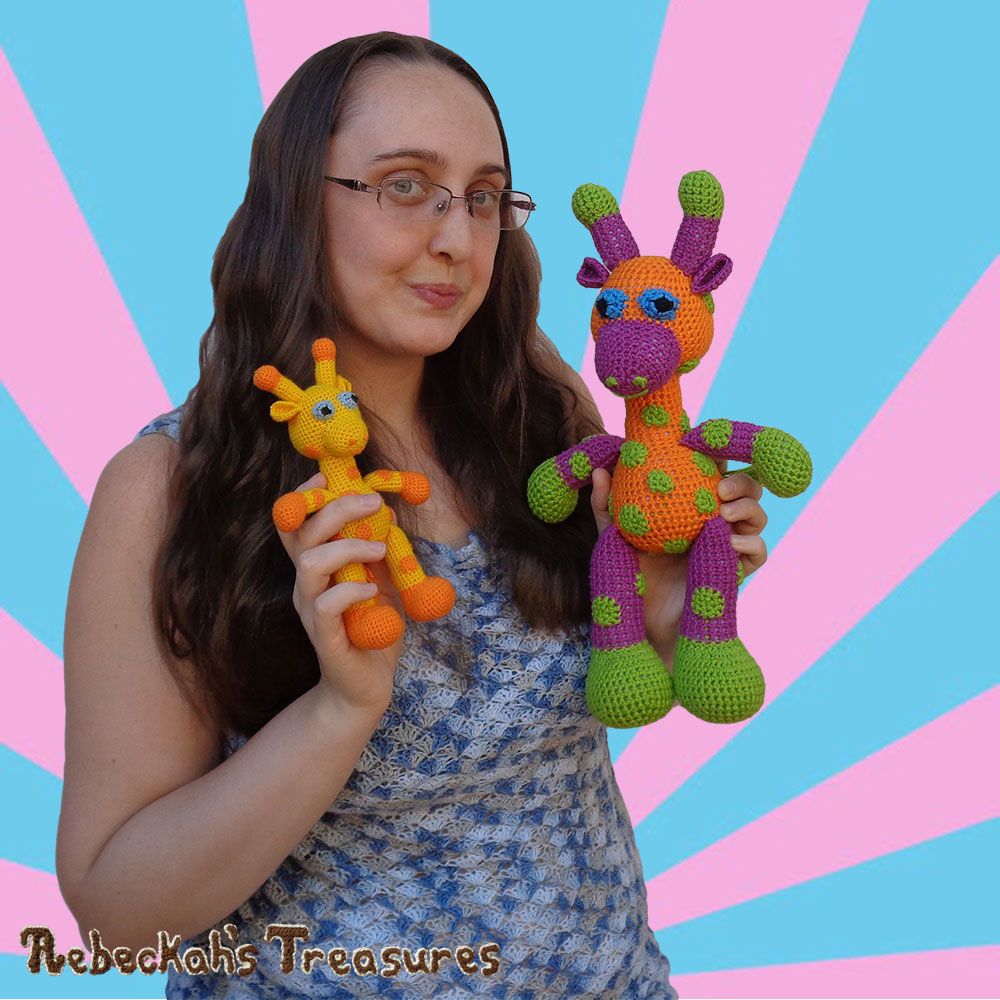
Beginners, you may like to watch the video tutorial to see the magic circle in action! Or, you can read and follow the crochet pattern below if you prefer. It's totally up to you. And, remember you can download PART 2 (in multiple languages), including the written crochet pattern & the handy guide for spot joining. It includes links to this post and video tutorial! *Find it after the pattern instructions below, and after the next picture of ME with Otis & April. Queue it, LOVE it, and Add your Otis Giraffe projects to Ravelry here!
This crochet pattern and it's complimentary photos and videos are copyrighted to Rebeckah Ferger of www.rebeckahstreasures.com. They are for personal use only. No part of this pattern may be copied or distributed in any way. If you sell what you make from this pattern, please credit me as the designer.
All rights reserved, 2017.
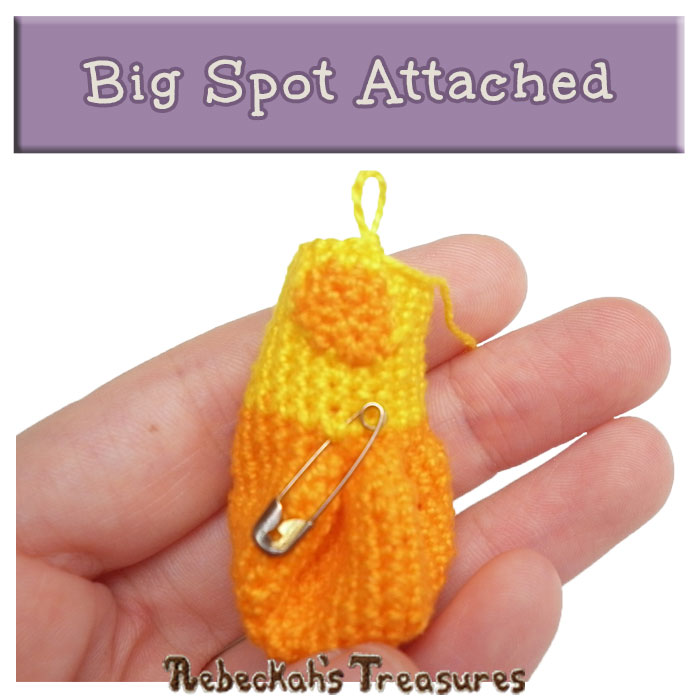
Normally, one would save the spots for last, but we'll need them ready to be attached for the Join-As-You-Go method. If you'd rather follow the traditional route, you may prefer to crochet them later.
Again, there are 2 sizes, big and small. You'll need a set amount for the Join-As-You-Go option. But you can mix them up for the Traditional option if you like. 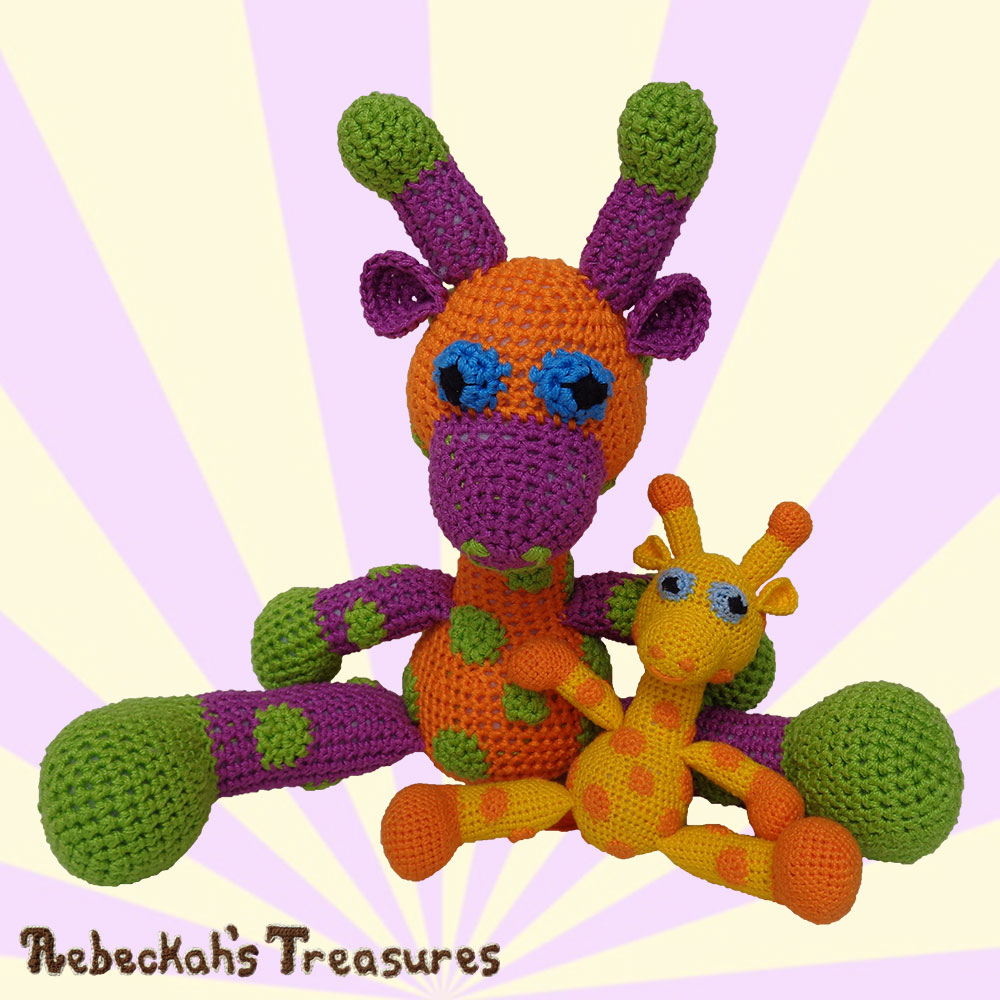
Starting the Giraffe's Spots
To minimize how much sewing is done later, the giraffe’s spots need to be crocheted first.
This is true if you are following the recommended option 2 – join-as-you-go. If you are following the traditional option, you may prefer to save crocheting the spots until the end. This part will also cover how to join the spots as you crochet. ~SEE PART ONE HERE FOR ABBREVIATIONS & IMPORTANT NOTES~
Giraffe Spot - Crochet Instructions:
The two spot sizes – SMALL AND BIG, are both worked in continuous rnds. *Side facing you = WS.
*Note: If you are sewing your spots onto the giraffe later, you may like to invent your own spot shapes and/or change the quantity of spots used for your giraffe. *Use AC. Rnd 1: Sc 4 (small) or 6 (big) into a magic circle (4 or 6 sts). Rnd 2: 2 sc into each st around, sl st join to the first st of rnd, f/o (with a long tail – traditional option ONLY) (8 or 12 sts). No need to weave in ends, since you will either use the tails to attach the spots to the body parts, or you will simply hide them in the respective body parts as you attach them.
Attach the Giraffe Spots As-You-Go Instructions (Skip if following Option 1):
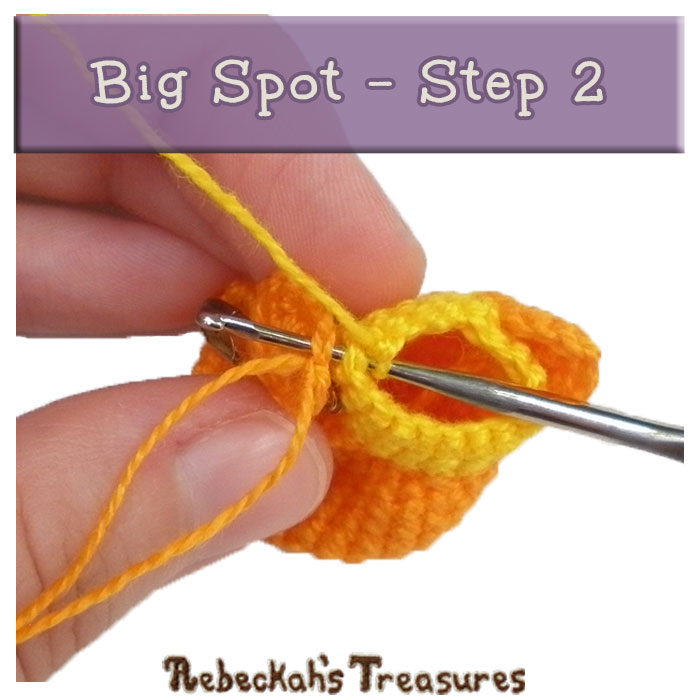
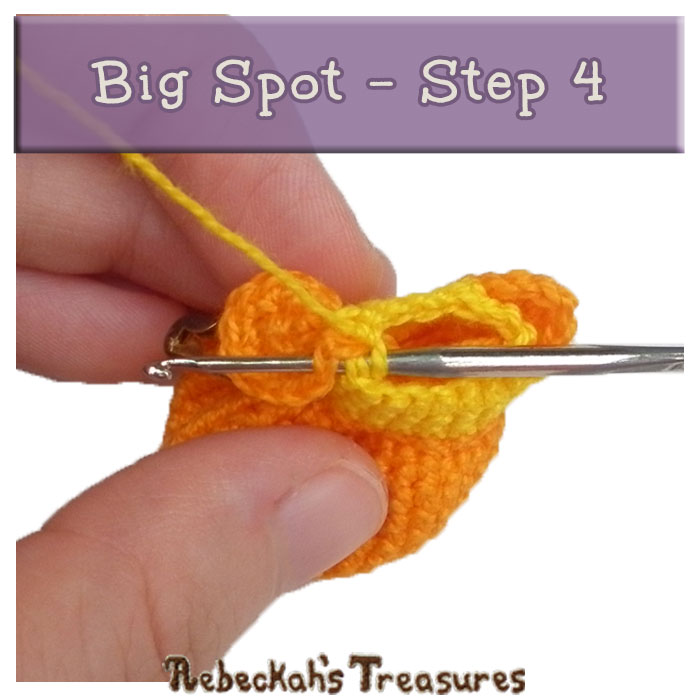
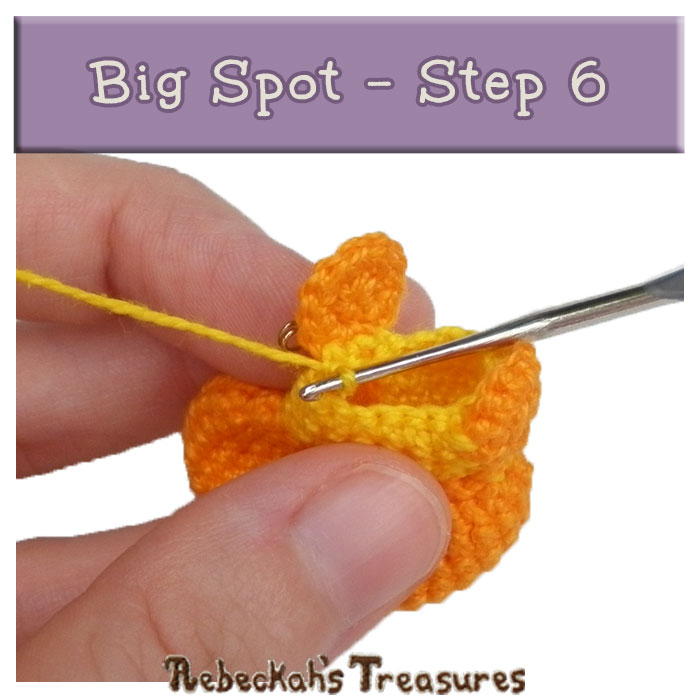
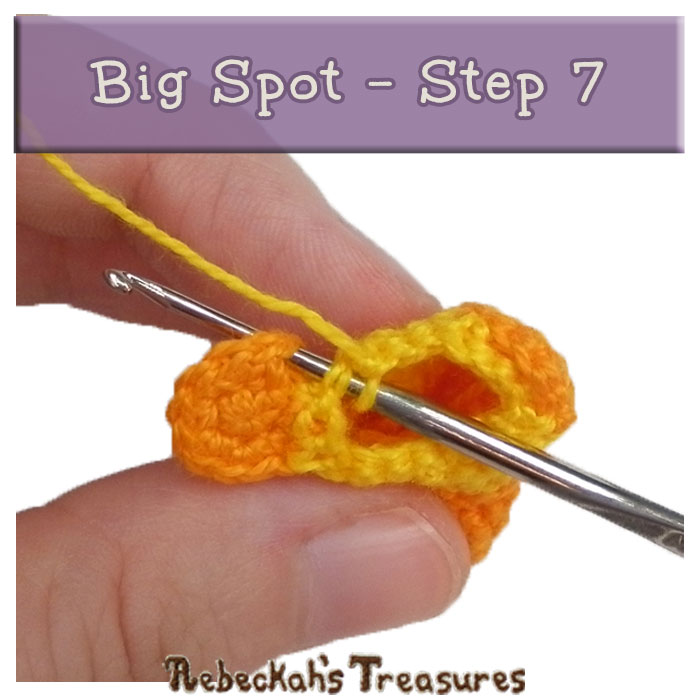
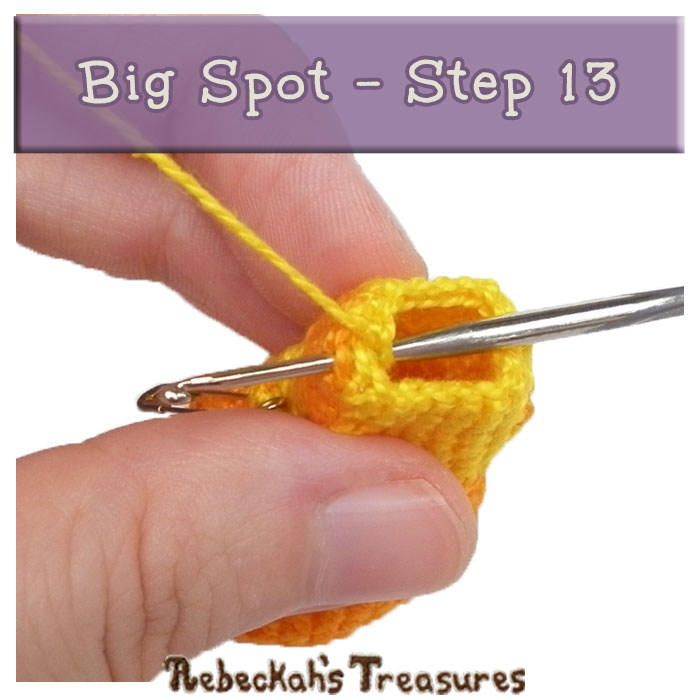
Rather than include separate instructions and photos for both spot attachments, their instructions will be combined, as it is the same for both sizes. *Photos below show the big spot being joined. THIS IS A GUIDE ONLY - It's here to get you acquainted with how the join-as-you-go works before we use it in Part 3 for the first time. There will be slight variations to these instructions as you join the spots to the body and head. The small spot is attached over 4 rnds – 2 spot stitches joined per rnd. Whereas, the big spot is attached over 5 rnds – 3 spot stitches are joined on the first and last rnds and 2 spot stitches per remaining rnds. Step 1: Hold the spot upside-down, RS to RS on the back of work for whichever body part you are working. Step 2: Insert hook into the next stitch on the current body part first AND then insert hook into the first/any stitch on the big or small spot. Two stitches should be on the hook now → work a sc here to join both sts tog. Step 3: Pull spot tails into the body part before working the next join stitch. Step 4: Insert hook into the next stitch on the current body part AND into the next spot stitch. Two stitches on hook now → work a sc here to join both sts tog. (Small Spot – JUMP to Step 6) Step 5: Repeat Step 4 for the next set of stitches. (Big Spot ONLY) Step 6: Lift spot upwards, so the spot’s WS is facing you and pressed up against the body part’s RS – first rnd of spot attachment is complete. *Click on images to zoom in and have a closer look...
Step 7: When you get to the stitch directly above the stitch before the first joined stitch, insert hook into the current body part’s next stitch AND into the nearest available spot stitch. Two stitches on hook now → work a sc here to join both sts tog.
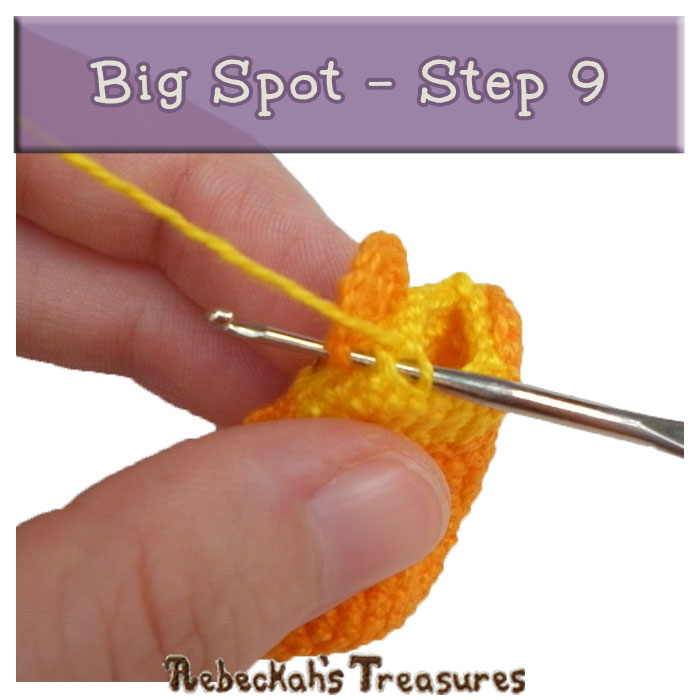
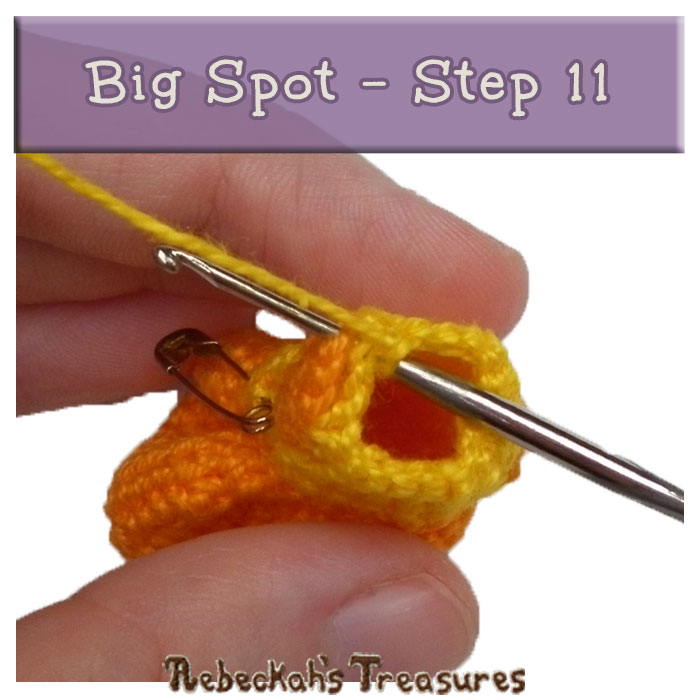
Step 8: Sc 3 (Big Spot) OR sc 2 (Small Spot) over the current body part stitches only. Step 9: Insert hook into the current body part’s next stitch AND into the nearest available spot stitch. Two stitches on hook now → work a sc here to join both sts tog – the next rnd of spot attachment is complete. Step 10: Repeat Steps 7-9 for the next TWO (Big Spot) OR ONE (Small Spot) attachment rnd(s). Step 11: When you get to the stitch directly above the first joined stitch, insert hook into the current body part’s next stitch AND into the nearest available spot stitch. Two stitches on hook now → work a sc here to join both sts tog. (Small Spot – JUMP to Step 13)
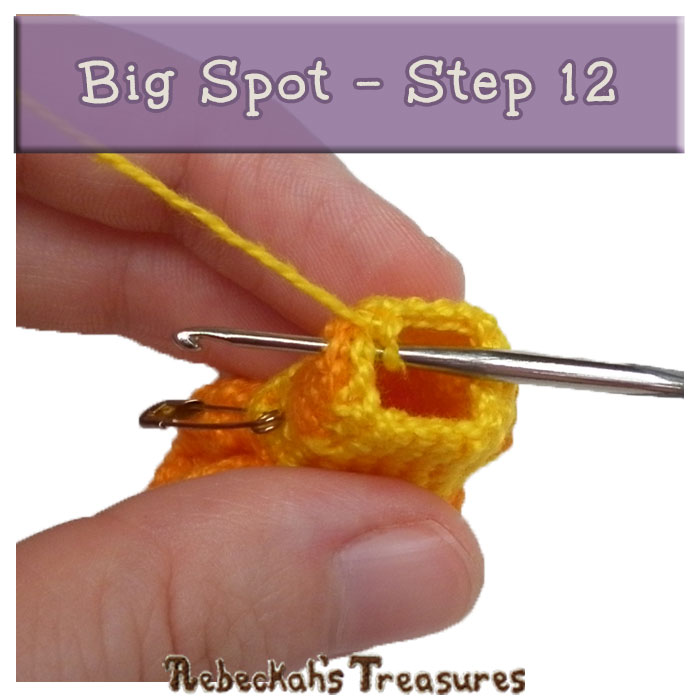
Step 12: Insert hook into the current body part’s next stitch AND into the next spot stitch. Two stitches on hook now → work a sc here to join both sts tog. (Big Spot ONLY)
Step 13: Repeat Step 12 to join the last spot stitch to the current body part – spot attached.
For future reference throughout the pattern, use the following short, colour-coded phrase abbreviations for the steps to make it easier to attach the spots as you go.
There will be slight variations on these phrases, whenever the spot attachment falls where there is an increase or decrease. Keep this in mind as you work!
Multiple Languages Available - DOWNLOAD Part 2 NOW!!!
Written pattern for this part is available in these languages:
DOWNLOADS BEGIN AUTOMATICALLY: Just Click on Your Favourite Button. 


Support & Share!
We want to see YOUR creativity and take on the same project. So, Share YOUR Otis Giraffe CAL Progress with US, make NEW friends, and get additional support along the way!
If you need support or help at any step, just reach out to me, or post in the same groups above. It is always a pleasure to be of service and I am very nice. :D If sharing or asking a question in one of the Facebook groups or events, tag me @Rebeckah Kristin Ferger, so I see your question and/or progress.
Are you enjoying this CAL, so far? Here's how you can support me...
However you decide to support me, THANK YOU!!! All comments, shares and donations mean so much to me, and are greatly appreciated. Many hearts...
Thanks so much for visiting today!
If you have any questions, or need pattern help, comment below, send me an inquiry through my website form, OR visit my one of my groups / communities on Facebook, Google+ or Ravelry. Wishing you a fantabulous day! We'll meet again on Monday, April 10th for Part 3: How to Crochet the Limbs. Or, join me tomorrow (Friday, April 7th, 2017) at 2:00 P.M. (EST) for FACEBOOK LIVE on my business page, Rebeckah's Treasures. There, you can ask questions about the Otis Giraffe CAL and share your ideas and what colour you picked for the spots... And feel free to ask me questions about me too as you like! 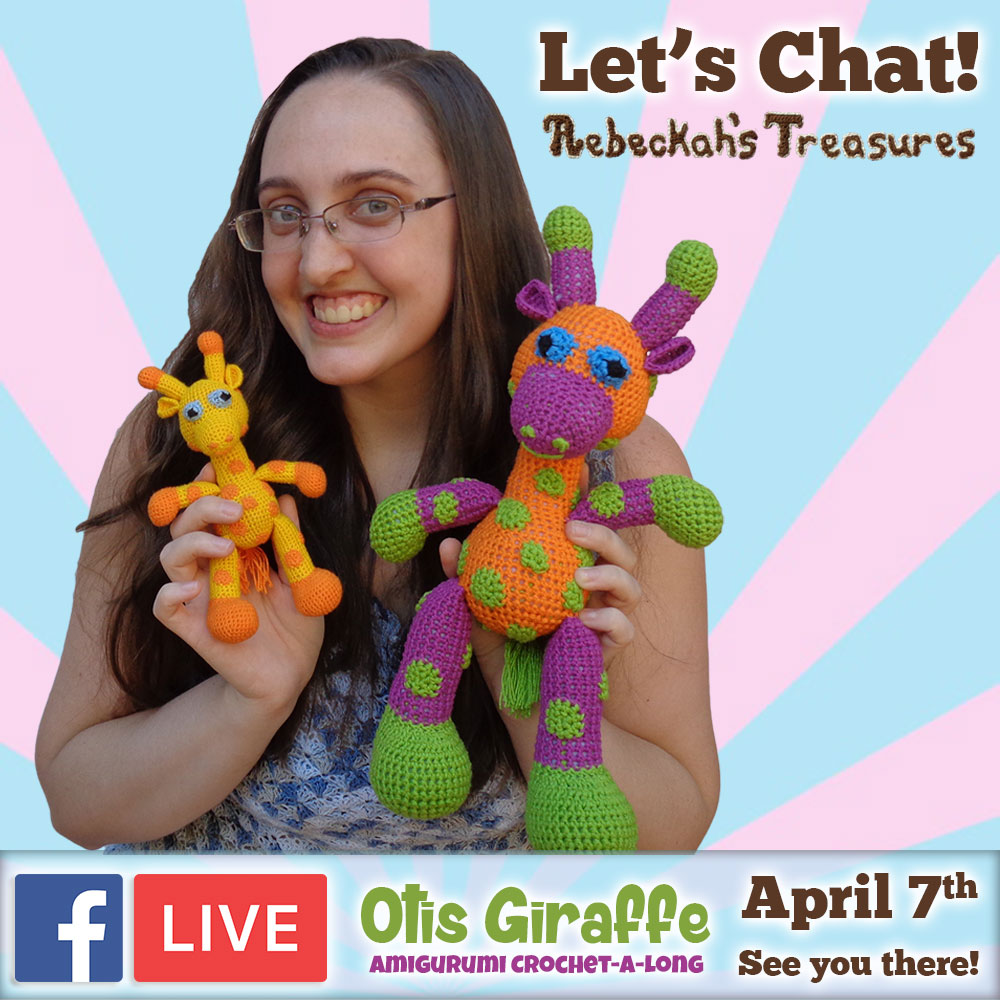
 
Hello Visitor and Welcome to Rebeckah's Treasures... I am a Norwegian/Canadian currently studying Midwifery in the UK. I love to crochet! At Rebeckah's Treasures, I share my crochet patterns and treasures. I hope they inspire you to crochet your own little treasures too... 
Comments
|


Hello, my name is Rebeckah.
I hope my crochet inspires you to create your very own treasures! Learn more about me... Categories
All
Archives
October 2021
© 2012-2021 Rebeckah Ferger
All rights reserved. Disclaimer: This website makes use of sponsored and/or affiliate links. Please see this page for more information.
|
- Home
-
-
- Special Offers
- New Releases
- Accessory Crochet Patterns
- Afghan Square Crochet Patterns
- Amigurumi Crochet Patterns
- Applique Crochet Patterns
- Baby Crochet Patterns
- Dolly Crochet Patterns
- Fashion Doll Crochet Patterns
- Free Downloads
- Holiday Crochet Patterns
- Tapestry Crochet Patterns
- Under the Sea Crochet Patterns
- Wedding Crochet Patterns
- Disclaimer and FAQs
-
-
- Free Crochet Patterns
- New Free Releases
- Free Accessory Crochet Patterns
- Free Afghan Square Crochet Patterns
- Free Amigurumi Crochet Patterns
- Free Applique Crochet Patterns
- Free Baby Crochet Patterns
- Free Dolly Crochet Patterns
- Free Fashion Doll Crochet Patterns
- Free Guest Crochet Patterns
- Free Holiday Crochet Patterns
- Free Tapestry Crochet Patterns
- Free Under the Sea Crochet Patterns
- Free Wedding Crochet Patterns
- Free Crochet Patterns Coming Soon
Welcome Visitor! I hope you enjoy my treasures.


 RSS Feed
